Deployments
Deployment Best Practices. Focuses on CI/CD as this is the current best practice.
- Introduction - Why are we even doing it like this
- Chapter 1: The Why, When and By Whom
- Chapter 2: Software List
- Chapter 3: Basic Machine Setup
- Chapter 4 - Base Project Setup
- Chapter 4.5 - Using an Existing Project
- Chapter 5: Daily Development Workflow
- Chapter 6 - Creating a New Project
- Useful Command reference
- Usual Command Flows - Daily
- Usual Command Flows - Scratch Org Creation
- Usual Command Flows - Sprint Release and Change Flow
Introduction - Why are we even doing it like this
Salesforce deployments are essential for managing and evolving Salesforce environments, especially in a consulting company setting. There are several methods for deploying metadata between organizations, including Change Sets, the Metadata API, and the Salesforce Command Line Interface (CLI). Each method has its unique advantages, but the introduction of Salesforce DX (SFDX) has revolutionized the process, making SFDX-based deployments the standard for the future.
The main reasons are because it is easy to deploy, and easy to revert to a prior version of anything you deploy as well - proper CI/CD depends on GIT being used, which ensures that everything you do can be rolled back in case of bugs.
| Deployment Method | Advantages | Disadvantages |
|---|---|---|
| Change Sets |
- Easy to use with a graphical interface - No additional setup required |
- Limited to connected orgs - Manual and time-consuming - No version control - Can be done ad-hoc |
| Metadata API |
- Supports complex deployments - Can be automated - Broad coverage |
- Requires programming knowledge - Steeper learning curve |
| Salesforce CLI (sf) |
- Advanced automation - Supports modern DevOps practices - Version control |
- Steeper learning curve - Initial setup and configuration required - Requires trained staff to maintain |
| Third-Party Tools |
- User-friendly interfaces - Advanced features and integrations |
- Additional costs - May have proprietary limitations |
Despite the complexity inherent in SFcli-based deployments, the benefits are substantial. They enable easy and frequent deployments, better testing by customers, smoother go-lives, and a general reduction in stress around project development and deployment cycles. The structured approach of SF ensures that deployments are reliable, repeatable, and less prone to errors.
To stay fact-based: SF deployments allow deploying multiple times a week in a few minutes per deployment. This allows very easy user testing, and also allows finding why a specific issue cropped up. You can check the Examples section to see how and why this is useful.
It is perfectly true that these deployments require more technical knowledge than third-party tools like Gearset or Changesets. It is our opinion that the tradeoff in productivity is worth the extra training and learning curve.
One thing that is often overlooked - you can NOT do proper CI/CD without plugging the deployment to your project management. This means the entire project management MUST be thought around the deployment logic.
This training is split into the following chapters:
-
Chapter 1: The Why, When and By Whom This chapter explores the fundamental considerations of Salesforce deployments within the context of consulting projects. It addresses:
- Why Deploy: The importance and benefits of deploying Salesforce metadata throughout the project lifecycle, from the build phase to UAT to GoLive.
- When: When in the project timeline should deployments be planned and executed to ensure smooth progress and mitigate risks. (Hint - it's often, but not in every org)
- By Whom: Roles and responsibilities involved in the deployment process, such as consultants committing changes, architects reviewing commits and system elements, and release managers overseeing and executing deployments.
Chapter 2: The What, How and How Frequently This chapter delves into the practical aspects of Salesforce deployments:
- What: Overview of the deployment tools used, including GIT, SFDX, SGD, Bitbucket, and your trusty Command Line.
- How: Detailed workflows and methodologies for using these tools effectively, tailored to specific roles within the project team (consultants, architects, release managers).
- How Frequently: Recommendations on the frequency of deployments throughout the project timeline to maintain agility, minimize conflicts, and ensure continuous integration and delivery.
Chapter 3: An Example Project and Deployment Flow This chapter provides a hands-on example to illustrate a typical project scenario and the corresponding deployment processes:
- Example Project: Overview of a hypothetical Salesforce consulting project, including its scope and objectives.
- Deployment Flow: Step-by-step walkthrough of the deployment lifecycle, from initial planning and setup through to execution and validation.
- Best Practices: Highlighting best practices and potential challenges encountered during the deployment process.
Chapter 4: Configurations, Templates and Setup This chapter focuses on the essential configurations and setup required to streamline the deployment process:
- Configurations: Detailed guidance on configuring Salesforce environments for efficient deployment management.
- Templates: Templates and reusable patterns for standardizing deployments and ensuring consistency across projects.
- Setup: Practical tips and strategies for setting up deployment pipelines, integrating with version control systems, and automating deployment tasks.
These chapters collectively provide a comprehensive guide to mastering Salesforce deployments within a consulting company, covering both strategic considerations and practical implementation details.
Chapters 5 and further contain information for daily work and should be viewed as cheat sheets. - Why Deploy: The importance and benefits of deploying Salesforce metadata throughout the project lifecycle, from the build phase to UAT to GoLive.
Chapter 1: The Why, When and By Whom
This chapter explores the fundamental considerations of Salesforce deployments within the context of consulting projects. It addresses:
- Why Deploy: The importance and benefits of deploying Salesforce metadata throughout the project lifecycle, from the build phase to UAT to GoLive.
- When: When in the project timeline should deployments be planned and executed to ensure smooth progress and mitigate risks. (Hint - it's often, but not in every org)
- By Whom: Roles and responsibilities involved in the deployment process, such as consultants committing changes, architects reviewing commits and system elements, and release managers overseeing and executing deployments.
Why do I Deploy ?
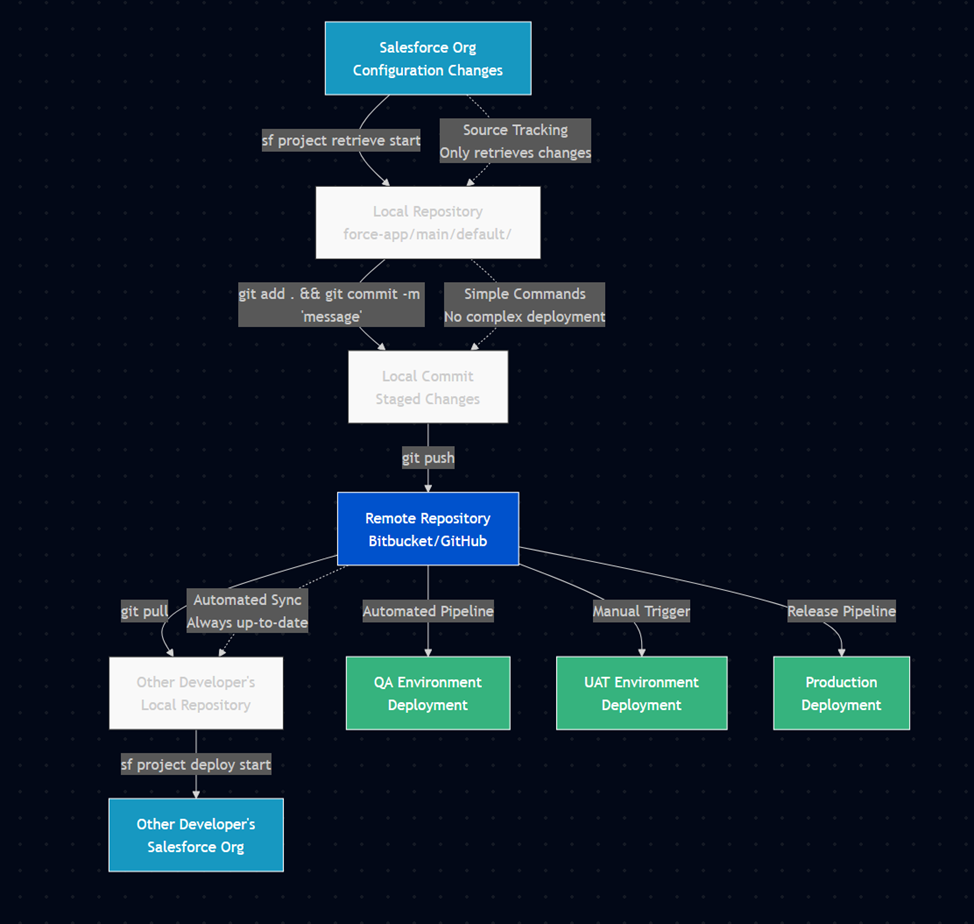
In traditional software development, deployments often occur to migrate changes between environments for testing or production releases. However, in the context of Continuous Integration (CI) and Salesforce development, deployments are just synchronization checkpoints for the application, irrelevant of the organization.
Said differently, in CI/CD Deployments are just a way to push commits to the environments that require them.
CI deployments are frequent, automated, and tied closely to the development cycle.
Deployments are never the focus in CI/CD, and what is important is instead the commits and the way that they tie into the project management - ideally into a ticket for each commit.
In software development, a commit is the action of saving changes to a version-controlled repository. It captures specific modifications to files, accompanied by a descriptive message. Commits are atomic, meaning changes are applied together as a single unit, ensuring version control, traceability of changes, and collaboration among team members.
Commits are part of using Git.
Git is a distributed version control system used to track changes in source code during software development. It is free and widely used, within Salesforce and elsewhere.
So if deployments are just here to sync commits...
Why do I commit ?
As soon as a commit is useful, or whenever a day has ended.
Commits should pretty much be done "as soon as they are useful", which often means you have fulfilled one of the following conditions:
- you have finished working a ticket;
- you have finished configuring or coding a self-contained logic, business domain, or functional domain;
- you have finished correcting something that you want to be able to revert easily;
- you have finished a hotfix;
- you have finished a feature.
This will allow you to pull your changes from the org, commit your changes referencing the ticket number in the Commit Message, and then push to the repository.
This will allow others to work on the same repository without issues and to easily find and revert changes if required.
You should also commit to your local repository whenever the day ends - in any case you can squash those commits together when you merge back to Main, so trying to delay commits is generally a bad idea.
Take the Salesforce-built "Devops Center" for example.
They tie every commit to a Work Item and allow you to chose which elements from the metadata should be added to the commit. They then ask you to add a quick description and you're done.
This is the same logic we apply to tickets in the above description.
If you're wondering "why not just use DevOps Center", the answer is generally "you definitely should if you can, but you sometimes can't because it is proprietary and it has limitations you can't work around".
Also because if you learn how to use the CLI, you'll realise pretty fast that it goes WAY faster than DevOps Center.
To tie back to our introduction - this forces a division of work into Work Items, Tickets, or whatever other Agile-ism you use internally, and the project management level.
DevOps makes sense when you work iteratively, probably in sprints, and when the work to be delivered is well defined and packaged.
This is because....
When do I Deploy ?
Pretty much all the time, but not everywhere.
In Salesforce CI/CD, the two main points of complexity in your existing pipeline are going to be:
- The first integration of a commit into the pipeline
- The merging of multiple commits, especially if you have the unfortunate situation where multiple people work in the same org.
The reasons for this are similar but different.
In the case of the first integration of a commit into the pipeline, most of the time, things should be completely fine. The problem is one that everyone in the Salesforce space knows very well. The Metadata API sucks. And sadly, SFDX... also isn't perfect.
So sometimes, you might do everything right, but the MDAPI will throw some file or some setting that while valid in output, is invalid in input. Meaning Salesforce happily gives you something you can't deploy.
If this happens, you will get an error when you first try to integrate your commit to an org. This is why some pre-merge checks ensure that the commit you did can be deployed back to the org.
In the case of merging multiple commits, the reasons is also that the Metadata API sucks. It will answer the same calls with metadata that is not ordered the same way within the same file, which will lead Git to think there's tons-o-changes... Except not really. This is mostly fine as long as you don't have to merge your work with someone else's where they worked on the same piece of metadata - if so, there is a non-zero chance that the automated merging will fail.
In both cases, the answer is "ask your senior how to solve this if the pipeline errors out". In both cases also, the pipeline should be setup to cover these cases and error out gracefully.
"What does that have to do with when I deploy? Like didn't you get lost somewhere?"
The relation is simple - you should deploy pretty much ASAP to your remote repo, and merge frequently to the main work repository. You should also pull the remote work frequently to ensure you are in sync with others.
Deploying to remote will run the integration checks to ensure things can be merged, and merging will allow others to see your work. Pulling the other's work will ensure you don't overwrite stuff.
Deploying to QA or UAT should be something tied to the project management cycle and is not up to an individual contributor.
For example, you can deploy to QA every sprint end, and deploy to UAT once EPICs are flagged as ready for UAT (a manual step).
Who Deploys ?
Different people across the lifecycle of the project.
On project setup, the DevOps engineer that sets up the pipeline should deploy and setup.
For standard work, you should deploy to your own repo, and the automated system should merge to common if all's good.
For end of sprints, the automated pipeline should deploy to QA.
For UAT, the Architect assigned to the project should run the required pipelines.
In most cases, the runs should be automatic, and key points should be covered by technical people.
Chapter 2: Software List
This chapter explores the actual tools we are using in our example, the basic understanding needed for each tool, and an explanation of why we're doing things this way.
In short, our example relies on:
- Git
- A Git frontend if you are unused to Git - gitkraken is nice for Windows, or sourcetree.
- There's a quite nice VSCode extension that handles Git properly.
- Bitbucket
- A good text editor (VSCode is fine, I prefer Sublime Text)
- The SF command line
- SFDMU, a SF command line extension
- SGD, a SF command line extension
- Code Analyzer, a SF command line extension
- JIRA
- A terminal emulator (Cmdr is nice for windows, iTerm2 for MAC is fine)
You can completely use other tools if your project, your client, or your leadership want you do use other things.
The main reason we are using these in this example is that it relies on a tech stack that is very present with customers and widely used at a global level, while also leveraging reusable things as much as possible - technically speaking a lot of the configuration we do here is directly reusable in another pipeline provider, and the link to tickets is also something that can be integrated using another provider.
In short "use this, or something else if you know what you're doing".
So What are we using
The CLI
The first entrypoint into the pipeline is going to be the Salesforce Command Line.You can download it here.
If you want a graphical user interface, you should set up VSCode, which you can do by following this Trailhead. You can start using the CLI directly via the terminal if you already know what you're doing otherwise. If you're using VSCode, download Azul as well to avoid errors down the line.
We'll be using the Salesforce CLI to:
- login to organizations, and avoid that pesky MFA;
- pull changes from an organization once our config is done;
- rarely, push hotfixes to a UAT org.
For some roles, mainly architects and developers, we will also use it to:
- validate deploys to specific orgs in cases of hotfixes;
- setup SGD jobs in cases of commit-based deploys or destructive changes;
- setup SFDMU jobs for any data-based transfers.
What this actually does is allow you to interact with Salesforce. We will use it to get the configuration, security, and setting files that we will then deploy.
This allows us not only to deploy, but also to have a backup of the configuration, and an easy way to edit it via text edition software.
The configuration needed is literally just the installation to start - we'll set up a full project later down the line.
GIT
You'll then need to download Git, as well as a GUI if you're not used to using it directly from the command line. Git is VERY powerful but also quite annoying to learn fully, which is why we will keep its usage simple in our case.
We'll be using Git to:
- version our work so we can easily go back to earlier configurations in case of issues;
- document what we did when we modified something;
- get the work that other people have done;
- upload our work to the repositories for the project.
You'll need a bit more configuration once you're done installing - depending on the GUI you use (or if you're using the command line) the how depends on the exact software, but in short you'll need to configure git with your user name and your user email.
Logging in to Bitbucket and getting your repository from there will come later - once you've given your username and email, and configured your UI, we will consider that you are done for now.
If you're a normal user, this is all you'll see of git.
If you're a Dev or an Architect, you'll also be using the Branches and Merges functions of Git - mostly through the Bitbucket interface (and as such, with Pull Requests instead of Merges).
Bitbucket
As said in intro, we're using bitbucket because we're using bitbucket. You can use Github, Gitlab, Gitea, whatever - but this guide is for bitbucket.
Bitbucket, much like Salesforce, is a cloud solution. It is part of the Atlassian cloud offering, which also hosts JIRA, which we'll be configuring as well. You'll need to authenticate to your workspace (maybe get your Administrator to get you logins), in the format https://bitbucket.org/myworkspace
You will see that Bitbucket is a Git Server that contains Git Repositories.
In short, it is the central place where we'll host the different project repositories that we are going to use.
Built on top of the Git server are also subordinate functions such as Pull Requests, Deployments, Pipelines - which we're all going to use.
Seeing as we want this to be connected with our Atlassian cloud, we'll also ask you to go to https://bitbucket.org/account/settings/app-passwords/ which allows you to create application passwords, and to create one for Git.
In detail:
- Repositories: Developers store their Salesforce metadata and code in Bitbucket repositories. Each repository can represent a project or a component of a larger Salesforce application.
- Branching: Developers create branches for new features, bug fixes, or enhancements. This allows multiple developers to work on different parts of the codebase simultaneously without interfering with each other.
- Pull Requests: When a feature or bug fix is complete, a pull request is created. Other team members review the changes before they are merged into the main branch, ensuring code quality and consistency.
- Commits: Developers commit their changes to Bitbucket, providing a detailed commit message. These messages often include references to JIRA ticket numbers (e.g., "Fixed bug in login flow [JIRA-123]").
- JIRA: When a commit message includes a JIRA ticket number, JIRA can automatically update the status of the ticket, link the commit to the ticket, and provide traceability from issue identification to resolution.
- Pipelines: Bitbucket Pipelines can be configured to automatically build, test, and deploy Salesforce code changes. This ensures that changes are validated before being merged and deployed to production. It does so using Deployments - which in bitbucket means "the installation of code on a remote server", in our case Salesforce.
Extra Stuff
CLI Extensions
SGD
SGD, or Salesforce-Git-Delta is a command line plugin that allows the CLI to automatically generate a package.xml and a destructivechanges.xml based on the difference between two commits.
It allows you to do in Git what the CLI does alone using Source Tracking.
Why is it useful then ? Because Source Tracking is sometimes buggy, and also because in this case we're using Bitbucket, so it makes generating these deployment files independent from our machines.
SGD is very useful for inter-org deployment, which should technically be quite rare.
SFDMU
SFDMU, or the Salesforce Data Move Utility, is another command line plugin which is dataloader on steroids for when you want to migrate data between orgs or back stuff up to CSVs.
We use this because it allows migrating test data or config data (that last one should be VERY rare what with the presence of CMTD now) very easily including if you have hierarchies (Contacts of Accounts, etc).
Code Analyzer
AzulJDK
Basically just Java, but free. We don't use the old Java runtime because licensing is now extremely expensive.
A terminal emulator
If you don't spend a lot of time in the Terminal, you might not see that terminals aren't all equal.
A nice terminal emulator gives you things like copy/paste, better UX in general.
It's just quality of life.
A text editor
You should use VSCode unless you really want to do everything in separate apps.
If you're an expert you can use whatever floats your boat.
Chapter 3: Basic Machine Setup
1 - Install Local Software
If you are admin on your machine, download Visual Studio Code from this link. Otherwise, use whatever your IT has to install software, whether it be Software Center, opening a ticket, or anything else of that ilk.
As long as you're doing that, you can also install a JDK like AZUL, as well as Git, and a nice terminal emulator.
Also remember to install the Salesforce CLI.
These elements are all useful down the line, and doing all the setup at once avoids later issues.
2 - Configure the environment
Open your beautiful terminal emulator that you installed - we'll run a few commands in it to set it up.
SF CLI
Run the following command to update the sf cli. This is necessary because some installation sources won't have the latest version.sf update
You should see @salesforce/cli: Updating CLI run for a bit.
If you see an error saying sf is not a command or program, something went wrong during the installation in step 1. Contact your IT (or check the installation page of the CLI if you're Admin or not in an enterprise context).
Once that's done, run the following command to install the plugins we mentioned earlier - sfdmu, sgd, and code analyzerecho y | sf plugins install sfdmu sfdx-git-delta code-analyzer
Because sgd is not signed, you will get a warning saying that "This plugin is not digitally signed and its authenticity cannot be verified". This is expected, and you will have to answer y (yes) to proceed with the installation.
GIT
Once you've done that, run the following commands to configure git:
git config --global user.name "FirstName LastName" replacing Firstname and Lastname with your own.
git config --global user.email "email@server.tld" replacing the email with yours.
If you're running Windows - git config --global core.autocrlf true, followed by git config --global core.longpaths true - these allow git to properly handle line returns and long path names, which we have a lot of. For authentication, you should be using gcm by default, but just in case your installation got broken, run git config --global credential.helper manager to allow git to store logins.
If you're running Mac or Linux - git config --global core.autocrlf input and then go to the GCM Releases page, find the .pkg file, and install it.
All of this setup has to be done once, and you will probably never touch it again.
Finally, run
java --version
If you don't see an error, and you see something like openjdk 21.0.3 2024-04-16 LT then you installed Zulu properly and you're fine.
3 - Link Git to Bitbucket
Before proceeding, verify that Git is properly configured:
# Verify Git configuration
git config --global user.name
git config --global user.email
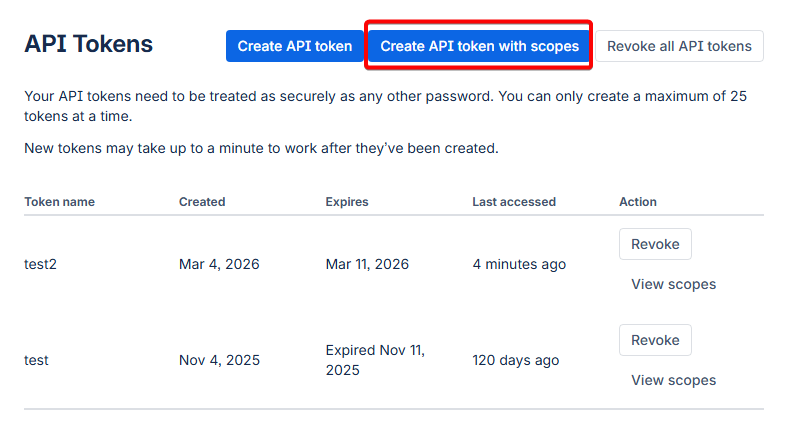
git config --global credential.helperCreate Atlassian API Token
-
Configure Token Scopes
- In the search bar, type
repositoryand select all repository-related scopes: Repositories: ReadRepositories: WriteRepositories: Admin(if you need admin access)- In the search bar, type
pull requestsand select: Pull requests: ReadPull requests: Write
- In the search bar, type
-
Copy and Secure Token
- Important: Copy the token immediately - you won't be able to see it again
- Store it securely (password manager recommended)
Treat this API token like a password.
Anyone with this token can access your Bitbucket repositories with the permissions you've granted.
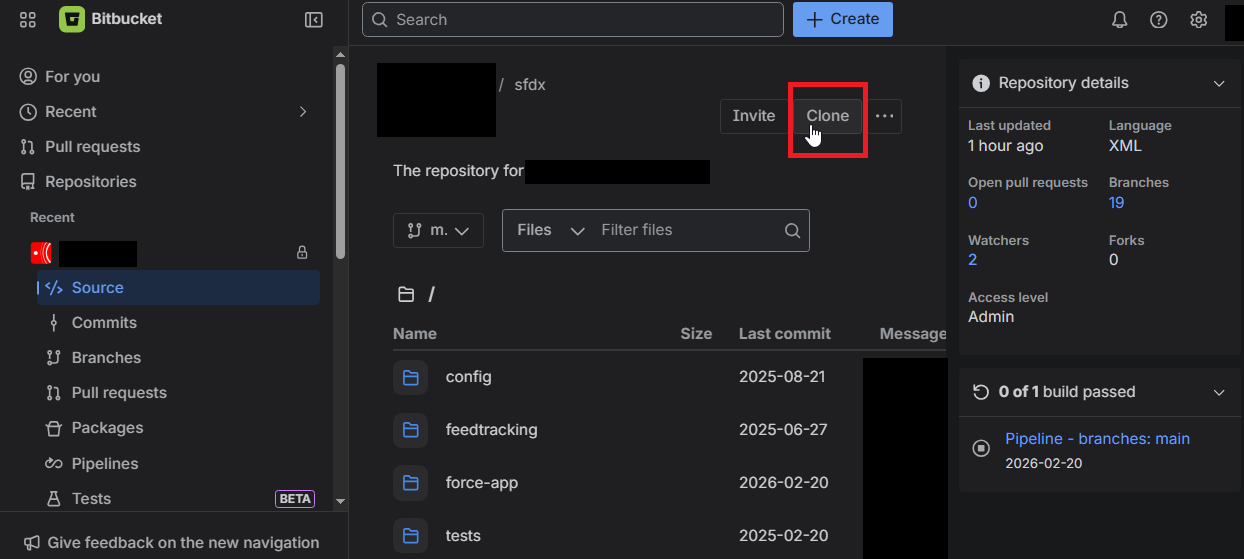
Clone Repository and Authenticate
-
Navigate to Your Project Repository
- Go to your Bitbucket workspace:
https://bitbucket.org/your-workspace - Find your project repository
- Click the "Clone" button
- Copy the HTTPS clone URL

- Go to your Bitbucket workspace:
- Clone Repository Locally
# Navigate to your projects directory cd /path/to/your/projects # Clone the repository git clone https://bitbucket.org/workspace/repo-name.git cd repo-name -
Authentication Process
When prompted for credentials:-
If prompted to choose between "web" and "password/token", select "token"
-
Paste the token - the bitbucket username should be prefilled from the git clone URL
-
- Verify Authentication
git fetch origin
If the command completes without asking for credentials again, your authentication is properly configured and stored in Git Credential Manager (GCM).
4 - Configure VSCode
Open up VSCode.
Go to the Extensions in the side panel (it looks like three squares)  and search for "Salesforce", then install
- Salesforce Extensions Pack
- Salesforce Extensions Pack (Expanded)
- Salesforce Package.xml Generator for VS Code
- Salesforce CLI Command Builder
- Salesforce XML Formatter
Then search for Atlassian and install "Jira and Bitbucket (Atlassian Labs)".
Finally, search for and install "GitLens - Git supercharged".
Then go to Preferences > Settings > Salesforcedx-vscode-core: Detect Conflicts At Sync and check this checkbox.
Once all this is done, I recommend you go to the side panel, click on Source Control, and drag-and-drop both the Commit element and the topmost element to the right of the editor.
All this setup allows you to have more visual functions and shortcuts. If you fail to install some elements, it cannot be guaranteed that you will have all the elements you are supposed to.
This concludes basic machine setup.
All of this should not have to be done again on an already configured machine.
Chapter 4 - Base Project Setup
This chapter covers everything needed to make the bitbucket-pipelines.yml operational, and explains what the pipeline does and when. Once completed, these configurations rarely need modification.
4.1 Repository Setup
SFDX Project Creation
Create the base Salesforce DX project structure:
# Create new SFDX project
sf project generate --name "your-project-name" --template standard

# Navigate to project directory
cd your-project-name

# Initialize Git repository
git init
git add .
git commit -m "Initial SFDX project setup"
Required Project Structure
Your project should have this structure. Note the extra Config elements - we'll set these up here. They're used for the scratch org creation mostly.
your-project-name/
├── config/
│   ├── project-scratch-def.json
│   ├── packagestoinstall.txt
│   ├── permsets.txt
│   ├── codeanalyzer/
│   │   └── code-analyzer.yml
│   ├── sfdmu-currency/
│   ├── sfdmu-demodata/
│   └── payload.json.template.*
├── force-app/
│   └── main/
│       └── default/
├── pre-deploy-dependencies/
├── scripts/
├── tests/
├── .forceignore
├── .gitignore
├── .sgdignore
├── bitbucket-pipelines.yml
├── package.json
└── sfdx-project.json
Essential Configuration Files
.forceignore - Exclude metadata from deployments:
# List files or directories below to ignore them when running force:source:push, force:source:pull, and force:source:status
# More information: https://developer.salesforce.com/docs/atlas.en-us.sfdx_dev.meta/sfdx_dev/sfdx_dev_exclude_source.htm


# Package.xml and autogenerated package files
package.xml
package/**

# LWC configuration files
**/jsconfig.json
**/.eslintrc.json

# LWC Jest
**/__tests__/**

# Standard Elements that should never be retrieved
*.flexipages/LightningSalesConsole_UtilityBar**

# These metadata files are ignored when promoting (deploying)
**/appMenus/**
**/appSwitcher/**
**/fieldRestrictionRules/**
**/settings/**
**/AuthProvider/**

# User Access Policies error on Deploy due to a KI https://issues.salesforce.com/issue/a028c00000zKnmrAAC/undefined
**/useraccesspolicies/**

# These metadata files are ignored when pulling (retrieving) and are mostly things that are not deployable
*.appMenu
*.appSwitcher
*.rule
*.AuthProvider
*.featureParameters
# *.featureParametersInteger
# *.featureParametersBoolean


# Settings can cause issues
# *.settings

# Profiles are negated except the ones we want
# *.profile
**/profiles/**
!**/profiles/Admin*
!**/profiles/Read*

# Permissions on retrieve
*.sharingRules
**/sharingRules/**
*.profilePasswordPolicy
*.profileSessionSetting

# Permissions on deploy
**/profilePasswordPolicy/**
**/profileSessionSetting/**

# Translations
# .objectTranslations
# **/objectTranslations/**

# Project-Specific Exclusions
**/duplicateRules/**
.gitignore - Exclude files from version control:
# Salesforce cache
.sf/
.sfdx/
.localdevserver/

# IDE files
.vscode/
*.log
.DS_Store

# Node modules
node_modules/
.sgdignore - Exclude from SGD delta deployments:
# Exclude profiles and permission sets from delta
**/profiles/**
**/permissionsets/**

# UAPs don't deploy well via MDAPI, and there's a KI for UAPs with Groups
**/useraccesspolicies/**.sgddestrdignore - Tells SGD which files should never appear in destructive changes, even if deleted from the repo.
# Never auto-delete objects or their fields
force-app/main/default/objects/

# Never auto-delete permission sets
force-app/main/default/permissionsets/
Be conservative here. It is always safer to block a destructive change and apply it manually than to accidentally delete a field in production.
4.2 Bitbucket Repository Integration
4.2.1 Create Bitbucket Repository
-
In Bitbucket workspace:
- Create new repository:
your-project-name - Access level: Private
- Do not include README or .gitignore (we have our own)
- Create new repository:
-
Link local project to remote:
git remote add origin https://bitbucket.org/your-workspace/your-project-name.git
git push -u origin main
4.2.2 Repository Variables Configuration
Repository variables are accessible by all pipelines and users with push permissions. Configure these in Repository Settings → Pipelines → Repository variables.
Core Authentication Variables
| Variable Name | Type | Description | Example Value |
|---|---|---|---|
DEVHUB_TOKEN |
Secured | SFDX authentication URL for Dev Hub org | force://PlatformCLI::... |
ACCESS_TOKEN |
Secured | Default authentication token for deployments | force://PlatformCLI::... |
Notification & Communication
| Variable Name | Type | Description | Example Value |
|---|---|---|---|
TEAMS_WEBHOOK |
Secured | Microsoft Teams webhook URL for notifications | https://outlook.office.com/webhook/... |
BB_EMAIL |
Unsecured | Email for Bitbucket operations | cicd_projectnameb@company.com |
BB_EMAIL_PASSWORD |
Secured | Password for Bitbucket email account | •••••• |
Code Quality & Testing
| Variable Name | Type | Description | Example Value |
|---|---|---|---|
SEV_THRESH |
Unsecured | Code Analyzer severity threshold (1-3) | 1 |
Scratch Org Management
| Variable Name | Type | Description | Example Value |
|---|---|---|---|
SNAPSHOT_NAME |
Unsecured | Name for scratch org snapshots | Client_Project_Snap |
SF_DISABLE_SOURCE_MEMBER_POLLING |
Unsecured | Disable source member polling for performance | TRUE |
Setting Up Repository Variables
4.3 Deployment Environments
Configure in Repository Settings → Deployments. These are environment-specific variables and allow for example storing Salesforce login information.
| ariable Name | Type | Description | Example Value |
|---|---|---|---|
ACCESS_TOKEN |
Secured | Authentication URL | force://PlatformCLI::... |
INSTANCE_URL |
Unsecured | Salesforce instance URL | https://stuff--dev.sandbox.my.salesforce.com |
TESTLEVEL |
Unsecured | Test execution level for deployments | NoTestRun |
4.4 Salesforce Environment Setup
Authentication Token Generation
For Salesforce Orgs
-
Generate SFDX Auth URL:
# Login to the target org
sf org login web --alias target-org

# Generate auth URL
sf org display --target-org target-org --verbose

# Copy the "Sfdx Auth Url" value
- Format for Bitbucket:
- The auth URL format:
force://PlatformCLI::5Aep861...::user@example.com - Use this complete string as the
ACCESS_TOKENvalue - Always mark as Secured
- The auth URL format:
For Dev Hub
-
Enable Dev Hub in Production:
- Setup → Dev Hub → Enable Dev Hub
- Enable Source Tracking in Developer Sandboxes
-
Generate Dev Hub Token:
# Login to Production org (Dev Hub)
sf org login web --alias devhub --set-default-dev-hub

# Get auth URL
sf org display --target-org devhub --verbose
Dev Hub Configuration
In your Production org:
4.5 Teams Webhook Configuration
Create Teams Webhook
-
In Microsoft Teams:
- Navigate to your project channel
- Click ⋯ (More options) → Connectors
- Search for "Incoming Webhook"
- Click Configure
-
Configure Webhook:
- Name:
Salesforce CI/CD Pipeline - Upload icon (optional)
- Click Create
- Copy the webhook URL
- Name:
-
Add to Bitbucket:
- Use the webhook URL as
TEAMS_WEBHOOKvalue - Always mark as Secured
- Use the webhook URL as
4.6 Scratch Org Definition
Create config/project-scratch-def.json. The documentation for scratch org features are listed here, and settings are here. Trailhead about Scratch orgs.
{
  "orgName": "My Project Name Scratch Org",
  "adminEmail":"myprojectalias@company.com",
  "country":"US",
  "language":"en_US",
  "description": "Scratch Org for project blablabla.",
  "hasSampleData": true,
  "edition": "Enterprise",
  "features": [
    "ContactsToMultipleAccounts",
    "DebugApex",
    "EnableSetPasswordInApi",
    "EntityTranslation",
    "Entitlements",
    "ForceComPlatform",
    "Interaction",
    "FlowSites",
    "FieldService:5",
    "FieldServiceDispatcherUser:5",
    "FieldServiceMobileExtension",
    "FieldServiceMobileUser:5",
    "FieldServiceSchedulingUser:5",
    "LiveAgent",
    "MarketingUser",
    "SalesUser",
    "SalesforceContentUser",
    "StateAndCountryPicklist",
    "RecordTypes",
    "RefreshOnInvalidSession",
    "ServiceCloud",
    "ServiceUser"
  ],
  "settings": {
    "caseSettings": {
      "closeCaseThroughStatusChange" : true
    },
    "CustomAddressFieldSettings": {
     "enableCustomAddressField" : true
      },
    "userManagementSettings": {
        "permsetsInFieldCreation": true,
        "userAccessPoliciesEnabled" : true
      },
    "currencySettings":{
        "enableMultiCurrency": true
      },
    "languageSettings": {
          "enableTranslationWorkbench": true
      },
    "pathAssistantSettings": {
          "pathAssistantEnabled": true
      },
    "lightningExperienceSettings": {
      "enableS1DesktopEnabled": true,
      "enableUsersAreLightningOnly": true,
      "enableLexEndUsersNoSwitching": true
    },
    "mobileSettings": {
      "enableS1EncryptedStoragePref2": false
    },
    "opportunitySettings": {
      "enableOpportunityTeam": true
    },
    "quoteSettings": {
    "enableQuote": true,
    "enableQuotesWithoutOppEnabled": true
    },
    "securitySettings": {
      "enableAdminLoginAsAnyUser": true,
      "passwordPolicies": {
        "expiration": "Never",
        "historyRestriction": "0"
      },
      "sessionSettings": {
        "sessionTimeout": "TwelveHours"
      }
    },
   "sharingSettings": {
     "enableAssetSharing": true
    },
    "fieldServiceSettings": {
      "enableDocumentBuilder": true,
      "enableWorkOrders": true,
      "fieldServiceNotificationsOrgPref": true,
      "fieldServiceOrgPref": true
      },
    "chatterSettings": {
      "enableChatter": true
    }
  },
  "objectSettings": {
    "product2": {
      "sharingModel": "read"
    },
    "account": {
      "sharingModel": "read"
    },
  	"asset": {
      "sharingModel": "ControlledByParent"
    },
    "contact": {
      "sharingModel": "Private"
    }
  }
}
Package Installation List
Create config/packagestoinstall.txt:
# List package IDs to install in scratch orgs
# One per line, comments start with #
04t000000000000AAA
04t000000000001AAA
Permission Set Assignment
Create config/permsets.txt:
# Permission sets to assign after deployment
# One per line
MyCustomPermissionSet
AnotherPermissionSet
4.5 Code Quality Configuration
Code Analyzer Setup
Create config/codeanalyzer/code-analyzer.yml:
# ======================================================================
# CODE ANALYZER CONFIGURATION
# To learn more about this configuration, visit:
# https://developer.salesforce.com/docs/platform/salesforce-code-analyzer/guide/config-custom.html
# ======================================================================
# The absolute folder path to which all other path values in this configuration may be relative to.
# If unspecified, or if specified as null, then the value is automatically chosen to be the parent folder of your Code Analyzer
# configuration file if it exists, or the current working directory otherwise.
config_root: null
# Folder where to store log files. May be an absolute path or a path relative to config_root.
# If unspecified, or if specified as null, then the value is automatically chosen to be your machine's default temporary directory.
# log_folder: "./config/codeanalyzer/logs/"
# Level at which to log messages to log files.
# Possible values are:
# 1 or 'Error' - Includes only error messages in the log.
# 2 or 'Warn' - Includes warning and error messages in the log.
# 3 or 'Info' - Includes informative, warning, and error messages in the log.
# 4 or 'Debug' - Includes debug, informative, warning, and error messages in the log.
# 5 or 'Fine' - Includes fine detail, debug, informative, warning, and error messages in the log.
# If unspecified, or if specified as null, then the 'Debug' log level will be used.
log_level: 1
# Rule override settings of the format rules.{engine_name}.{rule_name}.{property_name} = {override_value} where:
# {engine_name} is the name of the engine containing the rule that you want to override.
# {rule_name} is the name of the rule that you want to override.
# {property_name} can either be:
# 'severity' - [Optional] The severity level value that you want to use to override the default severity level for the rule
# Possible values: 1 or 'Critical', 2 or 'High', 3 or 'Moderate', 4 or 'Low', 5 or 'Info'
# 'tags' - [Optional] The string array of tag values that you want to use to override the default tags for the rule
# ---- [Example usage]: ---------------------
# rules:
# eslint:
# sort-vars:
# severity: "Info"
# tags: ["Recommended", "Suggestion"]
# -------------------------------------------
rules:
# ======================================================================
# ESLINT ENGINE RULE OVERRIDES
# ======================================================================
eslint:
"@lwc/lwc-platform/no-aura":
severity: 3
tags:
- Recommended
- LWC
- ErrorProne
- JavaScript
"@lwc/lwc-platform/no-aura-libs":
severity: 3
tags:
- Recommended
- LWC
- ErrorProne
- JavaScript
"@lwc/lwc-platform/no-community-import":
severity: 3
tags:
- Recommended
- LWC
- ErrorProne
- JavaScript
"@lwc/lwc-platform/no-create-context-provider":
severity: 3
tags:
- Recommended
- LWC
- BestPractices
- JavaScript
"@lwc/lwc-platform/no-deprecated-module-import":
severity: 3
tags:
- Recommended
- LWC
- BestPractices
- JavaScript
"@lwc/lwc-platform/no-dynamic-import-identifier":
severity: 3
tags:
- Recommended
- LWC
- BestPractices
- JavaScript
"@lwc/lwc-platform/no-inline-disable":
severity: 3
tags:
- Recommended
- LWC
- BestPractices
- JavaScript
"@lwc/lwc-platform/no-interop":
severity: 3
tags:
- Recommended
- LWC
- BestPractices
- JavaScript
"@lwc/lwc-platform/no-interop-create":
severity: 3
tags:
- Recommended
- LWC
- BestPractices
- JavaScript
"@lwc/lwc-platform/no-interop-dispatch":
severity: 3
tags:
- Recommended
- LWC
- BestPractices
- JavaScript
"@lwc/lwc-platform/no-interop-execute":
severity: 3
tags:
- Recommended
- LWC
- BestPractices
- JavaScript
"@lwc/lwc-platform/no-interop-execute-privileged":
severity: 3
tags:
- Recommended
- LWC
- BestPractices
- JavaScript
"@lwc/lwc-platform/no-interop-execute-raw-response":
severity: 3
tags:
- Recommended
- LWC
- BestPractices
- JavaScript
"@lwc/lwc-platform/no-interop-get-event":
severity: 3
tags:
- Recommended
- LWC
- BestPractices
- JavaScript
"@lwc/lwc-platform/no-interop-get-module":
severity: 3
tags:
- Recommended
- LWC
- BestPractices
- JavaScript
"@lwc/lwc-platform/no-interop-is-external-definition":
severity: 3
tags:
- Recommended
- LWC
- BestPractices
- JavaScript
"@lwc/lwc-platform/no-interop-load-definitions":
severity: 3
tags:
- Recommended
- LWC
- BestPractices
- JavaScript
"@lwc/lwc-platform/no-interop-module-instrumentation":
severity: 3
tags:
- Recommended
- LWC
- BestPractices
- JavaScript
"@lwc/lwc-platform/no-interop-module-storage":
severity: 3
tags:
- Recommended
- LWC
- BestPractices
- JavaScript
"@lwc/lwc-platform/no-interop-register":
severity: 3
tags:
- Recommended
- LWC
- BestPractices
- JavaScript
"@lwc/lwc-platform/no-interop-render":
severity: 3
tags:
- Recommended
- LWC
- BestPractices
- JavaScript
"@lwc/lwc-platform/no-interop-sanitize":
severity: 3
tags:
- Recommended
- LWC
- BestPractices
- JavaScript
"@lwc/lwc-platform/no-process-env":
severity: 3
tags:
- Recommended
- LWC
- BestPractices
- JavaScript
"@lwc/lwc-platform/no-restricted-namespaces":
severity: 3
tags:
- Recommended
- LWC
- ErrorProne
- JavaScript
"@lwc/lwc-platform/no-site-import":
severity: 3
tags:
- Recommended
- LWC
- ErrorProne
- JavaScript
"@lwc/lwc-platform/no-wire-service":
severity: 3
tags:
- Recommended
- LWC
- ErrorProne
- JavaScript
"@lwc/lwc-platform/valid-dynamic-import-hint":
severity: 3
tags:
- Recommended
- LWC
- BestPractices
- JavaScript
"@lwc/lwc/no-api-reassignments":
severity: 3
tags:
- Recommended
- LWC
- BestPractices
- JavaScript
"@lwc/lwc/no-async-operation":
severity: 3
tags:
- Recommended
- LWC
- BestPractices
- JavaScript
"@lwc/lwc/no-attributes-during-construction":
severity: 3
tags:
- Recommended
- LWC
- ErrorProne
- JavaScript
"@lwc/lwc/no-deprecated":
severity: 3
tags:
- Recommended
- LWC
- BestPractices
- JavaScript
"@lwc/lwc/no-disallowed-lwc-imports":
severity: 3
tags:
- Recommended
- LWC
- BestPractices
- JavaScript
"@lwc/lwc/no-document-query":
severity: 3
tags:
- Recommended
- LWC
- ErrorProne
- JavaScript
"@lwc/lwc/no-inner-html":
severity: 2
tags:
- Recommended
- LWC
- Security
- JavaScript
"@lwc/lwc/no-leading-uppercase-api-name":
severity: 3
tags:
- Recommended
- LWC
- ErrorProne
- JavaScript
"@lwc/lwc/no-template-children":
severity: 3
tags:
- Recommended
- LWC
- ErrorProne
- JavaScript
"@lwc/lwc/no-unexpected-wire-adapter-usages":
severity: 3
tags:
- Recommended
- LWC
- BestPractices
- JavaScript
"@lwc/lwc/no-unknown-wire-adapters":
severity: 3
tags:
- Recommended
- LWC
- BestPractices
- JavaScript
"@lwc/lwc/prefer-custom-event":
severity: 3
tags:
- Recommended
- LWC
- BestPractices
- JavaScript
"@lwc/lwc/valid-api":
severity: 3
tags:
- Recommended
- LWC
- ErrorProne
- JavaScript
"@lwc/lwc/valid-graphql-wire-adapter-callback-parameters":
severity: 3
tags:
- Recommended
- LWC
- ErrorProne
- JavaScript
"@lwc/lwc/valid-track":
severity: 3
tags:
- Recommended
- LWC
- ErrorProne
- JavaScript
"@lwc/lwc/valid-wire":
severity: 3
tags:
- Recommended
- LWC
- ErrorProne
- JavaScript
"@salesforce/lightning/valid-apex-method-invocation":
severity: 3
tags:
- Recommended
- LWC
- ErrorProne
- JavaScript
"@typescript-eslint/adjacent-overload-signatures":
severity: 3
tags:
- BestPractices
- TypeScript
"@typescript-eslint/array-type":
severity: 3
tags:
- BestPractices
- TypeScript
"@typescript-eslint/await-thenable":
severity: 2
tags:
- ErrorProne
- TypeScript
"@typescript-eslint/ban-ts-comment":
severity: 2
tags:
- Recommended
- ErrorProne
- TypeScript
"@typescript-eslint/ban-tslint-comment":
severity: 3
tags:
- BestPractices
- TypeScript
"@typescript-eslint/class-literal-property-style":
severity: 2
tags:
- ErrorProne
- TypeScript
"@typescript-eslint/class-methods-use-this":
severity: 3
tags:
- BestPractices
- TypeScript
"@typescript-eslint/consistent-generic-constructors":
severity: 3
tags:
- BestPractices
- TypeScript
"@typescript-eslint/consistent-indexed-object-style":
severity: 3
tags:
- BestPractices
- TypeScript
"@typescript-eslint/consistent-return":
severity: 3
tags:
- BestPractices
- TypeScript
"@typescript-eslint/consistent-type-assertions":
severity: 3
tags:
- BestPractices
- TypeScript
"@typescript-eslint/consistent-type-definitions":
severity: 3
tags:
- BestPractices
- TypeScript
"@typescript-eslint/consistent-type-exports":
severity: 3
tags:
- BestPractices
- TypeScript
"@typescript-eslint/consistent-type-imports":
severity: 3
tags:
- BestPractices
- TypeScript
"@typescript-eslint/default-param-last":
severity: 3
tags:
- BestPractices
- TypeScript
"@typescript-eslint/dot-notation":
severity: 3
tags:
- BestPractices
- TypeScript
"@typescript-eslint/explicit-function-return-type":
severity: 2
tags:
- ErrorProne
- TypeScript
"@typescript-eslint/explicit-member-accessibility":
severity: 2
tags:
- ErrorProne
- TypeScript
"@typescript-eslint/explicit-module-boundary-types":
severity: 2
tags:
- ErrorProne
- TypeScript
"@typescript-eslint/init-declarations":
severity: 3
tags:
- BestPractices
- TypeScript
"@typescript-eslint/max-params":
severity: 3
tags:
- BestPractices
- TypeScript
"@typescript-eslint/member-ordering":
severity: 3
tags:
- BestPractices
- TypeScript
"@typescript-eslint/method-signature-style":
severity: 3
tags:
- BestPractices
- TypeScript
"@typescript-eslint/naming-convention":
severity: 3
tags:
- BestPractices
- TypeScript
"@typescript-eslint/no-array-constructor":
severity: 3
tags:
- Recommended
- BestPractices
- TypeScript
"@typescript-eslint/no-array-delete":
severity: 2
tags:
- ErrorProne
- TypeScript
"@typescript-eslint/no-base-to-string":
severity: 3
tags:
- BestPractices
- TypeScript
"@typescript-eslint/no-confusing-non-null-assertion":
severity: 2
tags:
- ErrorProne
- TypeScript
"@typescript-eslint/no-confusing-void-expression":
severity: 2
tags:
- ErrorProne
- TypeScript
"@typescript-eslint/no-deprecated":
severity: 2
tags:
- ErrorProne
- TypeScript
"@typescript-eslint/no-dupe-class-members":
severity: 2
tags:
- ErrorProne
- TypeScript
"@typescript-eslint/no-duplicate-enum-values":
severity: 2
tags:
- Recommended
- ErrorProne
- TypeScript
"@typescript-eslint/no-duplicate-type-constituents":
severity: 3
tags:
- BestPractices
- TypeScript
"@typescript-eslint/no-dynamic-delete":
severity: 3
tags:
- BestPractices
- TypeScript
"@typescript-eslint/no-empty-function":
severity: 3
tags:
- BestPractices
- TypeScript
"@typescript-eslint/no-empty-object-type":
severity: 3
tags:
- Recommended
- BestPractices
- TypeScript
"@typescript-eslint/no-explicit-any":
severity: 3
tags:
- Recommended
- BestPractices
- TypeScript
"@typescript-eslint/no-extra-non-null-assertion":
severity: 2
tags:
- Recommended
- ErrorProne
- TypeScript
"@typescript-eslint/no-extraneous-class":
severity: 3
tags:
- BestPractices
- TypeScript
"@typescript-eslint/no-floating-promises":
severity: 2
tags:
- ErrorProne
- TypeScript
"@typescript-eslint/no-for-in-array":
severity: 2
tags:
- ErrorProne
- TypeScript
"@typescript-eslint/no-implied-eval":
severity: 3
tags:
- BestPractices
- TypeScript
"@typescript-eslint/no-import-type-side-effects":
severity: 2
tags:
- ErrorProne
- TypeScript
"@typescript-eslint/no-inferrable-types":
severity: 3
tags:
- BestPractices
- TypeScript
"@typescript-eslint/no-invalid-this":
severity: 3
tags:
- BestPractices
- TypeScript
"@typescript-eslint/no-invalid-void-type":
severity: 2
tags:
- ErrorProne
- TypeScript
"@typescript-eslint/no-loop-func":
severity: 3
tags:
- BestPractices
- TypeScript
"@typescript-eslint/no-magic-numbers":
severity: 3
tags:
- BestPractices
- TypeScript
"@typescript-eslint/no-meaningless-void-operator":
severity: 3
tags:
- BestPractices
- TypeScript
"@typescript-eslint/no-misused-new":
severity: 2
tags:
- Recommended
- ErrorProne
- TypeScript
"@typescript-eslint/no-misused-promises":
severity: 2
tags:
- ErrorProne
- TypeScript
"@typescript-eslint/no-misused-spread":
severity: 2
tags:
- ErrorProne
- TypeScript
"@typescript-eslint/no-mixed-enums":
severity: 2
tags:
- ErrorProne
- TypeScript
"@typescript-eslint/no-namespace":
severity: 3
tags:
- Recommended
- BestPractices
- TypeScript
"@typescript-eslint/no-non-null-asserted-nullish-coalescing":
severity: 2
tags:
- ErrorProne
- TypeScript
"@typescript-eslint/no-non-null-asserted-optional-chain":
severity: 2
tags:
- Recommended
- ErrorProne
- TypeScript
"@typescript-eslint/no-non-null-assertion":
severity: 2
tags:
- ErrorProne
- TypeScript
"@typescript-eslint/no-redeclare":
severity: 3
tags:
- BestPractices
- TypeScript
"@typescript-eslint/no-redundant-type-constituents":
severity: 3
tags:
- BestPractices
- TypeScript
"@typescript-eslint/no-require-imports":
severity: 2
tags:
- Recommended
- ErrorProne
- TypeScript
"@typescript-eslint/no-restricted-imports":
severity: 3
tags:
- BestPractices
- TypeScript
"@typescript-eslint/no-restricted-types":
severity: 3
tags:
- BestPractices
- TypeScript
"@typescript-eslint/no-shadow":
severity: 3
tags:
- BestPractices
- TypeScript
"@typescript-eslint/no-this-alias":
severity: 3
tags:
- Recommended
- BestPractices
- TypeScript
"@typescript-eslint/no-unnecessary-boolean-literal-compare":
severity: 3
tags:
- BestPractices
- TypeScript
"@typescript-eslint/no-unnecessary-condition":
severity: 3
tags:
- BestPractices
- TypeScript
"@typescript-eslint/no-unnecessary-parameter-property-assignment":
severity: 3
tags:
- BestPractices
- TypeScript
"@typescript-eslint/no-unnecessary-qualifier":
severity: 3
tags:
- BestPractices
- TypeScript
"@typescript-eslint/no-unnecessary-template-expression":
severity: 3
tags:
- BestPractices
- TypeScript
"@typescript-eslint/no-unnecessary-type-arguments":
severity: 3
tags:
- BestPractices
- TypeScript
"@typescript-eslint/no-unnecessary-type-assertion":
severity: 3
tags:
- BestPractices
- TypeScript
"@typescript-eslint/no-unnecessary-type-constraint":
severity: 3
tags:
- Recommended
- BestPractices
- TypeScript
"@typescript-eslint/no-unnecessary-type-parameters":
severity: 2
tags:
- ErrorProne
- TypeScript
"@typescript-eslint/no-unsafe-argument":
severity: 2
tags:
- ErrorProne
- TypeScript
"@typescript-eslint/no-unsafe-assignment":
severity: 2
tags:
- ErrorProne
- TypeScript
"@typescript-eslint/no-unsafe-call":
severity: 2
tags:
- ErrorProne
- TypeScript
"@typescript-eslint/no-unsafe-declaration-merging":
severity: 2
tags:
- Recommended
- ErrorProne
- TypeScript
"@typescript-eslint/no-unsafe-enum-comparison":
severity: 3
tags:
- BestPractices
- TypeScript
"@typescript-eslint/no-unsafe-function-type":
severity: 2
tags:
- Recommended
- ErrorProne
- TypeScript
"@typescript-eslint/no-unsafe-member-access":
severity: 2
tags:
- ErrorProne
- TypeScript
"@typescript-eslint/no-unsafe-return":
severity: 2
tags:
- ErrorProne
- TypeScript
"@typescript-eslint/no-unsafe-type-assertion":
severity: 2
tags:
- ErrorProne
- TypeScript
"@typescript-eslint/no-unsafe-unary-minus":
severity: 2
tags:
- ErrorProne
- TypeScript
"@typescript-eslint/no-unused-expressions":
severity: 3
tags:
- Recommended
- BestPractices
- TypeScript
"@typescript-eslint/no-unused-vars":
severity: 2
tags:
- Recommended
- ErrorProne
- TypeScript
"@typescript-eslint/no-use-before-define":
severity: 2
tags:
- ErrorProne
- TypeScript
"@typescript-eslint/no-useless-constructor":
severity: 2
tags:
- ErrorProne
- TypeScript
"@typescript-eslint/no-useless-empty-export":
severity: 3
tags:
- BestPractices
- TypeScript
"@typescript-eslint/no-wrapper-object-types":
severity: 2
tags:
- Recommended
- ErrorProne
- TypeScript
"@typescript-eslint/non-nullable-type-assertion-style":
severity: 3
tags:
- BestPractices
- TypeScript
"@typescript-eslint/only-throw-error":
severity: 2
tags:
- ErrorProne
- TypeScript
"@typescript-eslint/parameter-properties":
severity: 2
tags:
- ErrorProne
- TypeScript
"@typescript-eslint/prefer-as-const":
severity: 3
tags:
- Recommended
- BestPractices
- TypeScript
"@typescript-eslint/prefer-destructuring":
severity: 3
tags:
- BestPractices
- TypeScript
"@typescript-eslint/prefer-enum-initializers":
severity: 3
tags:
- BestPractices
- TypeScript
"@typescript-eslint/prefer-find":
severity: 3
tags:
- BestPractices
- TypeScript
"@typescript-eslint/prefer-for-of":
severity: 3
tags:
- BestPractices
- TypeScript
"@typescript-eslint/prefer-function-type":
severity: 3
tags:
- BestPractices
- TypeScript
"@typescript-eslint/prefer-includes":
severity: 3
tags:
- BestPractices
- TypeScript
"@typescript-eslint/prefer-literal-enum-member":
severity: 3
tags:
- BestPractices
- TypeScript
"@typescript-eslint/prefer-namespace-keyword":
severity: 3
tags:
- Recommended
- BestPractices
- TypeScript
"@typescript-eslint/prefer-nullish-coalescing":
severity: 3
tags:
- BestPractices
- TypeScript
"@typescript-eslint/prefer-optional-chain":
severity: 3
tags:
- BestPractices
- TypeScript
"@typescript-eslint/prefer-promise-reject-errors":
severity: 3
tags:
- BestPractices
- TypeScript
"@typescript-eslint/prefer-readonly":
severity: 3
tags:
- BestPractices
- TypeScript
"@typescript-eslint/prefer-readonly-parameter-types":
severity: 3
tags:
- BestPractices
- TypeScript
"@typescript-eslint/prefer-reduce-type-parameter":
severity: 2
tags:
- ErrorProne
- TypeScript
"@typescript-eslint/prefer-regexp-exec":
severity: 3
tags:
- BestPractices
- TypeScript
"@typescript-eslint/prefer-return-this-type":
severity: 3
tags:
- BestPractices
- TypeScript
"@typescript-eslint/prefer-string-starts-ends-with":
severity: 3
tags:
- BestPractices
- TypeScript
"@typescript-eslint/promise-function-async":
severity: 3
tags:
- BestPractices
- TypeScript
"@typescript-eslint/related-getter-setter-pairs":
severity: 2
tags:
- ErrorProne
- TypeScript
"@typescript-eslint/require-array-sort-compare":
severity: 2
tags:
- ErrorProne
- TypeScript
"@typescript-eslint/require-await":
severity: 3
tags:
- BestPractices
- TypeScript
"@typescript-eslint/restrict-plus-operands":
severity: 2
tags:
- ErrorProne
- TypeScript
"@typescript-eslint/restrict-template-expressions":
severity: 2
tags:
- ErrorProne
- TypeScript
"@typescript-eslint/return-await":
severity: 2
tags:
- ErrorProne
- TypeScript
"@typescript-eslint/strict-boolean-expressions":
severity: 3
tags:
- BestPractices
- TypeScript
"@typescript-eslint/switch-exhaustiveness-check":
severity: 3
tags:
- BestPractices
- TypeScript
"@typescript-eslint/triple-slash-reference":
severity: 3
tags:
- Recommended
- BestPractices
- TypeScript
"@typescript-eslint/typedef":
severity: 3
tags:
- BestPractices
- TypeScript
"@typescript-eslint/unbound-method":
severity: 2
tags:
- ErrorProne
- TypeScript
"@typescript-eslint/unified-signatures":
severity: 3
tags:
- BestPractices
- TypeScript
"@typescript-eslint/use-unknown-in-catch-callback-variable":
severity: 3
tags:
- BestPractices
- TypeScript
"accessor-pairs":
severity: 3
tags:
- BestPractices
- JavaScript
- TypeScript
"array-callback-return":
severity: 2
tags:
- ErrorProne
- JavaScript
- TypeScript
"arrow-body-style":
severity: 3
tags:
- BestPractices
- JavaScript
- TypeScript
"block-scoped-var":
severity: 3
tags:
- BestPractices
- JavaScript
- TypeScript
"camelcase":
severity: 3
tags:
- BestPractices
- JavaScript
- TypeScript
"capitalized-comments":
severity: 3
tags:
- BestPractices
- JavaScript
- TypeScript
"class-methods-use-this":
severity: 3
tags:
- BestPractices
- JavaScript
"complexity":
severity: 3
tags:
- BestPractices
- JavaScript
- TypeScript
"consistent-return":
severity: 3
tags:
- BestPractices
- JavaScript
"consistent-this":
severity: 3
tags:
- BestPractices
- JavaScript
- TypeScript
"constructor-super":
severity: 2
tags:
- Recommended
- ErrorProne
- JavaScript
"curly":
severity: 3
tags:
- BestPractices
- JavaScript
- TypeScript
"default-case":
severity: 3
tags:
- BestPractices
- JavaScript
- TypeScript
"default-case-last":
severity: 3
tags:
- BestPractices
- JavaScript
- TypeScript
"default-param-last":
severity: 3
tags:
- BestPractices
- JavaScript
"dot-notation":
severity: 3
tags:
- BestPractices
- JavaScript
"eqeqeq":
severity: 3
tags:
- BestPractices
- JavaScript
- TypeScript
"for-direction":
severity: 2
tags:
- Recommended
- ErrorProne
- JavaScript
- TypeScript
"func-name-matching":
severity: 3
tags:
- BestPractices
- JavaScript
- TypeScript
"func-names":
severity: 3
tags:
- BestPractices
- JavaScript
- TypeScript
"func-style":
severity: 3
tags:
- BestPractices
- JavaScript
- TypeScript
"getter-return":
severity: 2
tags:
- Recommended
- ErrorProne
- JavaScript
"grouped-accessor-pairs":
severity: 3
tags:
- BestPractices
- JavaScript
- TypeScript
"guard-for-in":
severity: 3
tags:
- BestPractices
- JavaScript
- TypeScript
"id-denylist":
severity: 3
tags:
- BestPractices
- JavaScript
- TypeScript
"id-length":
severity: 3
tags:
- BestPractices
- JavaScript
- TypeScript
"id-match":
severity: 3
tags:
- BestPractices
- JavaScript
- TypeScript
"init-declarations":
severity: 3
tags:
- BestPractices
- JavaScript
"line-comment-position":
severity: 4
tags:
- CodeStyle
- JavaScript
- TypeScript
"logical-assignment-operators":
severity: 3
tags:
- BestPractices
- JavaScript
- TypeScript
"max-classes-per-file":
severity: 3
tags:
- BestPractices
- JavaScript
- TypeScript
"max-depth":
severity: 3
tags:
- BestPractices
- JavaScript
- TypeScript
"max-lines":
severity: 3
tags:
- BestPractices
- JavaScript
- TypeScript
"max-lines-per-function":
severity: 3
tags:
- BestPractices
- JavaScript
- TypeScript
"max-nested-callbacks":
severity: 3
tags:
- BestPractices
- JavaScript
- TypeScript
"max-params":
severity: 3
tags:
- BestPractices
- JavaScript
"max-statements":
severity: 3
tags:
- BestPractices
- JavaScript
- TypeScript
"multiline-comment-style":
severity: 3
tags:
- BestPractices
- JavaScript
- TypeScript
"new-cap":
severity: 3
tags:
- BestPractices
- JavaScript
- TypeScript
"no-alert":
severity: 3
tags:
- BestPractices
- JavaScript
- TypeScript
"no-array-constructor":
severity: 3
tags:
- BestPractices
- JavaScript
"no-async-promise-executor":
severity: 2
tags:
- Recommended
- ErrorProne
- JavaScript
- TypeScript
"no-await-in-loop":
severity: 2
tags:
- ErrorProne
- JavaScript
- TypeScript
"no-bitwise":
severity: 3
tags:
- BestPractices
- JavaScript
- TypeScript
"no-caller":
severity: 3
tags:
- BestPractices
- JavaScript
- TypeScript
"no-case-declarations":
severity: 3
tags:
- Recommended
- BestPractices
- JavaScript
- TypeScript
"no-class-assign":
severity: 2
tags:
- Recommended
- ErrorProne
- JavaScript
"no-compare-neg-zero":
severity: 2
tags:
- Recommended
- ErrorProne
- JavaScript
- TypeScript
"no-cond-assign":
severity: 2
tags:
- Recommended
- ErrorProne
- JavaScript
- TypeScript
"no-console":
severity: 3
tags:
- BestPractices
- JavaScript
- TypeScript
"no-const-assign":
severity: 2
tags:
- Recommended
- ErrorProne
- JavaScript
"no-constant-binary-expression":
severity: 2
tags:
- ErrorProne
- JavaScript
- TypeScript
"no-constant-condition":
severity: 2
tags:
- Recommended
- ErrorProne
- JavaScript
- TypeScript
"no-constructor-return":
severity: 2
tags:
- ErrorProne
- JavaScript
- TypeScript
"no-continue":
severity: 3
tags:
- BestPractices
- JavaScript
- TypeScript
"no-control-regex":
severity: 2
tags:
- Recommended
- ErrorProne
- JavaScript
- TypeScript
"no-debugger":
severity: 2
tags:
- Recommended
- ErrorProne
- JavaScript
- TypeScript
"no-delete-var":
severity: 3
tags:
- Recommended
- BestPractices
- JavaScript
- TypeScript
"no-div-regex":
severity: 3
tags:
- BestPractices
- JavaScript
- TypeScript
"no-dupe-args":
severity: 2
tags:
- Recommended
- ErrorProne
- JavaScript
"no-dupe-class-members":
severity: 2
tags:
- Recommended
- ErrorProne
- JavaScript
"no-dupe-else-if":
severity: 2
tags:
- Recommended
- ErrorProne
- JavaScript
- TypeScript
"no-dupe-keys":
severity: 2
tags:
- Recommended
- ErrorProne
- JavaScript
"no-duplicate-case":
severity: 2
tags:
- Recommended
- ErrorProne
- JavaScript
- TypeScript
"no-duplicate-imports":
severity: 2
tags:
- ErrorProne
- JavaScript
- TypeScript
"no-else-return":
severity: 3
tags:
- BestPractices
- JavaScript
- TypeScript
"no-empty":
severity: 3
tags:
- Recommended
- BestPractices
- JavaScript
- TypeScript
"no-empty-character-class":
severity: 2
tags:
- Recommended
- ErrorProne
- JavaScript
- TypeScript
"no-empty-function":
severity: 3
tags:
- BestPractices
- JavaScript
"no-empty-pattern":
severity: 2
tags:
- Recommended
- ErrorProne
- JavaScript
- TypeScript
"no-empty-static-block":
severity: 3
tags:
- BestPractices
- JavaScript
- TypeScript
"no-eq-null":
severity: 3
tags:
- BestPractices
- JavaScript
- TypeScript
"no-eval":
severity: 3
tags:
- BestPractices
- JavaScript
- TypeScript
"no-ex-assign":
severity: 2
tags:
- Recommended
- ErrorProne
- JavaScript
- TypeScript
"no-extend-native":
severity: 3
tags:
- BestPractices
- JavaScript
- TypeScript
"no-extra-bind":
severity: 3
tags:
- BestPractices
- JavaScript
- TypeScript
"no-extra-boolean-cast":
severity: 3
tags:
- Recommended
- BestPractices
- JavaScript
- TypeScript
"no-extra-label":
severity: 3
tags:
- BestPractices
- JavaScript
- TypeScript
"no-fallthrough":
severity: 2
tags:
- Recommended
- ErrorProne
- JavaScript
- TypeScript
"no-func-assign":
severity: 2
tags:
- Recommended
- ErrorProne
- JavaScript
"no-global-assign":
severity: 3
tags:
- Recommended
- BestPractices
- JavaScript
- TypeScript
"no-implicit-coercion":
severity: 3
tags:
- BestPractices
- JavaScript
- TypeScript
"no-implicit-globals":
severity: 3
tags:
- BestPractices
- JavaScript
- TypeScript
"no-implied-eval":
severity: 3
tags:
- BestPractices
- JavaScript
"no-import-assign":
severity: 2
tags:
- Recommended
- ErrorProne
- JavaScript
"no-inline-comments":
severity: 3
tags:
- BestPractices
- JavaScript
- TypeScript
"no-inner-declarations":
severity: 2
tags:
- Recommended
- ErrorProne
- JavaScript
- TypeScript
"no-invalid-regexp":
severity: 2
tags:
- Recommended
- ErrorProne
- JavaScript
- TypeScript
"no-invalid-this":
severity: 3
tags:
- BestPractices
- JavaScript
"no-irregular-whitespace":
severity: 2
tags:
- Recommended
- ErrorProne
- JavaScript
- TypeScript
"no-iterator":
severity: 3
tags:
- BestPractices
- JavaScript
- TypeScript
"no-label-var":
severity: 3
tags:
- BestPractices
- JavaScript
- TypeScript
"no-labels":
severity: 3
tags:
- BestPractices
- JavaScript
- TypeScript
"no-lone-blocks":
severity: 3
tags:
- BestPractices
- JavaScript
- TypeScript
"no-lonely-if":
severity: 3
tags:
- BestPractices
- JavaScript
- TypeScript
"no-loop-func":
severity: 3
tags:
- BestPractices
- JavaScript
"no-loss-of-precision":
severity: 2
tags:
- Recommended
- ErrorProne
- JavaScript
- TypeScript
"no-magic-numbers":
severity: 3
tags:
- BestPractices
- JavaScript
"no-misleading-character-class":
severity: 2
tags:
- Recommended
- ErrorProne
- JavaScript
- TypeScript
"no-multi-assign":
severity: 3
tags:
- BestPractices
- JavaScript
- TypeScript
"no-multi-str":
severity: 3
tags:
- BestPractices
- JavaScript
- TypeScript
"no-negated-condition":
severity: 3
tags:
- BestPractices
- JavaScript
- TypeScript
"no-nested-ternary":
severity: 3
tags:
- BestPractices
- JavaScript
- TypeScript
"no-new":
severity: 3
tags:
- BestPractices
- JavaScript
- TypeScript
"no-new-func":
severity: 3
tags:
- BestPractices
- JavaScript
- TypeScript
"no-new-native-nonconstructor":
severity: 2
tags:
- ErrorProne
- JavaScript
"no-new-symbol":
severity: 2
tags:
- Recommended
- ErrorProne
- JavaScript
"no-new-wrappers":
severity: 3
tags:
- BestPractices
- JavaScript
- TypeScript
"no-nonoctal-decimal-escape":
severity: 3
tags:
- Recommended
- BestPractices
- JavaScript
- TypeScript
"no-obj-calls":
severity: 2
tags:
- Recommended
- ErrorProne
- JavaScript
"no-object-constructor":
severity: 3
tags:
- BestPractices
- JavaScript
- TypeScript
"no-octal":
severity: 2
tags:
- Recommended
- ErrorProne
- JavaScript
- TypeScript
"no-octal-escape":
severity: 3
tags:
- BestPractices
- JavaScript
- TypeScript
"no-param-reassign":
severity: 3
tags:
- BestPractices
- JavaScript
- TypeScript
"no-plusplus":
severity: 3
tags:
- BestPractices
- JavaScript
- TypeScript
"no-promise-executor-return":
severity: 2
tags:
- ErrorProne
- JavaScript
- TypeScript
"no-proto":
severity: 3
tags:
- BestPractices
- JavaScript
- TypeScript
"no-prototype-builtins":
severity: 2
tags:
- Recommended
- ErrorProne
- JavaScript
- TypeScript
"no-redeclare":
severity: 3
tags:
- Recommended
- BestPractices
- JavaScript
"no-regex-spaces":
severity: 3
tags:
- Recommended
- BestPractices
- JavaScript
- TypeScript
"no-restricted-exports":
severity: 3
tags:
- BestPractices
- JavaScript
- TypeScript
"no-restricted-globals":
severity: 3
tags:
- BestPractices
- JavaScript
- TypeScript
"no-restricted-imports":
severity: 3
tags:
- BestPractices
- JavaScript
"no-restricted-properties":
severity: 3
tags:
- BestPractices
- JavaScript
- TypeScript
"no-restricted-syntax":
severity: 3
tags:
- BestPractices
- JavaScript
- TypeScript
"no-return-assign":
severity: 3
tags:
- BestPractices
- JavaScript
- TypeScript
"no-script-url":
severity: 3
tags:
- BestPractices
- JavaScript
- TypeScript
"no-self-assign":
severity: 2
tags:
- Recommended
- ErrorProne
- JavaScript
- TypeScript
"no-self-compare":
severity: 2
tags:
- ErrorProne
- JavaScript
- TypeScript
"no-sequences":
severity: 3
tags:
- BestPractices
- JavaScript
- TypeScript
"no-setter-return":
severity: 2
tags:
- Recommended
- ErrorProne
- JavaScript
"no-shadow":
severity: 3
tags:
- BestPractices
- JavaScript
"no-shadow-restricted-names":
severity: 3
tags:
- Recommended
- BestPractices
- JavaScript
- TypeScript
"no-sparse-arrays":
severity: 2
tags:
- Recommended
- ErrorProne
- JavaScript
- TypeScript
"no-template-curly-in-string":
severity: 2
tags:
- ErrorProne
- JavaScript
- TypeScript
"no-ternary":
severity: 3
tags:
- BestPractices
- JavaScript
- TypeScript
"no-this-before-super":
severity: 2
tags:
- Recommended
- ErrorProne
- JavaScript
"no-throw-literal":
severity: 3
tags:
- BestPractices
- JavaScript
"no-undef":
severity: 2
tags:
- Recommended
- ErrorProne
- JavaScript
"no-undef-init":
severity: 3
tags:
- BestPractices
- JavaScript
- TypeScript
"no-undefined":
severity: 3
tags:
- BestPractices
- JavaScript
- TypeScript
"no-underscore-dangle":
severity: 3
tags:
- BestPractices
- JavaScript
- TypeScript
"no-unexpected-multiline":
severity: 2
tags:
- Recommended
- ErrorProne
- JavaScript
- TypeScript
"no-unmodified-loop-condition":
severity: 2
tags:
- ErrorProne
- JavaScript
- TypeScript
"no-unneeded-ternary":
severity: 3
tags:
- BestPractices
- JavaScript
- TypeScript
"no-unreachable":
severity: 2
tags:
- Recommended
- ErrorProne
- JavaScript
"no-unreachable-loop":
severity: 2
tags:
- ErrorProne
- JavaScript
- TypeScript
"no-unsafe-finally":
severity: 2
tags:
- Recommended
- ErrorProne
- JavaScript
- TypeScript
"no-unsafe-negation":
severity: 2
tags:
- Recommended
- ErrorProne
- JavaScript
"no-unsafe-optional-chaining":
severity: 2
tags:
- Recommended
- ErrorProne
- JavaScript
- TypeScript
"no-unused-expressions":
severity: 3
tags:
- BestPractices
- JavaScript
"no-unused-labels":
severity: 3
tags:
- Recommended
- BestPractices
- JavaScript
- TypeScript
"no-unused-private-class-members":
severity: 2
tags:
- ErrorProne
- JavaScript
- TypeScript
"no-unused-vars":
severity: 2
tags:
- Recommended
- ErrorProne
- JavaScript
"no-use-before-define":
severity: 2
tags:
- ErrorProne
- JavaScript
"no-useless-backreference":
severity: 2
tags:
- Recommended
- ErrorProne
- JavaScript
- TypeScript
"no-useless-call":
severity: 3
tags:
- BestPractices
- JavaScript
- TypeScript
"no-useless-catch":
severity: 3
tags:
- Recommended
- BestPractices
- JavaScript
- TypeScript
"no-useless-computed-key":
severity: 3
tags:
- BestPractices
- JavaScript
- TypeScript
"no-useless-concat":
severity: 3
tags:
- BestPractices
- JavaScript
- TypeScript
"no-useless-constructor":
severity: 3
tags:
- BestPractices
- JavaScript
"no-useless-escape":
severity: 3
tags:
- Recommended
- BestPractices
- JavaScript
- TypeScript
"no-useless-rename":
severity: 3
tags:
- BestPractices
- JavaScript
- TypeScript
"no-useless-return":
severity: 3
tags:
- BestPractices
- JavaScript
- TypeScript
"no-var":
severity: 3
tags:
- Recommended
- BestPractices
- JavaScript
- TypeScript
"no-void":
severity: 3
tags:
- BestPractices
- JavaScript
- TypeScript
"no-warning-comments":
severity: 3
tags:
- BestPractices
- JavaScript
- TypeScript
"no-with":
severity: 3
tags:
- Recommended
- BestPractices
- JavaScript
"object-shorthand":
severity: 3
tags:
- BestPractices
- JavaScript
- TypeScript
"one-var":
severity: 3
tags:
- BestPractices
- JavaScript
- TypeScript
"operator-assignment":
severity: 3
tags:
- BestPractices
- JavaScript
- TypeScript
"prefer-arrow-callback":
severity: 3
tags:
- BestPractices
- JavaScript
- TypeScript
"prefer-const":
severity: 3
tags:
- Recommended
- BestPractices
- JavaScript
- TypeScript
"prefer-destructuring":
severity: 3
tags:
- BestPractices
- JavaScript
"prefer-exponentiation-operator":
severity: 3
tags:
- BestPractices
- JavaScript
- TypeScript
"prefer-named-capture-group":
severity: 3
tags:
- BestPractices
- JavaScript
- TypeScript
"prefer-numeric-literals":
severity: 3
tags:
- BestPractices
- JavaScript
- TypeScript
"prefer-object-has-own":
severity: 3
tags:
- BestPractices
- JavaScript
- TypeScript
"prefer-object-spread":
severity: 3
tags:
- BestPractices
- JavaScript
- TypeScript
"prefer-promise-reject-errors":
severity: 3
tags:
- BestPractices
- JavaScript
"prefer-regex-literals":
severity: 3
tags:
- BestPractices
- JavaScript
- TypeScript
"prefer-rest-params":
severity: 3
tags:
- Recommended
- BestPractices
- JavaScript
- TypeScript
"prefer-spread":
severity: 3
tags:
- Recommended
- BestPractices
- JavaScript
- TypeScript
"prefer-template":
severity: 3
tags:
- BestPractices
- JavaScript
- TypeScript
"radix":
severity: 3
tags:
- BestPractices
- JavaScript
- TypeScript
"require-atomic-updates":
severity: 2
tags:
- ErrorProne
- JavaScript
- TypeScript
"require-await":
severity: 3
tags:
- BestPractices
- JavaScript
"require-unicode-regexp":
severity: 3
tags:
- BestPractices
- JavaScript
- TypeScript
"require-yield":
severity: 3
tags:
- Recommended
- BestPractices
- JavaScript
- TypeScript
"sort-imports":
severity: 3
tags:
- BestPractices
- JavaScript
- TypeScript
"sort-keys":
severity: 3
tags:
- BestPractices
- JavaScript
- TypeScript
"sort-vars":
severity: 3
tags:
- BestPractices
- JavaScript
- TypeScript
"strict":
severity: 3
tags:
- BestPractices
- JavaScript
- TypeScript
"symbol-description":
severity: 3
tags:
- BestPractices
- JavaScript
- TypeScript
"unicode-bom":
severity: 4
tags:
- CodeStyle
- JavaScript
- TypeScript
"use-isnan":
severity: 2
tags:
- Recommended
- ErrorProne
- JavaScript
- TypeScript
"valid-typeof":
severity: 2
tags:
- Recommended
- ErrorProne
- JavaScript
- TypeScript
"vars-on-top":
severity: 3
tags:
- BestPractices
- JavaScript
- TypeScript
"yoda":
severity: 3
tags:
- BestPractices
- JavaScript
- TypeScript
# ======================================================================
# RETIRE-JS ENGINE RULE OVERRIDES
# ======================================================================
retire-js:
"LibraryWithKnownCriticalSeverityVulnerability":
severity: 1
tags:
- Recommended
- Security
- JavaScript
"LibraryWithKnownHighSeverityVulnerability":
severity: 2
tags:
- Recommended
- Security
- JavaScript
"LibraryWithKnownMediumSeverityVulnerability":
severity: 3
tags:
- Recommended
- Security
- JavaScript
"LibraryWithKnownLowSeverityVulnerability":
severity: 4
tags:
- Recommended
- Security
- JavaScript
# ======================================================================
# REGEX ENGINE RULE OVERRIDES
# ======================================================================
regex:
"NoTrailingWhitespace":
severity: 5
tags:
- Recommended
- CodeStyle
- Apex
"AvoidTermsWithImplicitBias":
severity: 5
tags:
- Recommended
- BestPractices
"AvoidOldSalesforceApiVersions":
severity: 2
tags:
- Recommended
- Security
- XML
"AvoidGetHeapSizeInLoop":
severity: 2
tags:
- Recommended
- Performance
- Apex
"MinVersionForAbstractVirtualClassesWithPrivateMethod":
severity: 2
tags:
- Recommended
- BestPractices
- Apex
# ======================================================================
# CPD ENGINE RULE OVERRIDES
# ======================================================================
cpd:
"DetectCopyPasteForApex":
severity: 5
tags:
- Recommended
- Design
- Apex
"DetectCopyPasteForHtml":
severity: 5
tags:
- Design
- Html
"DetectCopyPasteForJavascript":
severity: 5
tags:
- Recommended
- Design
- Javascript
"DetectCopyPasteForTypescript":
severity: 5
tags:
- Recommended
- Design
- Typescript
"DetectCopyPasteForVisualforce":
severity: 5
tags:
- Recommended
- Design
- Visualforce
"DetectCopyPasteForXml":
severity: 5
tags:
- Design
- Xml
# ======================================================================
# PMD ENGINE RULE OVERRIDES
# ======================================================================
pmd:
"ApexAssertionsShouldIncludeMessage":
severity: 3
tags:
- BestPractices
- Apex
"ApexBadCrypto":
severity: 2
tags:
- Recommended
- Security
- Apex
"ApexCRUDViolation":
severity: 2
tags:
- Recommended
- Security
- Apex
"ApexCSRF":
severity: 1
tags:
- Recommended
- Security
- Apex
"ApexDangerousMethods":
severity: 3
tags:
- Recommended
- Security
- Apex
"ApexDoc":
severity: 4
tags:
- Recommended
- Documentation
- Apex
"ApexInsecureEndpoint":
severity: 2
tags:
- Recommended
- Security
- Apex
"ApexOpenRedirect":
severity: 2
tags:
- Recommended
- Security
- Apex
"ApexSharingViolations":
severity: 3
tags:
- Recommended
- Security
- Apex
"ApexSOQLInjection":
severity: 2
tags:
- Recommended
- Security
- Apex
"ApexSuggestUsingNamedCred":
severity: 2
tags:
- Recommended
- Security
- Apex
"ApexUnitTestClassShouldHaveAsserts":
severity: 3
tags:
- Recommended
- BestPractices
- Apex
"ApexUnitTestClassShouldHaveRunAs":
severity: 4
tags:
- Recommended
- BestPractices
- Apex
"ApexUnitTestMethodShouldHaveIsTestAnnotation":
severity: 2
tags:
- Recommended
- BestPractices
- Apex
"ApexUnitTestShouldNotUseSeeAllDataTrue":
severity: 2
tags:
- Recommended
- BestPractices
- Apex
"ApexXSSFromEscapeFalse":
severity: 2
tags:
- Recommended
- Security
- Apex
"ApexXSSFromURLParam":
severity: 2
tags:
- Recommended
- Security
- Apex
"AssignmentInOperand":
severity: 3
tags:
- CodeStyle
- JavaScript
"AvoidApiSessionId":
severity: 2
tags:
- AppExchange
- Security
- XML
"AvoidAuraWithLockerDisabled":
severity: 1
tags:
- AppExchange
- Security
- XML
"AvoidChangeProtectionUnprotected":
severity: 1
tags:
- AppExchange
- Security
- Apex
"AvoidConsoleStatements":
severity: 3
tags:
- Performance
- JavaScript
"AvoidCreateElementScriptLinkTag":
severity: 2
tags:
- AppExchange
- Security
- Visualforce
"AvoidDebugStatements":
severity: 4
tags:
- Recommended
- Performance
- Apex
"AvoidDeeplyNestedIfStmts":
severity: 3
tags:
- Recommended
- Design
- Apex
"AvoidDirectAccessTriggerMap":
severity: 3
tags:
- Recommended
- ErrorProne
- Apex
"AvoidDisableProtocolSecurityRemoteSiteSetting":
severity: 3
tags:
- AppExchange
- Security
- XML
"AvoidGetInstanceWithTaint":
severity: 3
tags:
- AppExchange
- Security
- Apex
"AvoidGlobalInstallUninstallHandlers":
severity: 1
tags:
- AppExchange
- Security
- Apex
"AvoidGlobalModifier":
severity: 3
tags:
- Recommended
- BestPractices
- Apex
"AvoidHardCodedCredentialsInAura":
severity: 2
tags:
- AppExchange
- Security
- HTML
"AvoidHardcodedCredentialsInFieldDecls":
severity: 3
tags:
- AppExchange
- Security
- Apex
"AvoidHardcodedCredentialsInHttpHeader":
severity: 3
tags:
- AppExchange
- Security
- Apex
"AvoidHardcodedCredentialsInSetPassword":
severity: 1
tags:
- AppExchange
- Security
- Apex
"AvoidHardcodedCredentialsInVarAssign":
severity: 3
tags:
- AppExchange
- Security
- Apex
"AvoidHardcodedCredentialsInVarDecls":
severity: 3
tags:
- AppExchange
- Security
- Apex
"AvoidHardcodedSecretsInVFAttrs":
severity: 2
tags:
- AppExchange
- Security
- Visualforce
"AvoidHardcodingId":
severity: 3
tags:
- Recommended
- ErrorProne
- Apex
"AvoidInlineStyles":
severity: 4
tags:
- BestPractices
- HTML
"AvoidInsecureHttpRemoteSiteSetting":
severity: 3
tags:
- AppExchange
- Security
- XML
"AvoidInvalidCrudContentDistribution":
severity: 3
tags:
- AppExchange
- Security
- Apex
"AvoidJavaScriptCustomObject":
severity: 2
tags:
- AppExchange
- Security
- XML
"AvoidJavaScriptHomePageComponent":
severity: 2
tags:
- AppExchange
- Security
- XML
"AvoidJavaScriptInUrls":
severity: 1
tags:
- AppExchange
- Security
- XML
"AvoidJavaScriptWebLink":
severity: 2
tags:
- AppExchange
- Security
- XML
"AvoidLmcIsExposedTrue":
severity: 2
tags:
- AppExchange
- Security
- XML
"AvoidLogicInTrigger":
severity: 3
tags:
- Recommended
- BestPractices
- Apex
"AvoidLwcBubblesComposedTrue":
severity: 3
tags:
- AppExchange
- Security
- JavaScript
"AvoidNonExistentAnnotations":
severity: 4
tags:
- Recommended
- ErrorProne
- Apex
"AvoidNonRestrictiveQueries":
severity: 4
tags:
- Recommended
- Performance
- Apex
"AvoidSControls":
severity: 1
tags:
- AppExchange
- Security
- XML
"AvoidSecurityEnforcedOldApiVersion":
severity: 3
tags:
- AppExchange
- Security
- Apex
"AvoidStatefulDatabaseResult":
severity: 3
tags:
- Recommended
- ErrorProne
- Apex
"AvoidTrailingComma":
severity: 2
tags:
- ErrorProne
- JavaScript
"AvoidUnauthorizedApiSessionIdInApex":
severity: 3
tags:
- AppExchange
- Security
- Apex
"AvoidUnauthorizedApiSessionIdInVisualforce":
severity: 3
tags:
- AppExchange
- Security
- Visualforce
"AvoidUnauthorizedGetSessionIdInApex":
severity: 3
tags:
- AppExchange
- Security
- Apex
"AvoidUnauthorizedGetSessionIdInVisualforce":
severity: 2
tags:
- AppExchange
- Security
- Visualforce
"AvoidUnescapedHtmlInAura":
severity: 2
tags:
- AppExchange
- Security
- HTML
"AvoidUnsafePasswordManagementUse":
severity: 1
tags:
- AppExchange
- Security
- Apex
"AvoidWithStatement":
severity: 2
tags:
- BestPractices
- JavaScript
"ClassNamingConventions":
severity: 3
tags:
- Recommended
- CodeStyle
- Apex
"CognitiveComplexity":
severity: 3
tags:
- Recommended
- Design
- Apex
"ConsistentReturn":
severity: 3
tags:
- BestPractices
- JavaScript
"CyclomaticComplexity":
severity: 3
tags:
- Recommended
- Design
- Apex
"DebugsShouldUseLoggingLevel":
severity: 4
tags:
- Recommended
- BestPractices
- Apex
"EagerlyLoadedDescribeSObjectResult":
severity: 2
tags:
- Recommended
- Performance
- Apex
"EmptyCatchBlock":
severity: 2
tags:
- Recommended
- ErrorProne
- Apex
"EmptyIfStmt":
severity: 3
tags:
- Recommended
- ErrorProne
- Apex
"EmptyStatementBlock":
severity: 3
tags:
- Recommended
- ErrorProne
- Apex
"EmptyTryOrFinallyBlock":
severity: 3
tags:
- Recommended
- ErrorProne
- Apex
"EmptyWhileStmt":
severity: 3
tags:
- Recommended
- ErrorProne
- Apex
"EqualComparison":
severity: 3
tags:
- ErrorProne
- JavaScript
"ExcessiveClassLength":
severity: 3
tags:
- Recommended
- Design
- Apex
"ExcessiveParameterList":
severity: 3
tags:
- Recommended
- Design
- Apex
"ExcessivePublicCount":
severity: 3
tags:
- Recommended
- Design
- Apex
"FieldDeclarationsShouldBeAtStart":
severity: 3
tags:
- Recommended
- CodeStyle
- Apex
"FieldNamingConventions":
severity: 3
tags:
- Recommended
- CodeStyle
- Apex
"ForLoopsMustUseBraces":
severity: 3
tags:
- Recommended
- CodeStyle
- Apex
"ForLoopsMustUseBraces-javascript":
severity: 3
tags:
- CodeStyle
- JavaScript
"FormalParameterNamingConventions":
severity: 3
tags:
- Recommended
- CodeStyle
- Apex
"GlobalVariable":
severity: 2
tags:
- BestPractices
- JavaScript
"IfElseStmtsMustUseBraces":
severity: 3
tags:
- Recommended
- CodeStyle
- Apex
"IfElseStmtsMustUseBraces-javascript":
severity: 3
tags:
- CodeStyle
- JavaScript
"IfStmtsMustUseBraces":
severity: 3
tags:
- Recommended
- CodeStyle
- Apex
"IfStmtsMustUseBraces-javascript":
severity: 3
tags:
- CodeStyle
- JavaScript
"InaccessibleAuraEnabledGetter":
severity: 3
tags:
- Recommended
- ErrorProne
- Apex
"InaccurateNumericLiteral":
severity: 3
tags:
- ErrorProne
- JavaScript
"LimitConnectedAppScope":
severity: 3
tags:
- AppExchange
- Security
- XML
"LoadCSSApexStylesheet":
severity: 2
tags:
- AppExchange
- Security
- Visualforce
"LoadCSSLinkHref":
severity: 2
tags:
- AppExchange
- Security
- Visualforce
"LoadJavaScriptHtmlScript":
severity: 2
tags:
- AppExchange
- Security
- Visualforce
"LoadJavaScriptIncludeScript":
severity: 2
tags:
- AppExchange
- Security
- Visualforce
"LocalVariableNamingConventions":
severity: 3
tags:
- Recommended
- CodeStyle
- Apex
"MethodNamingConventions":
severity: 3
tags:
- Recommended
- CodeStyle
- Apex
"MethodWithSameNameAsEnclosingClass":
severity: 3
tags:
- Recommended
- ErrorProne
- Apex
"MissingEncoding":
severity: 3
tags:
- BestPractices
- XML
"MistypedCDATASection":
severity: 3
tags:
- ErrorProne
- XML
"NcssConstructorCount":
severity: 4
tags:
- Recommended
- Design
- Apex
"NcssMethodCount":
severity: 4
tags:
- Recommended
- Design
- Apex
"NcssTypeCount":
severity: 4
tags:
- Design
- Apex
"NoElseReturn":
severity: 3
tags:
- CodeStyle
- JavaScript
"OneDeclarationPerLine":
severity: 3
tags:
- Recommended
- CodeStyle
- Apex
"OperationWithHighCostInLoop":
severity: 3
tags:
- Recommended
- Performance
- Apex
"OperationWithLimitsInLoop":
severity: 3
tags:
- Recommended
- Performance
- Apex
"OverrideBothEqualsAndHashcode":
severity: 2
tags:
- Recommended
- ErrorProne
- Apex
"PropertyNamingConventions":
severity: 3
tags:
- Recommended
- CodeStyle
- Apex
"ProtectSensitiveData":
severity: 3
tags:
- AppExchange
- Security
- XML
"QueueableWithoutFinalizer":
severity: 4
tags:
- Recommended
- BestPractices
- Apex
"ScopeForInVariable":
severity: 2
tags:
- BestPractices
- JavaScript
"StdCyclomaticComplexity":
severity: 3
tags:
- Design
- Apex
"TestMethodsMustBeInTestClasses":
severity: 3
tags:
- Recommended
- ErrorProne
- Apex
"TooManyFields":
severity: 3
tags:
- Recommended
- Design
- Apex
"UnnecessaryBlock":
severity: 3
tags:
- CodeStyle
- JavaScript
"UnnecessaryParentheses":
severity: 4
tags:
- CodeStyle
- JavaScript
"UnnecessaryTypeAttribute":
severity: 3
tags:
- BestPractices
- HTML
"UnreachableCode":
severity: 2
tags:
- CodeStyle
- JavaScript
"UnusedLocalVariable":
severity: 3
tags:
- Recommended
- BestPractices
- Apex
"UnusedMethod":
severity: 3
tags:
- Recommended
- Design
- Apex
"UseAltAttributeForImages":
severity: 3
tags:
- BestPractices
- HTML
"UseBaseWithParseInt":
severity: 2
tags:
- BestPractices
- JavaScript
"UseHttpsCallbackUrlConnectedApp":
severity: 3
tags:
- AppExchange
- Security
- XML
"VfCsrf":
severity: 2
tags:
- Recommended
- Security
- Visualforce
"VfHtmlStyleTagXss":
severity: 2
tags:
- Recommended
- Security
- Visualforce
"VfUnescapeEl":
severity: 2
tags:
- Recommended
- Security
- Visualforce
"WhileLoopsMustUseBraces":
severity: 3
tags:
- Recommended
- CodeStyle
- Apex
"WhileLoopsMustUseBraces-javascript":
severity: 3
tags:
- CodeStyle
- JavaScript
# ======================================================================
# SFGE ENGINE RULE OVERRIDES
# ======================================================================
sfge:
"ApexFlsViolation":
severity: 2
tags:
- DevPreview
- Security
- Apex
"ApexNullPointerException":
severity: 3
tags:
- DevPreview
- ErrorProne
- Apex
"AvoidDatabaseOperationInLoop":
severity: 2
tags:
- DevPreview
- Performance
- Apex
"AvoidMultipleMassSchemaLookups":
severity: 2
tags:
- DevPreview
- Performance
- Apex
"DatabaseOperationsMustUseWithSharing":
severity: 2
tags:
- DevPreview
- Security
- Apex
"MissingNullCheckOnSoqlVariable":
severity: 3
tags:
- DevPreview
- Performance
- Apex
"UnimplementedType":
severity: 4
tags:
- DevPreview
- Performance
- Apex
# Engine specific custom configuration settings of the format engines.{engine_name}.{property_name} = {value} where:
# {engine_name} is the name of the engine containing the setting that you want to override.
# {property_name} is the name of a property that you would like to override.
# Each engine may have its own set of properties available to help customize that particular engine's behavior.
engines:
# ======================================================================
# FLOW SCANNER ENGINE CONFIGURATION
# To learn more about this configuration, visit:
# https://developer.salesforce.com/docs/platform/salesforce-code-analyzer/guide/engine-flow.html#flow-scanner-configuration-reference
# ======================================================================
flow:
# Whether to turn off the 'flow' engine so that it is not included when running Code Analyzer commands.
disable_engine: false
# Indicates the specific Python command to use for the 'Flow Scanner' engine.
# May be provided as the name of a command that exists on the path, or an absolute file path location.
# If unspecified, or specified as null, then an attempt will be made to automatically discover a Python command from your environment.
python_command: null
# ======================================================================
# ESLINT ENGINE CONFIGURATION
# To learn more about this configuration, visit:
# https://developer.salesforce.com/docs/platform/salesforce-code-analyzer/guide/engine-eslint.html#eslint-configuration-reference
# ======================================================================
eslint:
# Whether to turn off the 'eslint' engine so that it is not included when running Code Analyzer commands.
disable_engine: false
# Your project's main ESLint configuration file. May be an absolute path or a path relative to the config_root.
# If null and auto_discover_eslint_config is true, then Code Analyzer will attempt to discover/apply it automatically.
# Currently only legacy ESLInt config files are supported.
# See https://eslint.org/docs/v8.x/use/configure/configuration-files to learn more.
eslint_config_file: null
# Your project's ".eslintignore" file. May be an absolute path or a path relative to the config_root.
# If null and auto_discover_eslint_config is true, then Code Analyzer will attempt to discover/apply it automatically.
# See https://eslint.org/docs/v8.x/use/configure/ignore#the-eslintignore-file to learn more.
eslint_ignore_file: null
# Whether to have Code Analyzer automatically discover/apply any ESLint configuration and ignore files from your workspace.
auto_discover_eslint_config: false
# Whether to turn off the default base configuration that supplies the standard ESLint rules for JavaScript files.
disable_javascript_base_config: false
# Whether to turn off the default base configuration that supplies the LWC rules for JavaScript files.
disable_lwc_base_config: false
# Whether to turn off the default base configuration that supplies the standard rules for TypeScript files.
disable_typescript_base_config: false
# Extensions of the files in your workspace that will be used to discover rules.
# To associate file extensions to the standard ESLint JavaScript rules, LWC rules, or custom JavaScript-based
# rules, add them under the 'javascript' language. To associate file extensions to the standard TypeScript
# rules or custom TypeScript-based rules, add them under the 'typescript' language. To allow for the
# discovery of custom rules that are associated with any other language, then add the associated file
# extensions under the 'other' language.
file_extensions:
javascript:
- .js
- .cjs
- .mjs
typescript:
- .ts
other: []
# ======================================================================
# RETIRE-JS ENGINE CONFIGURATION
# To learn more about this configuration, visit:
# https://developer.salesforce.com/docs/platform/salesforce-code-analyzer/guide/engine-retire-js.html#retirejs-configuration-reference
# ======================================================================
retire-js:
# Whether to turn off the 'retire-js' engine so that it is not included when running Code Analyzer commands.
disable_engine: false
# ======================================================================
# REGEX ENGINE CONFIGURATION
# To learn more about this configuration, visit:
# https://developer.salesforce.com/docs/platform/salesforce-code-analyzer/guide/engine-regex.html#regex-configuration-reference
# ======================================================================
regex:
# Whether to turn off the 'regex' engine so that it is not included when running Code Analyzer commands.
disable_engine: false
# Custom rules to be added to the 'regex' engine of the format custom_rules.{rule_name}.{rule_property_name} = {value} where:
# {rule_name} is the name you would like to give to your custom rule
# {rule_property_name} is the name of one of the rule properties. You may specify the following rule properties:
# 'regex' - The regular expression that triggers a violation when matched against the contents of a file.
# 'file_extensions' - The extensions of the files that you would like to test the regular expression against.
# 'description' - A description of the rule's purpose
# 'violation_message' - [Optional] The message emitted when a rule violation occurs.
# This message is intended to help the user understand the violation.
# Default: 'A match of the regular expression {regex} was found for rule {rule_name}: {description}'
# 'severity' - [Optional] The severity level to apply to this rule by default.
# Possible values: 1 or 'Critical', 2 or 'High', 3 or 'Moderate', 4 or 'Low', 5 or 'Info'
# Default: 3
# 'tags' - [Optional] The string array of tag values to apply to this rule by default.
# Default: ['Recommended']
# ---- [Example usage]: ---------------------
# engines:
# regex:
# custom_rules:
# "NoTodoComments":
# regex: /\/\/[ \t]*TODO/gi
# file_extensions: [".apex", ".cls", ".trigger"]
# description: "Prevents TODO comments from being in apex code."
# violation_message: "A comment with a TODO statement was found. Please remove TODO statements from your apex code."
# severity: "Info"
# tags: ["TechDebt"]
# -------------------------------------------
custom_rules:
# Object naming conventions
"ObjectNamingConvention":
regex: /<CustomObject>\s*<fullName>(?!([A-Z][a-zA-Z0-9]*__c))<\/fullName>/g
file_extensions: [".xml"]
description: "Object API names must follow naming conventions."
violation_message: "Custom object API names must be in PascalCase with __c suffix."
severity: "High"
tags: ["NamingConvention"]
# Field PascalCase validation
"FieldPascalCaseValidation":
regex: /<CustomField[^>]*>[\s\S]*?<fullName>(?!([A-Z][a-zA-Z0-9]*)(__c)?)<\/fullName>/g
file_extensions: [".xml"]
description: "Field API names must be in PascalCase."
violation_message: "Field API names must follow PascalCase convention."
severity: "High"
tags: ["NamingConvention"]
# Boolean field naming (must start with Is or IsCan)
"BooleanFieldNaming":
regex: /<CustomField[^>]*>[\s\S]*?<type>Checkbox<\/type>[\s\S]*?<fullName>(?!(Is|IsCan)[A-Za-z0-9]*(__c)?)<\/fullName>/g
file_extensions: [".xml"]
description: "Boolean fields must start with 'Is' or 'IsCan'."
violation_message: "Boolean field API names must start with 'Is' or 'IsCan'."
severity: "High"
tags: ["NamingConvention"]
# Lookup field naming (must end with Ref)
"LookupFieldNaming":
regex: /<CustomField[^>]*>[\s\S]*?<type>Lookup<\/type>[\s\S]*?<fullName>(?!.*Ref(__c)?)[A-Za-z0-9_]*<\/fullName>/g
file_extensions: [".xml"]
description: "Lookup fields must end with 'Ref'."
violation_message: "Lookup field API names must end with 'Ref__c'."
severity: "High"
tags: ["NamingConvention"]
# Master-Detail field naming (must end with Ref)
"MasterDetailFieldNaming":
regex: /<CustomField[^>]*>[\s\S]*?<type>MasterDetail<\/type>[\s\S]*?<fullName>(?!.*Ref(__c)?)[A-Za-z0-9_]*<\/fullName>/g
file_extensions: [".xml"]
description: "Master-Detail fields must end with 'Ref'."
violation_message: "Master-Detail field API names must end with 'Ref__c'."
severity: "High"
tags: ["NamingConvention"]
# Formula field naming (must end with Auto)
"FormulaFieldNaming":
regex: /<CustomField[^>]*>[\s\S]*?<type>Formula<\/type>[\s\S]*?<fullName>(?!.*Auto(__c)?)[A-Za-z0-9_]*<\/fullName>/g
file_extensions: [".xml"]
description: "Formula fields must end with 'Auto'."
violation_message: "Formula field API names must end with 'Auto__c'."
severity: "High"
tags: ["NamingConvention"]
# Rollup Summary field naming (must end with Auto)
"RollupSummaryFieldNaming":
regex: /<CustomField[^>]*>[\s\S]*?<type>Summary<\/type>[\s\S]*?<fullName>(?!.*Auto(__c)?)[A-Za-z0-9_]*<\/fullName>/g
file_extensions: [".xml"]
description: "Rollup Summary fields must end with 'Auto'."
violation_message: "Rollup Summary field API names must end with 'Auto__c'."
severity: "Moderate"
tags: ["NamingConvention"]
# Picklist field naming (must end with Pick)
"PicklistFieldNaming":
regex: /<CustomField[^>]*>[\s\S]*?<type>Picklist<\/type>[\s\S]*?<fullName>(?![A-Za-z0-9_]*Pick__c)[A-Za-z0-9_]+__c<\/fullName>/g
file_extensions: [".xml"]
description: "Picklist fields must end with 'Pick'."
violation_message: "Picklist field API names must end with 'Pick__c'."
severity: "High"
tags: ["NamingConvention"]
# Multipicklist field naming (must end with Pick)
"MultipicklistFieldNaming":
regex: /<CustomField[^>]*>[\s\S]*?<type>Picklist<\/type>[\s\S]*?<fullName>(?![A-Za-z0-9_]*Pick__c)[A-Za-z0-9_]+__c<\/fullName>/g
file_extensions: [".xml"]
description: "Multipicklist fields must end with 'Pick'."
violation_message: "Multipicklist field API names must end with 'Pick__c'."
severity: "High"
tags: ["NamingConvention"]
# Field filled by automation (must end with Trig)
"AutomationFieldNaming":
regex: /<CustomField[^>]*>[\s\S]*?<description>(?=.*\b(filled by apex|trigger|automation)\b)[\s\S]*?<\/description>[\s\S]*?<fullName>(?!.*Trig(__c)?)[A-Za-z0-9_]*<\/fullName>/gi
file_extensions: [".xml"]
description: "Fields filled by automation must end with 'Trig'."
violation_message: "Fields filled by automation must end with 'Trig__c'."
severity: "Moderate"
tags: ["NamingConvention"]
# Technical fields (must start with TECH_)
"TechnicalFieldNaming":
regex: /<CustomField[^>]*>[\s\S]*?<fullName>(?!TECH_)[A-Za-z0-9_]*<\/fullName>[\s\S]*?<description>(?=.*\b(technical|not displayed|shouldn't display)\b)[\s\S]*?<\/description>/gi
file_extensions: [".xml"]
description: "Technical fields must start with 'TECH_'."
violation_message: "Technical field API names must start with 'TECH_'."
severity: "Moderate"
tags: ["NamingConvention"]
# Enforce description for custom fields
"CustomFieldDescription":
regex: /<CustomField[^>]*>(?![\s\S]*?<description>[^<]+<\/description>)[\s\S]*?<fullName>(?!\w+__\w+__c)[^<]*__c<\/fullName>[\s\S]*?<\/CustomField>/g
file_extensions: [".xml"]
description: "Custom fields must have a non-empty description."
violation_message: "Custom field must have a non-empty description. Add a meaningful description to explain the field's purpose."
severity: "High"
tags: ["Documentation", "NamingConvention"]
# ======================================================================
# CPD ENGINE CONFIGURATION
# To learn more about this configuration, visit:
# https://developer.salesforce.com/docs/platform/salesforce-code-analyzer/guide/engine-cpd.html#cpd-configuration-reference
# ======================================================================
cpd:
# Whether to turn off the 'cpd' engine so that it is not included when running Code Analyzer commands.
disable_engine: true
# Indicates the specific 'java' command associated with the JRE or JDK to use for the 'cpd' engine.
# May be provided as the name of a command that exists on the path, or an absolute file path location.
# If unspecified, or specified as null, then an attempt will be made to automatically discover a 'java' command from your environment.
java_command: null # Last calculated by the config command as: "java"
# Specifies the list of file extensions to associate to each rule language.
# The rule(s) associated with a given language will run against all the files in your workspace containing one of
# the specified file extensions. Each file extension can only be associated to one language. If a specific language
# is not specified, then a set of default file extensions for that language will be used.
file_extensions:
apex:
- .cls
- .trigger
html:
- .html
- .htm
- .xhtml
- .xht
- .shtml
- .cmp
javascript:
- .js
- .cjs
- .mjs
typescript:
- .ts
visualforce:
- .page
- .component
xml:
- .xml
# Specifies the minimum tokens threshold for each rule language.
# The minimum tokens threshold is the number of tokens required to be in a duplicate block of code in order to be
# reported as a violation. The concept of a token may be defined differently per language, but in general it is a
# distinct basic element of source code. For example, this could be language specific keywords, identifiers,
# operators, literals, and more. See https://docs.pmd-code.org/latest/pmd_userdocs_cpd.html to learn more.
# If a value for a language is unspecified, then the default value of 100 will be used for that language.
minimum_tokens:
apex: 100
html: 100
javascript: 100
typescript: 100
visualforce: 100
xml: 100
# Indicates whether to ignore multiple copies of files of the same name and length.
skip_duplicate_files: false
# ======================================================================
# PMD ENGINE CONFIGURATION
# To learn more about this configuration, visit:
# https://developer.salesforce.com/docs/platform/salesforce-code-analyzer/guide/engine-pmd.html#pmd-configuration-reference
# ======================================================================
pmd:
# Whether to turn off the 'pmd' engine so that it is not included when running Code Analyzer commands.
disable_engine: false
# Indicates the specific 'java' command associated with the JRE or JDK to use for the 'pmd' engine.
# May be provided as the name of a command that exists on the path, or an absolute file path location.
# If unspecified, or specified as null, then an attempt will be made to automatically discover a 'java' command from your environment.
java_command: null # Last calculated by the config command as: "java"
# Specifies the list of file extensions to associate to each rule language.
# The rule(s) associated with a given language will run against all the files in your workspace containing one of
# the specified file extensions. Each file extension can only be associated to one language. If a specific language
# is not specified, then a set of default file extensions for that language will be used.
file_extensions:
apex:
- .cls
- .trigger
html:
- .html
- .htm
- .xhtml
- .xht
- .shtml
- .cmp
javascript:
- .js
- .cjs
- .mjs
typescript:
- .ts
visualforce:
- .page
- .component
xml:
- .xml
# List of jar files and/or folders to add the Java classpath when running PMD.
# Each entry may be given as an absolute path or a relative path to 'config_root'.
# This field is primarily used to supply custom Java based rule definitions to PMD.
# See https://pmd.github.io/pmd/pmd_userdocs_extending_writing_java_rules.html
java_classpath_entries: []
# List of xml ruleset files containing custom PMD rules to be made available for rule selection.
# Each ruleset must be an xml file that is either:
# - on disk (provided as an absolute path or a relative path to 'config_root')
# - or a relative resource found on the Java classpath.
# Not all custom rules can be fully defined within an xml ruleset file. For example, Java based rules may be defined in jar files.
# In these cases, you will need to also add your additional files to the Java classpath using the 'java_classpath_entries' field.
# See https://pmd.github.io/pmd/pmd_userdocs_making_rulesets.html to learn more about PMD rulesets.
custom_rulesets: []
# ======================================================================
# SFGE ENGINE CONFIGURATION
# This engine is in Developer Preview and is subject to change.
# To learn more about this configuration, visit:
# [PLACEHOLDER LINK]
# ======================================================================
sfge:
# Whether to turn off the 'sfge' engine so that it is not included when running Code Analyzer commands.
disable_engine: false
# Whether to prevent 'sfge' from throwing LimitReached violations for complex paths.
# By default, Salesforce Graph Engine attempts to detect complex paths that might cause OutOfMemory errors,
# and throws LimitReached violations for these paths to continue evaluating other paths safely. The allowed
# complexity is dynamically calculated based on the max Java heap size available, but in some cases you may
# desire to disable this check in addition to increasing java_max_heap_size.
disable_limit_reached_violations: false
# Indicates the specific 'java' command associated with the JRE or JDK to use for the 'sfge' engine.
# May be provided as the name of a command that exists on the path, or an absolute file path location.
# If unspecified, or specified as null, then an attempt will be made to automatically discover a 'java' command from your environment.
java_command: null # Last calculated by the config command as: "java"
# Specifies the maximum size (in bytes) of the Java heap. The specified value is appended to the '-Xmx' Java
# command option. The value must be a multiple of 1024, and greater than 2MB. Append the letters 'k', 'K', 'kb',
# or 'KB' to indicate kilobytes, 'm', 'M', 'mb', or 'MB' to indicate megabytes, and 'g', 'G', 'gb', or 'GB' to
# indicate gigabytes. If unspecified, or specified as null, then the JVM will dynamically choose a default value
# at runtime based on system configuration.
java_max_heap_size: null
# Specifies the number of Java threads available for parallel execution. Increasing the thread count allows for
# Salesforce Graph Engine to evaluate more paths at the same time.
java_thread_count: 4
# Specifies the maximum time (in milliseconds) a specific Java thread may execute before Salesforce Graph Engine
# issues a Timeout violation.
java_thread_timeout: 900000
# ======================================================================
# END OF CODE ANALYZER CONFIGURATION
# ======================================================================
4.6 JIRA Integration
Project Setup
-
Create JIRA project with these issue types:
- Epic
- Story
- Bug
- Task
-
Configure workflow states:
Backlog → In Progress → In Review → Ready for Deploy → Done- Link to Bitbucket:
- Enable Development integration in JIRA project settings
- Connect to your Bitbucket repository
Smart Commits Configuration
Enable automatic JIRA transitions based on commit messages:
# Commit message format
git commit -m "PROJ-123: Add validation rule to Account object

- Added required field validation
- Updated test classes
- Ready for UAT testing"
4.7 Notification Setup
Microsoft Teams Integration
- Create Teams webhook in your project channel
- Add webhook URL to Bitbucket environment variables
- Configure notification templates in
config/directory:
{
    "type":"message",
    "attachments":[
       {
          "contentType":"application/vnd.microsoft.card.adaptive",
          "contentUrl":null,
          "content":{
            "$schema":"http://adaptivecards.io/schemas/adaptive-card.json",
            "type":"AdaptiveCard",
            "version": "1.4",
            "body": [
                {
                    "type": "Container",
                    "items": [
                        {
                            "type": "TextBlock",
                            "text": "$TITLE",
                            "weight": "Bolder",
                            "size": "Medium",
                            "color": "Good"
                        },
                        {
                            "type": "ColumnSet",
                            "columns": [
                                {
                                    "type": "Column",
                                    "width": "auto",
                                    "items": [
                                        {
                                            "type": "Image",
                                            "url": "https://cdn-icons-png.flaticon.com/512/1907/1907742.png",
                                            "altText": "Pipeline Logo",
                                            "size": "Small"
                                        }
                                    ]
                                },
                                {
                                    "type": "Column",
                                    "width": "stretch",
                                    "items": [
                                        {
                                            "type": "TextBlock",
                                            "text": "Scratch Org Creation",
                                            "weight": "Bolder",
                                            "wrap": true
                                        },
                                        {
                                            "type": "TextBlock",
                                            "spacing": "None",
                                            "text": "$STATUS on $BITBUCKET_BRANCH",
                                            "isSubtle": true,
                                            "wrap": true,
                                            "color": "Good"
                                        }
                                    ]
                                }
                            ]
                        }
                    ]
                },
                {
                    "type": "Container",
                    "items": [
                        {
                            "type": "TextBlock",
                            "text": "The Login URL for the login command is ",
                            "wrap": true
                        },
                        {
                            "type": "TextBlock",
                            "text": "$SF_SCRATCH_AUTH",
                            "wrap": true,
                            "spacing": "Small",
                            "fontType": "Monospace",
                            "isSubtle": true,
                            "color": "Dark",
                            "weight": "Bolder"
                        },
                        {
                            "type": "TextBlock",
                            "text": "Please login using the command in  your terminal",
                            "wrap": true
                        },
                        {
                            "type": "TextBlock",
                            "text": "echo URL | sf org login sfdx-url --alias ALIAS --sfdx-url-stdin ",
                            "wrap": true,
                            "spacing": "Small",
                            "spacing": "Small",
                            "fontType": "Monospace",
                            "isSubtle": true,
                            "color": "Dark",
                            "weight": "Bolder"
                        },
                        {
                            "type": "TextBlock",
                            "text": "where URL is the URL above and ALIAS is your choice of alias to log in.",
                            "wrap": true
                        },
                        {
                            "type": "TextBlock",
                            "text": "If you prefer to use the VSCode, please select",
                            "wrap": true,
                            "weight": "Bolder"
                        },
                        {
                            "type": "TextBlock",
                            "text": "'Authorize an Org using SessionId'",
                            "wrap": true
                        },
                        {
                            "type": "TextBlock",
                            "text": "and paste the following token.",
                            "wrap": true
                        },
                        {
                            "type": "TextBlock",
                            "text": "$SF_SCRATCH_TOKEN",
                            "wrap": true,
                            "spacing": "Small",
                            "spacing": "Small",
                            "fontType": "Monospace",
                            "isSubtle": true,
                            "color": "Dark",
                            "weight": "Bolder"
                        },
                        {
                            "type": "FactSet",
                            "facts": [
                                {
                                    "title": "Status:",
                                    "value": "Success"
                                }
                            ]
                        }
                    ]
                }
            ]
        }
    }
 ]
}
Chapter 4.5 - Using an Existing Project
Repository
- Go to Bitbucket
- Go the repository for the project.
- At the top right of "Source", click Clone, then "Clone in VS Code"

- Allow VSCode to open the link and install the extension if you are requested to do so. Also trust the publisher "Atlassian".
- If this is the first time, click on "Login to JIRA", follow the steps (including "back to vs code"), then also login to Bitbucket using the same screen.
- If during the Clone, Git requests a login, you might need an App Password. You can create one by going to the cog on the top right, going to Personal Bitbucket Settings, and App passwords.
- VScode will ask what to do - select "clone a new copy", and store it somewhere on your computer.

- Log in to the Org that you will be working against. Presumably a scratch org, but if you're still using persistent Orgs, this means login to Production, and Dev orgs as needed, using
- Ensure your workspace has Source Source Tracking, Atlassian, and Salesforce icons.
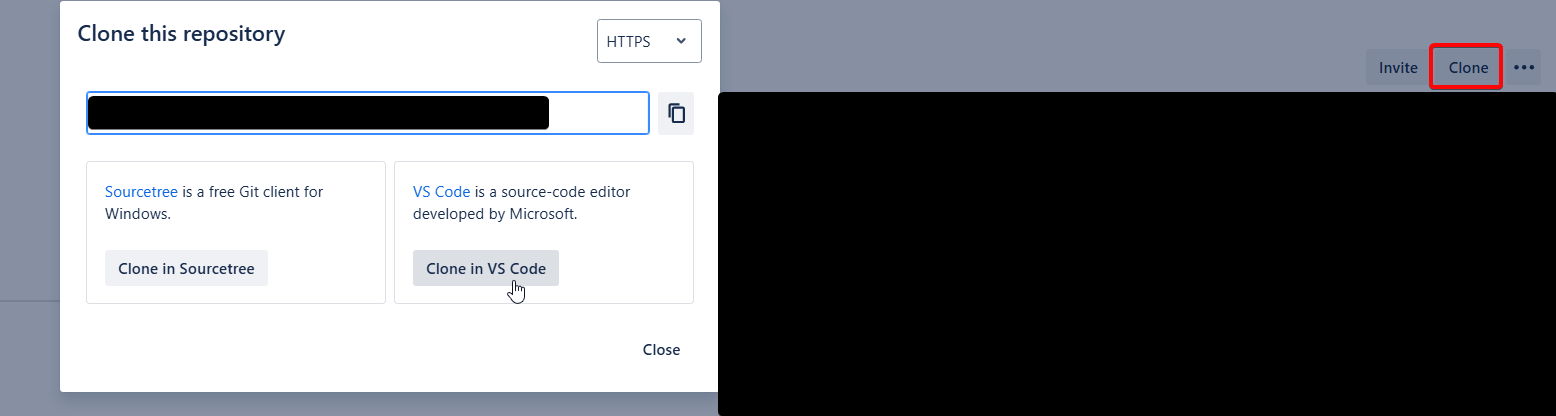
Salesforce
- Go to your Production, then navigate to Setup > Dev Hub. ensure
Enable Dev HubandEnable Source Tracking in Developer and Developer Pro Sandboxesare both checked.
These settings allow both the CLI and Change Sets to function with Source Tracking.
This fully replaces the usual "compare the source and the target organizations
VSCode
- Open VSCode and open your Repository Folder using VSCode.
- If necessary, run
sf org login --alias MyOrgwith MyOrg being the org type (examples:Client-Prod,Client-Dev,Client-ScratchFeatureName) - Start working in Salesforce, then go the Terminal and run
sf project retrieve start --target-org MyOrg --ignore-conflicts --wait 20where MyOrg is the organization you have logged in to which contains what you want. This assumes Source tracking is on.
This works best if you are the only one working in an Org. If you are not, you might want to start using Scratch orgs. Otherwise, you will see all the changes done by everyone.
- Go the Terminal and run
sf project deploy start --target-org MyOrg --ignore-conflicts --wait 20where MyOrg is the organization you have logged in to which must receive what you got. This assumes Source tracking is on. If Source Tracking is not on, or you want to do a full send, you can runsf project deploy start --target-org MyOrg --source-dir force-app --ignore-conflicts --wait 20 - Go to Source tab in VSCode, then add a commit message, Stage the changes required, and Commit.
- Push your changes (the cloud with an upwards arrow - name may change based on context)


Chapter 5: Daily Development Workflow
This chapter outlines the day-to-day development process that consultants follow when working with Salesforce deployments in a CI/CD environment. The workflow is designed to enable frequent, safe deployments while maintaining team collaboration and code quality.
The Core Development Cycle
The daily development workflow follows a simple but powerful pattern that ensures all changes are tracked, validated, and deployable:
- Pull from remote using Git
- Do your changes in your Salesforce org
- Retrieve your changes using the CLI
- Commit using Git with a ticket number for JIRA tracking
- Push to Bitbucket using Git
Things that happen automatically without you handling them:
- Differentials
- Syncs with other people working on the project
- Deployments to Salesforce on sprint end
This workflow transforms every local commit into a "mini-deployment" - a validated, deployable unit that can be applied to any Salesforce org later.
Understanding "When do I Deploy?"
Frequent Deployment, But Not Directly to Salesforce Orgs
The key principle is that you deploy frequently, but not directly to Salesforce orgs. Instead, you're constantly synchronizing with your team through the repository.
Metadata Retrieval and Local Development
You use the Salesforce CLI or Metadata API to retrieve metadata (XML files) from Salesforce orgs to your local file system. This creates a local copy of customizations like custom objects, page layouts, and configurations for development work.
Local Git Commit: The "Mini-Deployment"
A local commit saves the current state of Salesforce metadata on your computer. Think of it as a "mini-deployment" - you're packaging validated changes into a deployable unit. This commit acts as a snapshot that can be deployed to any Salesforce org later. It's stored locally as a "warehouse of things to deploy" until pushed to the remote repository.
Push to Remote Repository (Bitbucket)
Pushing syncs your local commits to the remote repository (Bitbucket). This action accomplishes two critical functions:
- Uploads your changes to the shared repository
- Downloads all changes made by other team members
Managing Conflicts
Prevention Through Frequent Syncing
Conflicts often happen if you're not syncing to remote often enough. Frequent pulling and pushing is essential to avoid merge conflicts. Merge conflicts occur when multiple developers modify the same Salesforce components in different environments 2.
Best Practice: Pull before starting work, push frequently during development. If you pull and push frequently, Salesforce should handle the conflicts itself.
Conflict Resolution
When conflicts arise, a Technical Architect must resolve them. Conflicts happen when the same metadata components are modified by different developers. Resolution requires understanding both sets of changes and determining the correct final state 2.
Daily Workflow Steps
1. Start of Day

Setup
# Navigate to your project directory
cd path/to/your-salesforce-project

# Pull latest changes from the team
git pull origin main

# Login to your development org (usually a scratch org)
sf org login web --alias my-scratch-org
2. Sync Team Changes to Your Org
# Deploy teammates' latest changes to your scratch org
sf project deploy start --target-org my-scratch-org --source-dir force-app --wait 20
3. Development Work
Work directly in your Salesforce org using the standard Salesforce interface:
- Create/modify custom objects, fields, validation rules
- Build flows, process builders, or other automation
- Develop Apex classes, triggers, and Lightning components
- Configure page layouts, record types, and other metadata
4. Retrieve Your Changes
# Retrieve metadata changes from your org to local files
sf project retrieve start --target-org my-scratch-org --ignore-conflicts --wait 20

# Alternative: Retrieve specific metadata types
sf project retrieve start --metadata ApexClass,CustomObject --target-org my-scratch-org
5. Review and Commit Changes
# Check what was retrieved
git status
git diff

# Stage specific files (selective commit)
git add force-app/main/default/classes/MyClass.cls
git add force-app/main/default/objects/MyObject__c/

# Commit with ticket number for JIRA integration
git commit -m "TICKET-123: Add validation rule to Account object

- Added required field validation for Account Name
- Updated related test classes
- Ready for UAT testing"
6. Push to Repository
# Push changes to remote repository
git push origin feature/my-ticket-branch
Automated Pipeline Integration
Once you push your changes, the automated pipeline takes over :
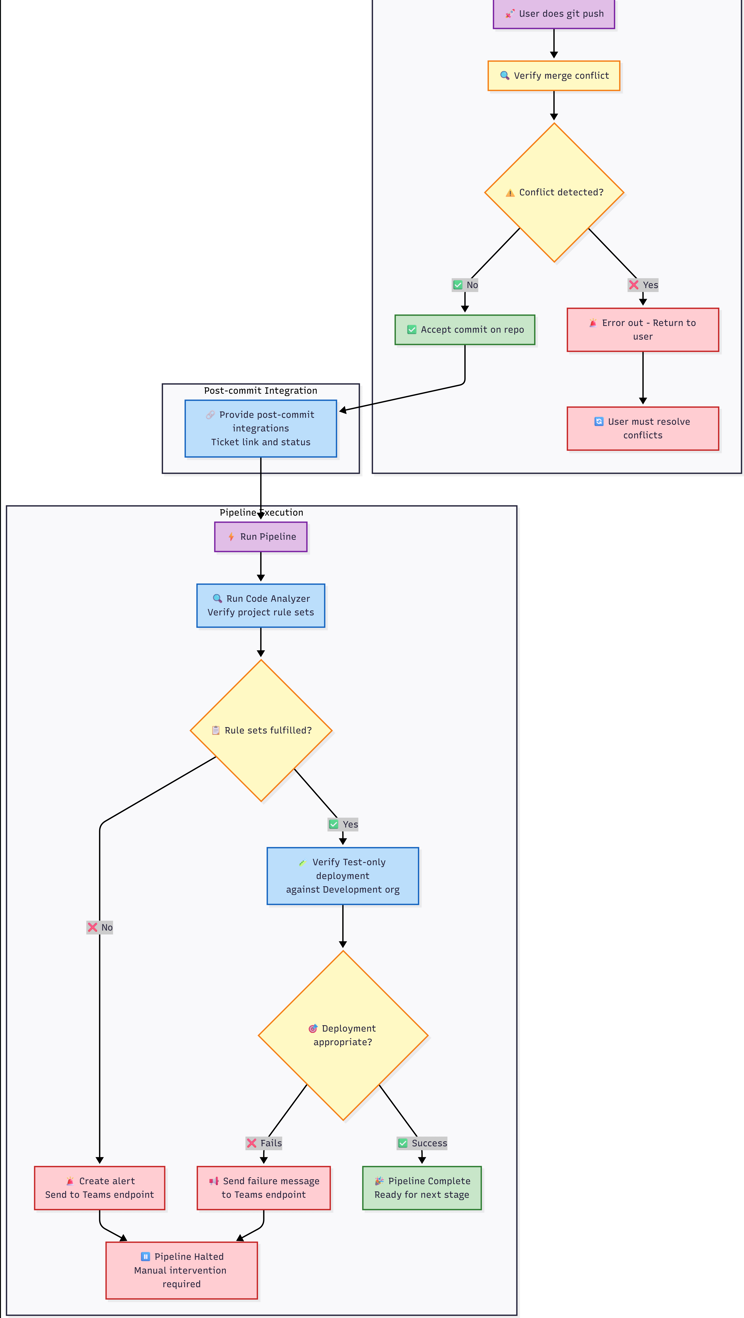
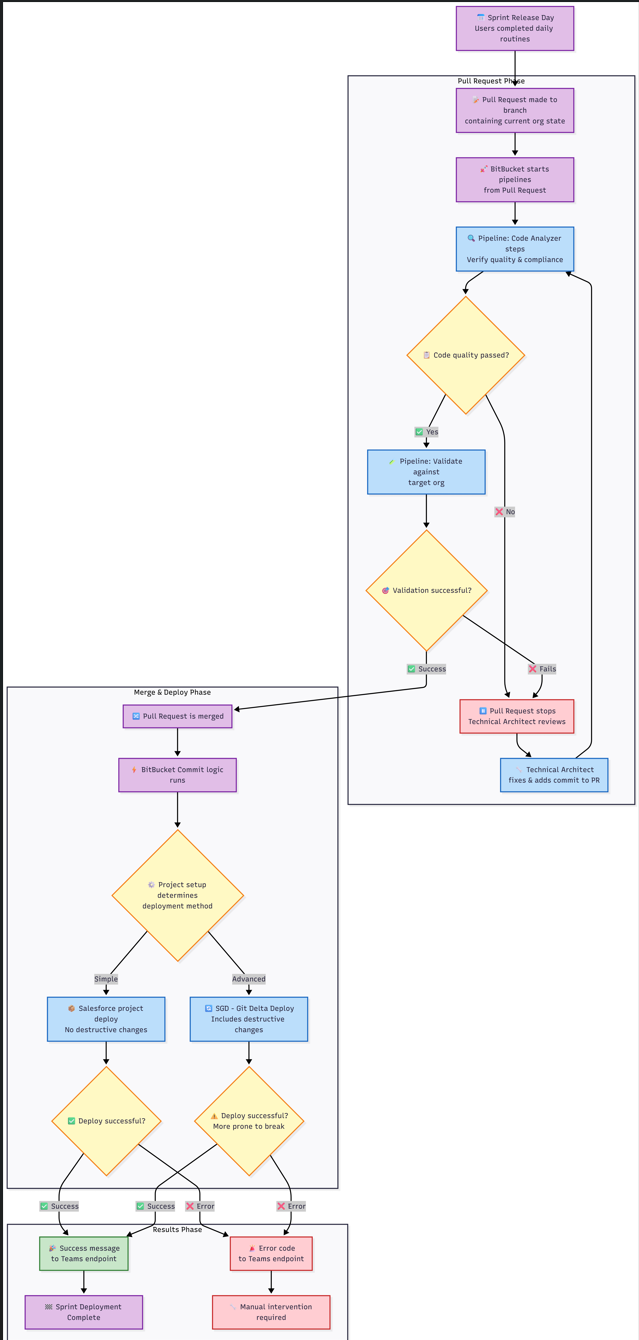
Code Quality Checks
The pipeline automatically runs code quality checks based on what you've changed:
- Apex Code Analysis: PMD, SFGE, and CPD checks for Apex classes and triggers
- LWC Analysis: ESLint and Retire-js checks for Lightning Web Components
- Flow Analysis: Flow Scanner checks for Salesforce Flows
- Security Scans: Comprehensive security and best practice validation
Validation Deployments
For pull requests, the pipeline runs validation deployments:
- Validates metadata can be deployed without errors
- Runs appropriate test levels based on target environment
- Checks for conflicts with existing metadata
Environment-Specific Actions
Based on your branch and target, different actions occur automatically:
- Feature branches → Dev: Validation against Dev environment
- Release branches → UAT: Full deployment to UAT
- Hotfix branches → Production: Comprehensive validation and testing
- Main branch: Continuous validation without deployment
Working with Scratch Orgs
Scratch Org Lifecycle
Scratch orgs are temporary development environments that typically last 7-30 days. The pipeline provides automated scratch org management:
- Creation: Automated scratch org creation with project-specific configuration
- Setup: Automatic package installation, permission set assignment, and data loading
- Snapshots: Template creation for faster future scratch org provisioning
Scratch Org Best Practices
- Use snapshots for faster org creation when available
- Load demo data from UAT for realistic testing scenarios
- Assign permission sets automatically through configuration files
- Refresh regularly to avoid expiration and maintain clean state
Integration with Project Management
JIRA Integration
Every commit should reference a JIRA ticket number in the commit message. This enables:
- Automatic ticket status updates
- Traceability from requirements to implementation
- Release notes generation
- Change impact analysis
Teams Notifications
The pipeline sends automatic notifications to Microsoft Teams channels :
- Code quality check results
- Deployment success/failure notifications
- Scratch org creation confirmations
- Validation results with artifact links
Troubleshooting Common Issues
Merge Conflicts
If you encounter merge conflicts:
- Pull the latest changes:
git pull origin main - Resolve conflicts in your IDE
- Test the resolution in your scratch org
- Commit and push the resolution
- If unable to resolve, escalate to Technical Architect
Deployment Failures
When deployments fail:
- Check the pipeline logs in Bitbucket
- Review code quality reports in the artifacts
- Fix issues locally and re-commit
- Use validation deployments to test fixes
Org Sync Issues
If your org gets out of sync with the repository:
- Use
sf project retrieve startto get latest org state - Review differences with
git diff - Commit necessary changes or revert unwanted ones
- The pipeline includes sync checks to detect this automatically
Chapter 6 - Creating a New Project
Setting up the Project
SF Cli Project
- Open VSCode and navigate to the folder where you want to create the Project - presumably
somefolder/sfdx_projectsor equivalent - Use CTRL+SHIFT+P to open the VSCode Command Panel and type SFDX, then select
SFDX:Create Project
- Select
emptythen type the name of your project and type Enter. - This will create a new SF Project. VS Code will ask if you want to open the folder - say yes.
- You should now have the VScode Project open.
- Select the Source tracking tab of VS Code and click "Initialize Repository"

- Go to Bitbucket and create a repository.
 Make it "empty" and refuse to add a GitIgnore.
 - Copy the URL given by Bitbucket in the format
https://MYNAME@bitbucket.org/MYWORSPACE/MYREPO.gitwhich should be displayed in the screen. - Select the three dots at the top right of the leftmost panel, then click "Add Remote"

- Paste the URL, select "Add Remote from URL". When asked for the remote name, type
originthen press enter. - At the bottom right, click yes on "Run Fetch periodically".

- run
git push --set-upstream origin mainin the VSCode Terminal to sync your local and remote branches.
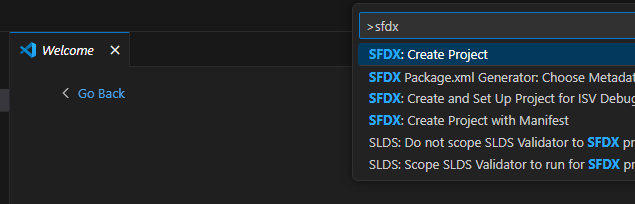
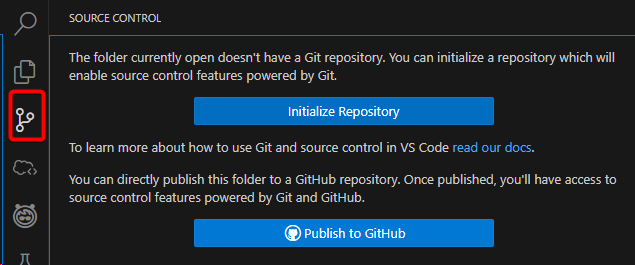
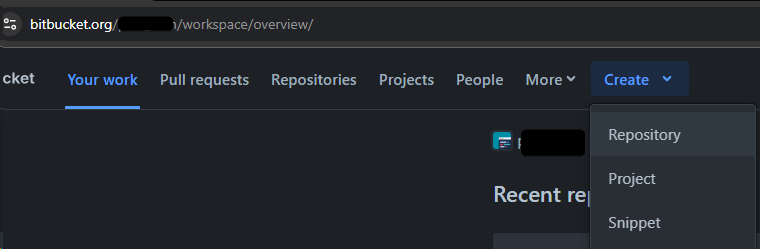
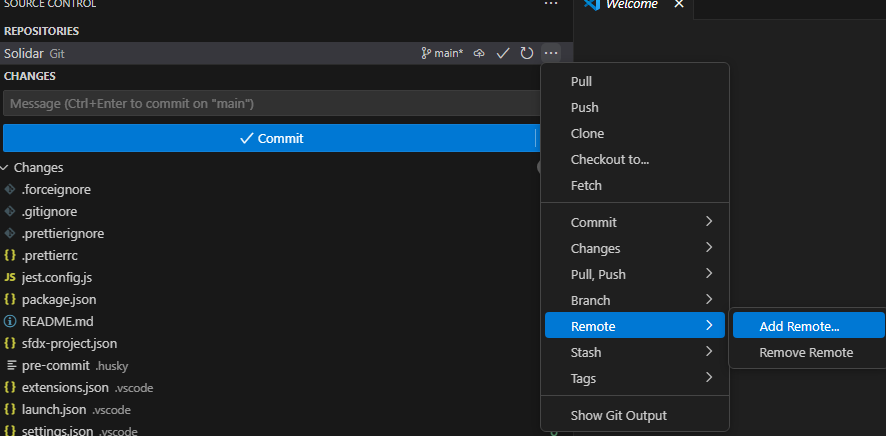

Fetch your Salesforce Metadata
- Login to your Salesforce org. This can be done using CTRL+SHIFT+P
Authorize an Org, or runningsf org login web --alias MyOrgin the terminal where MyOrg is the name you want to give to the org. - Run
sf project retrieve start --target-org MyOrg --ignore-conflicts --wait 20 - Commit the state of the project and push
Continue working
Useful Command reference
Base
sf org login web --alias MyOrg
Login
git add . && git commit -m "My Commit Message" && git push
quick and dirty commit everything from local
git remote update origin --prune
get all Branches from remote and remove the deleted ones from your local
Deployments
sf project retrieve start --target-org MyOrg --ignore-conflicts --wait 20
Retrieve changes from Org. Assumes Source Tracking is on.
sf project retrieve start --target-org MyOrg --ignore-conflicts --wait 20 -x manifest/package.xml
Get the metadata listed in the package from the Org
sf project retrieve start --target-org MyOrg --ignore-conflicts --wait 20 -m InstalledPackage:FSL
Retrieve specific metadata from the org. Based on the Metadata Types from SF https://developer.salesforce.com/docs/atlas.en-us.api_meta.meta/api_meta/meta_types_list.htm
sf project deploy start --target-org MyOrg --ignore-conflicts --wait 20
Deploy the source. Does destructive changes and assumes source tracking
sf project deploy start --target-org MyOrg --source-dir force-app --ignore-conflicts --wait 20
Deploy the metadata contained in the force-app folder. Does not do destructive changes.
sf project deploy start --target-org MyOrg --manifest package/package.xml --pre-destructive-changes destructiveChanges/destructiveChanges.xml --ignore-conflicts --ignore-warnings --wait 20 --dry-run
Same as previous but validates only
Using SGD
sf sgd:source:delta --to HEAD --from HEAD~1 --output-dir . -i .sgdignore
sgd - do delta from last commit to current commit, generate the package.xml and destructivechanges in the current directory, and ignore directories listed in .sgdignore
sf project deploy start --target-org MyOrg --manifest package/package.xml --pre-destructive-changes destructiveChanges/destructiveChanges.xml --ignore-conflicts --ignore-warnings --wait 20 --dry-run
sgd - do a Salesforce Project deploy based on the generated manifest from SGD, and do destructive changes before running anything else based on the destructivechanges.xml
Usual Command Flows - Daily
This flow represents a typical consultant's daily routine for working with Salesforce scratch orgs and version control.
1. Start of Day - Setup
# Open your terminal/CLI
# Navigate to your project folder
cd path/to/your/salesforce-project

# Get latest changes from repository
git pull origin main
Check for conflicts: If conflicts occur, resolve them before proceeding or escalate to Technical Architect.
2. Salesforce CLI Authentication
# Login to your scratch org
sf org login web --alias my-scratch-org

# Or use existing auth
sf org open --alias my-scratch-org
3. Deploy Latest Team Changes
# Deploy teammates' latest changes to your scratch org
sf project deploy start --target-org my-scratch-org
Review deployed metadata output
Check for any overlaps with your planned work
4. Handle Potential Overlaps
If deployed metadata overlaps with your work:
# Check what changed in git
git log --oneline -n 10
git diff HEAD~1 path/to/file

# If needed, revert specific files to previous version
git checkout HEAD~1 path/to/file
6. Daily Development Work
Ideally retrieve once per ticket change (see below)
7. End of Day - Retrieve Changes
# Retrieve metadata changes from your scratch org
sf project retrieve start --target-org my-scratch-org

# Alternative: Retrieve specific metadata types
sf project retrieve start --metadata ApexClass,CustomObject --target-org my-scratch-org
8. Verify and Commit Changes
# Check retrieved changes
git status
git diff

# Stage specific files (selective commit)
git add force-app/main/default/classes/MyClass.cls
git add force-app/main/default/objects/MyObject__c/

# Commit with ticket number
git commit -m "TICKET-123: Add new validation rule to Account object"

# Push to remote repository
git push origin feature/my-ticket-branch
9. Handle Merge Conflicts
If merge conflicts occur:
# Attempt to resolve locally
git pull origin main
# Resolve conflicts in your IDE
git add .
git commit -m "TICKET-123: Resolve merge conflicts"
git push
If unable to resolve: Escalate to Technical Architect or CoE Hub.
Usual Command Flows - Scratch Org Creation
Scratch orgs typically last 7-30 days. Here's the flow for creating and managing scratch orgs.
1. Create New Scratch Org
# Navigate to project directory
cd path/to/your/salesforce-project

# Create scratch org using project config
sf org create scratch --definition-file config/project-scratch-def.json --alias my-scratch-org --duration-days 30 --set-default
2. Initial Org Setup
# Open the scratch org
sf org open --target-org my-scratch-org

# Deploy base metadata from main branch
git checkout main
git pull origin main
sf project deploy start --target-org my-scratch-org --wait 20
3. Configure Org Settings
# Assign permission sets if needed
sf org assign permset --name MyPermissionSet --target-org my-scratch-org

# Run post-setup scripts if configured
sf apex run --file scripts/setup.apex --target-org my-scratch-org
4. Create Feature Branch
# Create new branch for your work
git checkout -b feature/my-ticket-branch

# Push branch to remote
git push -u origin feature/my-ticket-branch
5. Daily Work Routine
Follow the "Daily Normal Command Flow" above for regular development work.
6. Scratch Org Renewal (Before Expiration)
# Check org expiration date
sf org display --target-org my-scratch-org

# If org is expiring, retrieve all changes first
sf project retrieve start --target-org my-scratch-org
git add .
git commit -m "TICKET-123: Final changes before org renewal"
git push

# Delete old scratch org
sf org delete scratch --target-org my-scratch-org --no-prompt

# Create new scratch org and redeploy
sf org create scratch --definition-file config/project-scratch-def.json --alias my-scratch-org-v2 --duration-days 30
sf project deploy start --target-org my-scratch-org
Usual Command Flows - Sprint Release and Change Flow
This flow describes the process when code is promoted through environments during sprint releases.
1. Pre-Release - Complete Feature Work
# Ensure all changes are committed
git status
sf project retrieve start --target-org my-scratch-org
git add .
git commit -m "TICKET-123: Final implementation"
git push origin feature/my-ticket-branch
2. Create Pull Request
Via BitBucket UI:
3. Pipeline Validation (Automated)
BitBucket automatically triggers:
# This happens automatically in the pipeline
# Code Analyzer steps
pmd-analyzer: Check Apex code quality
eslint: Check JavaScript/LWC quality
sf scanner run: Security and quality scans

# Validation deployment
sf project deploy validate --target-org target-sandbox --test-level RunLocalTests
If validation fails: Technical Architect reviews and adds fixes to PR branch.
4. Pull Request Merge
Once validation passes and PR is approved:Bash
# Via BitBucket UI - Click "Merge" button5. Post-Merge Deployment (Automated)
Option A: Simple Deployment (No Destructive Changes)
# Automated pipeline command
sf project deploy start --target-org target-sandbox --test-level RunLocalTests --wait 30
Option B: SGD - Salesforce Git Delta Deploy (With Destructive Changes)
# Automated pipeline using SGD tool
# Generates delta packages between commits

# Install SGD (if not already in pipeline)
sf plugins install sfdx-git-delta

# Generate delta package
sf sgd source delta --to "HEAD" --from "HEAD~1" --output-dir "sgd"

# Deploy with destructive changes
sf project deploy start -x sdg/package/package.xml --post-destructive-changes sdg/destructiveChanges/destructiveChanges.xml
9. Rollback (If Needed)
# Quick rollback using git
git revert <commit-hash>
git push origin main

# Or restore from previous deployment
sf project deploy start --manifest path/to/previous-package.xml --target-org target-sandbox