Best Practices
Naming and architectural conventions that are considered best practice
- Field Conventions
- Workflow Conventions
- Workflow Triggers
- Workflow Field Updates
- Workflow Email Alerts
- Workflow Tasks
- Workflow Outbound Messages
- Validation Rule Conventions
- Bypasses
- Data Migration Best Practices
- 1 - Data Migrations Checklist
- 2 - Data Migration Step-by-step - Before Loading
- 3 - Data Migration Step-by-step - Loading
- Getting the right (number of) Admins
- Big Objects
- Mass Update Access to Objects And Fields For Profiles And Permission Sets
- Object Permissions - Basic Functionality
- Field Permissions - Basic Functionality
- Query CRED And FLS Permissions - Examples
- Updating, Deleting, and Adding Permissions
- Important Notes
- Flow Conventions
- Flow General Notes
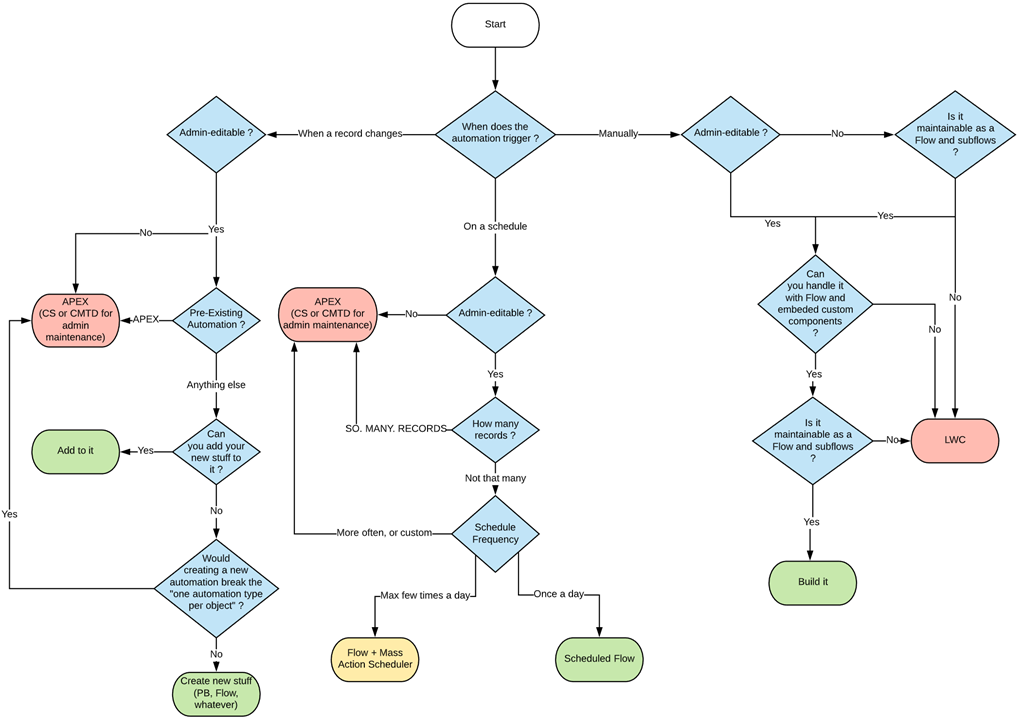
- What Automation do I create Flowchart
- Flow Meta Conventions
- Flow Structural Conventions - Common Core
- Flow Structural Conventions - Record-Triggered
- Flow Structural Conventions - Scheduled
- Flow Naming Conventions
- Deployments
- Introduction - Why are we even doing it like this
- Chapter 1: The Why, When and By Whom
- Chapter 2: Software List
- Chapter 3: Basic Machine Setup
- Chapter 4 - Base Project Setup
- Chapter 4.5 - Using an Existing Project
- Chapter 5: Daily Development Workflow
- Chapter 6 - Creating a New Project
- Useful Command reference
- Usual Command Flows - Daily
- Usual Command Flows - Scratch Org Creation
- Usual Command Flows - Sprint Release and Change Flow
Field Conventions
General conventions about field creation, grouping, naming, etc.
General Conventions
All Naming Conventions Are RFC 2119 and RFC 6919 compliant.
- All field API names MUST be written in English, even when the label is in another language.
- All field API names MUST be written in PascalCase.
- Fields SHOULD NOT contain an underscore in the fields name, except where explicitly defined otherwise in these conventions.
- Fields generally MUST (but you probably won't) contain a description.
- In all cases where the entire purpose of the field is not evident by reading the name, the field MUST contain a description.
- If the purpose of the field is ambiguous, the field MUST contain a help text. In cases where the purpose is clear, the help text COULD also be defined for clarity's sake.
- Field API names should respect the following prefixes and suffixes.2 Prefixes and Suffixes SHALL NOT be prepended by an underscore.
| Field Type | Prefix | Suffix |
|---|---|---|
| MasterDetail | Ref |
|
| Lookup | Ref |
|
| Formula | Auto |
|
| Rollup Summary | Auto |
|
| Filled by automation (APEX)1 | Trig |
|
| Picklist or Multipicklist | Pick |
|
| Boolean | Is or IsCan3 |
1 Workflows, Process Builders and Flows are not included in this logic because these automations either allow field name modifications with no error, or can be modified by an administrator. If fields are created for the sole purpose of being filled by automation (e.g. fields that will be used in roll-up summaries), a consultant WOULD PROBABLY use the Trig suffix anyway, to indicate that users cannot set the data themselves.
2 While norms for other field types were considered, e.g. to make sure number, currency and percentage fields were easily recognizable, they were discarded as being too restrictive for an admin. Fixing type mismatches in this case is easily solved by casting the value to the correct type using either TEXT() or VALUE() functions.
3IsCan replaces "Can", e.g. CanActivateContract becomes IsCanActivateContract. This is to enable searching for all checkboxes on a page with a single query.
Grouping fields
- If the organization is home to multiple services, the field
APIname SHOULD be prepended with the name of the service that required the field, followed by an underscore.- This MUST NOT be the case if there is only one service using the object.
- If several services use the field, or the field was originally required by a service before being used by others: the field
APIname MUST (but you probably won't) be prepended with the name of the service that is responsible for the user story that lead to the field creation, followed by an underscore. The Description of the field MUST indicate which services use the field.1 - In the case the field is use differently by different services, the Description of the field MUST contain a summary description of each use.
- If a field is created to host a value for technical reasons, but is not or should not be displayed to the users, the
APIname MUST be prefixed withTECHand an underscore. - If more than 50 fields are created on an object, a consultant SHOULD consider using prefixes to group fields in the same manner as technical fields, in the format of
$Groupnamefollowed by an underscore.
Examples
| Object | Field type | Comment | Field Label | Field API Name | Field Description |
|---|---|---|---|---|---|
| Case | Lookup | Looks up to Account | Service Provider | ServiceProviderRef__c | Links the case to the Service Provider who will conduct the task at the client's. |
| Account | Formula | Made for the Accounting department only | Solvability | Accounting_SolvabilityAuto__c | Calculates solvability based on revenue and expenses. Sensitive data, should not be shared. |
| Contact | Checkbox | Sponsored ? | IsSponsored__c | Checked if the contact was sponsored into the program by another client. |
1 While modifying API names post-deployment is notoriously complicated, making sure that field are properly recognizable is better in the long term than avoiding a maintenance during a project. Such modifications SHOULD be taken into account while doing estimations.
Workflow Conventions
Naming and structural conventions related to workflows
Workflow Triggers
Workflow Rules (along with Process Builders) are now on a deprecation / End-of-Life plan. Existing Workflow Rules will continue to operate for the foreseeable future, but in the near future (Winter 23) Salesforce will begin to prevent creating new Workflow Rules. Establish a plan to migrate to Flows, and create any new automation using Flow Builder.
These naming convention best practices will remain in place for reference purposes so long as Workflow Rules may exist in a Salesforce org
A workflow trigger MUST always be named after what Triggers the workflow, and not the actions. In all cases possible, the number of triggers per object SHOULD be limited - reading the existing trigger names allows using existing ones when possible. Knowing that all automations count towards Salesforce allotted CPU time per record, a consultant SHOULD consider how to limit the number of workflows in all cases.
- All Workflow Triggers MUST contain a Bypass Rule check.
- A Workflow Trigger SHALL always start by
WF, followed by a number corresponding to the number of workflows on the triggering Object, followed by an underscore. - The Workflow Trigger name MUST try to explain in a concise manner what triggers the WF. Note that conciseness trumps clarity for this field.
- All Workflows Trigger MUST have a description detailing how they are triggered.
- Wherever possible, a Consultant SHOULD use operators over functions.
Examples
| Object | WF Name | Description | WF Rule |
|---|---|---|---|
| Invoice | WF01_WhenInvoicePaid | This WF triggers when the invoice Status is set to "Paid". Triggered from another automation. | !$User.BypassWF__c && ISPICKVAL(Status__c, "Paid") |
| Invoice | WF02_CE_WhenStatusChanges | This WF triggers every time the Status of the invoice is changed. | !$User.BypassWF__c && ISCHANGED(Status__c) |
| Contact | WF01_C_IfStreetBlank | This WF triggers on creation if the street is Blank | !$User.BypassWF__c && ISBLANK(MailingStreet) |
Workflow Field Updates
Workflow Rules (along with Process Builders) are now on a deprecation / End-of-Life plan. Existing Workflow Rules will continue to operate for the foreseeable future, but in the near future (Winter 23) Salesforce will begin to prevent creating new Workflow Rules. Establish a plan to migrate to Flows, and create any new automation using Flow Builder.
- A Workflow Field Update MUST Start with
FU, followed by a number corresponding to the number of field updates on the triggering Object. - A Workflow Field Update SHOULD contain the Object name, or an abbreviation thereof, in the Field Update Name.1
- A Workflow Field Update MUST be named after the field that it updates, and then the values it sets, in the most concise manner possible.
- The Description of a Workflow Field Update SHOULD give precise information on what the field is set to.
Examples
| Object | FU Name | Description |
|---|---|---|
| Contact | FU01_SetEmailOptOut | Sets the Email Opt Out checkbox to TRUE. |
| Invoice | FU02_SetFinalBillingStreet | Calculates the billing street based on if the client is billed alone, via an Agency, or via a mother company. Part of three updates that handle this address. |
| Contact | FU03_CalculateFinalAmount | Uses current Tax settings and information to set the final amount |
1 While Field Updates are segregated by Object when viewed through an IDE or through code, the UI offers no such ease of use. If this is not done, a consultant WOULD PROBABLY create list views for field updates per Object.
Workflow Email Alerts
Workflow Rules (along with Process Builders) are now on a deprecation / End-of-Life plan. Existing Workflow Rules will continue to operate for the foreseeable future, but in the near future (Winter 23) Salesforce will begin to prevent creating new Workflow Rules. Establish a plan to migrate to Flows, and create any new automation using Flow Builder.
Email Alerts are NOT part of the Workflow Rule deprecation plan- you can and should continue to configure and use Email Alerts. Flows can reference and execute these Email Alerts
-
A Workflow Email Alert MUST Start with
EA, followed by a number corresponding to the number of email alerts on the triggering Object. -
A Workflow Email Alert SHOULD contain the Object name, or an abbreviation thereof, in the Field Update Name.
-
A Workflow Email Alert's Unique Name and Description SHOULD contain the exact same information, except where a longer description is absolutely necessary.1
-
A Workflow Email Alert SHOULD be named after the type of email it sends, or the reason the email is sent.
Note that declaratively, the Name of the template used to send the email is always shown by default in Email Alert lists.
Examples
| Object | EA Name | Description |
|---|---|---|
| Invoice | EA01_Inv_SendFirstPaymentReminder | EA01_Inv_SendFirstPaymentReminder. |
| Invoice | EA02_Inv_SendSecondPaymentReminder | SendSecondPaymentReminder |
| Contact | EA03_Con_SendBirthdayEmail | EA03_Con_SendBirthdayEmail |
1 Email Alert's Unique Names are generated from the Description by default in Salesforce. As Email Alerts can only send emails, this convention describes a less exhaustive solution than could be, at the profit of speed while creating Email Alerts declaratively.
Workflow Tasks
Workflow Rules (along with Process Builders) are now on a deprecation / End-of-Life plan. Existing Workflow Rules will continue to operate for the foreseeable future, but in the near future (Winter 23) Salesforce will begin to prevent creating new Workflow Rules. Establish a plan to migrate to Flows, and create any new automation using Flow Builder.
-
A Workflow Task Unique Name MUST Start with
TSK, followed by a number corresponding to the number of tasks on the triggering Object. -
A Workflow Task Unique Name COULD contain the Object name, or an abbreviation thereof, in the Field Update Name. This is to avoid different conventions for Workflow Actions in general.
Most information about tasks are displayed by default declaratively, and creating a task should rarely impact internal processes or external processes in such a manner that urgent debugging is required. As Users will in all cases never see the Unique Name of a Workflow Task, it is not needed nor recommended to norm them more than necessary.
Workflow Outbound Messages
Workflow Rules (along with Process Builders) are now on a deprecation / End-of-Life plan. Existing Workflow Rules will continue to operate for the foreseeable future, but in the near future (Winter 23) Salesforce will begin to prevent creating new Workflow Rules. Establish a plan to migrate to Flows, and create any new automation using Flow Builder.
Outbound Messages are NOT part of the Workflow Rule deprecation plan- you can and should continue to configure and use Outbound Messages when appropriate. Flows can reference and execute these Outbound Messages
- An Outbound Message Name MUST Start with
OM, followed by a number corresponding to the number of outbound messages on the triggering Object. -
An Outbound Message Name COULD contain the Object name, or an abbreviation thereof, in the Field Update Name. This is to avoid different conventions for Workflow Actions in general.
-
An Outbound Message MUST be named after the Service that it send information to, and then information it sends in the most concise manner possible.
-
The Description of An Outbound Message SHOULD give precise information on why the Outbound Message is created.
-
Listing the fields sent by the Outbound Message is NOT RECOMMENDED.
Examples
| Object | EA Name | Description |
|---|---|---|
| Invoice | OM01_Inv_SendBasicInfo | Send the invoice header to the client software. |
| Invoice | OM02_Inv_SendStatusPaid | Sends a flag that the invoice was paid to the client software. |
| Contact | OM01_SendContactInfo | Sends most contact information to the internal Directory. |
Validation Rule Conventions
Conventions about validation rules, naming, creation, etc
Validation Rule Metadata Conventions
- The Validation Rule Name MUST try to explain in a concise manner what the validation rule prevents. Note that conciseness trumps clarity for this field.
- All validation Rules
APInames MUST be written in PascalCase. - Validation Rules SHOULD NOT contain an underscore in the fields name, except where explicitly defined otherwise in these conventions.
- A Validation Rule SHALL always start by a shorthand of the object name (example:
ACC, then the stringVR, followed by a number corresponding to the number of validation rules on the triggering Object, followed by an underscore. - The Validation Rule Error Message MUST contain an error code indicating the number of the Validation Rule, in the format
[VRXX],XXbeing the Validation Rule Number.1 - Validation Rules MUST have a description, where the description details the Business Use Case that is addressed by the VR. A Description SHALL NOT contain technical descriptions of what triggers the VR - the Validation Rule itself SHOULD be written in such a manner as to be clearly readable.
1 While including an error code in a user displayed message may be seen as strange, this will allow any admin or consultant to find exactly which validation rule is causing problems when user need only communicate the end code for debugging purposes.
Validation rules writing conventions
- All Validation Rules MUST contain a Bypass2 Rule check.
-
Wherever possible, a Consultant SHOULD use operators over functions.
-
All possible instances of
IF()SHOULD be replaced byCASE() -
Referencing other formula fields should be avoided at all cost.
-
In all instances,
ISBLANK()should be used instead ofISNULL, as per this link. -
Validation Rules MUST NOT be triggered in a cascading manner.1
Examples
| Name | Formula | Error Message | Description |
|---|---|---|---|
| OPP_VR01_CancelReason |
|
If you select "other" as a cancellation reason, you must fill out the details of that reason. [OPP_VR01] | Prevents selecting "other" less reason without putting a comment in. [OPP_VR01] |
| OPP_VR02_NoApprovalCantReserve | !$Setup.Bypasses__c.IsBypassVR__c &&
!IsApproved__c &&
( ISPICKVAL(Status__c,"Approved - CC ") ||
ISPICKVAL(Status__c,"Approved - Client") ||
ISPICKVAL(Status__c,"Paid") ) |
The status cannot advance further if it is not approved. [OPP_VR02] | The status cannot advance further if it is not approved. [OPP_VR02] |
1 Cascading Validation Rules are defined as VRs that trigger when another VR is triggered. Example: A field is mandatory if the status is Lost, but the field cannot contain less than 5 characters. Doing two validation rules which would trigger one another would result in a user first seeing that the field is mandatory, then saving again, and being presented with the second error. In this case, the second error should be displayed as soon as the first criteria is met.
2 See main Bypasses page for more info on the topic
Bypasses
We reference "bypasses" in a number of these conventions.
Bypasses are administrator-defined checkboxes that allow you to massively deactivate automations and validation rules with a simple click. They avoid that awkward feeling when you realize that you need to turn them off one by one so you can do that huge data update operation you're planning.
If your validation rules bypasses look like this, this is bad:$Profile.id <> '00eo0000000KXdC' && somefield__c = 'greatvalue'
The most maintainable way to create a bypass is to create a hierarchical custom setting to store all the bypass values that you will use. This means that the custom setting should be named "Bypasses", and contain one field per bypass type that you want to do.
Great-looking bypass setup right there
This setup allows you to create bypasses either by profile or by user, like so:

This allows you to reference bypasses directly in your validation rules by simply letting Salesforce handle knowing whether or not the bypass is active or not for that specific user or profile. In the validations themselves, using this bypass is as easy as referencing it via the formula builder. An example for validation rules could be:
!$Setup.Bypasses__c.IsBypassVR__c && Name = "test"
As you can also see in the above screenshots, you can use a single custom setting to host all the bypasses for your organization, including Validation Rules, Workflows, Triggers, etc. As additional examples, you can see that "Bypass Emails" and "Bypass Invoicing Process" are also present in the custom setting - adding the check for these checkboxes in the automations that trigger emails, and automations that belong to Invoicing respectively, allow partial deactivation of automations based on criteria.
Data Migration Best Practices
An attempt to help you not delete your production database
1 - Data Migrations Checklist
The following is a semi-profanity-ridden attempt at explaining one way to do data migrations while following best practices. It is rather long and laced with colorful language. If you have read it already, or if you want to avoid the profanity, you can consult the following checklist in the beautiful table below.
Note that all elements are considered mandatory.
As a quick note, and a reminder even if you've read the whole version:
DO NOT MODIFY SOURCE DATA FILES, EVER.
If you're doing data migrations, either use a script to modify the source files and save the edited version, or use excel workbooks that open the source file and then save the edited result elsewhere. Yes, even if the source is an excel file.
Why? Because sources change. People forget stuff, files aren't well formatted, shit gets broken, and people are human - meaning that one-time data import is actually going to be done multiple times. Edit the source file, and get to do everything all over again. Use scripts or workbooks to do the transformations ? Point that to the new source file and BAM Bob's your uncle.
Scripts you might want to use:
- OpenRefine
- SFXD's PSCSV
- Salesforce's official Data Migration Tool for cross-org data loading
- Amaxa for related objects, done by David Reed
Or, if you prefer excel, open a blank workbook, Import the source file via the "data" ribbon tab, select "from text/csv" (or whatever matches based on your source type), then save it as both:
- the construction excel,
- a NEW csv file after doing your changes in formula columns.
That way when you change the source file you can just open the construction book again and resave.
2 - Data Migration Step-by-step - Before Loading
Introduction
You're going to have to map data from various sources into Salesforce. IT'S THAT BIG MIGRATION TIME.
Well let's make sure you don't have to do it again in two days because data is missing, or delete production data.
Salesforce does not back up your data.
If you delete your data, and the amount deleted is bigger than what is in the recycle bin, if will be deleted forever. You could try restoring it via Workbench, praying that the automated Salesforce jobs haven't wiped your data yet.
If you update data, the moment the update hits the database (the DML) is done, the old data is lost. Forever.
If you don't have a backup, you could try seeing if you turned on field history.
If worst comes to worst you can pay 10 000€ (not joking, see here) to Salesforce to restore your data. Did I mention that Salesforce would give you a CSV extract of the data you had in Salesforce ? Yeah they don't restore the org for you. You'd still need to restore it table per table with a data loading tool.
But let's try to avoid these situations, by following these steps. These steps apply to any massive data load, but especially in case of deletions.
GENERAL DATA OPERATIONS STUFF
Tools
Do not use Data Loader if you can avoid it. If you tried doing a full data migration with Dataloader, you will not be helped. By this I mean I will laugh at you and go back to drinking coffee. Dataloader is a BAD tool.
Amaxa is awesome and handles objects that are related to one another. It's free and awesome.
Jitterbit is like Dataloader but better. It's free. It's getting old though, and some of the newer stuff won't work like Time fields.
Talend requires some tinkering but knowing it will allow you to migrate from almost anything, to almost anything.
Hell you can even use SFDX to do data migrations.
But yeah don't use dataloader. Even Dataloader.io is better, and that's a paid solution. Yes I would recommend you literally pay rather than use Dataloader.
If you MUST use dataloader, EXPORT THE MAPPINGS YOU ARE DOING. You can find how to do so in the data loader user guide: https://developer.salesforce.com/docs/atlas.en-us.dataLoader.meta/dataLoader/data_loader.htm
Even if you think you will do a data load only once, the reality is you will do it multiple times. Plus, for documentation, having the mapping file is best practice anyway. Always export the mapping, or make sure it is reusable without rebuilding it, whatever the tool you use.
Volume
If you are loading a big amount of data or the org is mature, read this document entirely before doing anything. LDV starts at a few million records in general, or several gigabytes of data. Even if you don't need this right now, reading it should be best practice in general.
Yes, read the whole thing. The success of the project depends on it, and the document is quite short.
Deletions
If you delete data in prod without a backup, this is bad.
If the data backup was not checked, this is bad.
If you did not check automations before deleting, this is also bad.
Seriously, before deleting ANYTHING, EVER:
- get backup
- check automations
- check backup is valid.
Data Mapping
For Admins or Consultants: you should avoid mapping the data yourself. Any data mapping you do should be with someone from the end-user's who can understand you are saying. If no one like this is available, spend time with a business operative so you can do the mapping and make them sign off on it.
The client signing off on the mapping is drastically important, as this will impact the success of the data load, AND what happens if you do not successfully load it - or if the client realizes they forgot something.
Basic operations for a data mapping are as follow:
- study Source and target data model
- establish mapping from table to table, field to field, or both if necessary.
- for each table and field, establish Source of Truth, meaning which data should take priority if conflicts exist
- establish an ExternalId from all systems to ensure data mapping is correct
- define which users can see what data. Update permissions if needed.
Data retrieval
Data needs to be extracted from source system. This can be via API, an ETL, a simple CSV extract, etc. Note that in general it is better if storing data as CSV can be avoided - ideally you should do a point-to-point load which simply transforms the data - but as most clients can only extract csv, the following best practices apply:
- Verify Data Format
- Date format yyyy-mm-dd
- DateTime format yyyy-mm-ddT00:00:00z
- Emails not longer than 80 char
- Text containing carriage returns is qualified by "
- Other field-specific verifications re. length and separators for text, numbers, etc.
- Verify Table integrity
- Check that all tables have basic data for records:
- LastName, Account for Contact
- Name for Account
- Any other system mandatory fields
- Check that all records have the agreed-upon external Ids
- Check that all tables have basic data for records:
- Verify Parsing
- Do a dummy load to ensure that the full data extracted can be mapped and parsed by the selected automation tool
Data Matching
You should already have created External Ids on every table, if you are upserting data.
If not, do so now.
DO NOT match the data in excel.
Yes, INDEX(MATCH()) is a beautiful tool. No, no one wants you to spend hours doing that when you could be doing other stuff, like drinking a cold beer.
If you're using VLOOKUP() in Excel, stop. Read up on how to use INDEX(MATCH()). You will save time, the results will be better, and you will thank yourself later. Only thing to remember is to always add "0" as a third parameter to "MATCH" so it forces exact results.
Store IDs of the external system in the target tables, in the ExternalId field. Then use that when recreating lookup relationships to find the records.
This saves time, avoids you doing a wrong matching, and best of all, if the source data changes, you can just run the data load operation again on the new file, without spending hours matching IDs.
3 - Data Migration Step-by-step - Loading
FIRST STEPS
- Login to Prod. Is there a weekly backup running, encoded as UTF-8, in Setup > Data Export
- Nope
Select encoding UTF-8 and click "Export Now". This will take hours.
Turn that weekly stuff on.
Make sure the client KNOWS it's on.
Make sure they have a strategy for downloading the ZIP file that is generated by the extract weekly. - Yup
- Is it UTF-8 and has run in the last 48 hours ?
- Yup
Confer with the client to see if additional backup files are needed. Otherwise, you're good. - Nope
If the export isn't UTF-8, it's worthless.
If it's more than 48h old, confer with the client to see if additional backup files are needed. In all cases, you should consider doing a new, manual export.SERIOUSLY MAKE SURE YOU CHANGE THE ENCODING. Salesforce has some dumb rule of not defaulting to UTF-8. YOU NEED UTF-8. Accents and ḍîáꞓȑîȶîꞓs exist. Turns out people like accents and non-roman alphabets, who knew?
- Yup
- If Data Export is not an option because it has run too recently, or because the encoding was wrong, you can also do your export by using whatever too you want to Query all the relevant tables. Remember to set UTF-8 as the encoding on both export and import.
- Is it UTF-8 and has run in the last 48 hours ?
- Nope
- Check the org code and automation
- Seriously, look over all triggers that can fire when you upload the data.
You don't want to be that consultant that sent a notification email to 50000 people.
Just check the triggers, WFs, PBs, and see what they do.
If you can't read triggers, ask a dev to help you.
Yes, Check the Workflows and Process Builders too. They can send Emails as well. - Check Process Builders again. Are there a lot that are firing on an object you are loading ? Make note of that for later, you may have to deactivate them.
- Seriously, look over all triggers that can fire when you upload the data.
- Check data volume.
- Is there enough space in the org to accommodate the extra data ? (this should be pre-project checks, but check it again)
- Are volumes to load enough to cause problems API-call wise ?
If so, you may need to consider using the BULK jobs instead of normal operations - In case data volumes are REALLY big, you will need to abide by LDV (large data volume) best practices, including not doing upserts, defering sharing calculations, and grouping records by Parent record and owner before uploading. Full list of these is available in the pdf linked above and here.
PREPARING THE JOBS
Before creating a job, ask yourself which job type is best.
Upsert is great but is very resource intensive, and is more prone to RECORD_LOCK than other operation types. It also takes longer to complete.
Maybe think about using the BULK Api.
In all cases, study what operation you do and make sure it is the right one.
Once that is done...
You are able to create insert, upsert, query and deletion jobs, and change select parts of it. That's because you are using a real data loading tool.
This is important because this means you can:
- Create a new Sandbox
- In whatever tool you're using, create the operations you will do, and name them so you know in which order you need to trigger them.
- Prepare each job, point them to a sandbox.
- Do a dummy load in sandbox. Make sure to set the start line to something near the end so you don't clog the sandbox up with all the data.
- Make sure everything looks fine.
If something fails, you correct the TRANSFORMATION, not the file, except in cases where it would be prohibitively long to do so. Meaning if you have to redo the load, you can run the same scripts you did before to have a nice CSV to upload.
GETTING READY TO DO THAT DATA OPERATION
This may sound stupid but warn your client, the PM, the end users that you're doing a data load. There's nothing worse than losing data or seeing stuff change without knowing why. Make sure key stakeholders are aware of the operation, the start time, and the estimated end time. Plus, you need them to check the data afterwards to ensure it's fine.
You've got backups of every single table in the Production org.
Even if you KNOW you do, you open the backups and check they are not corrupt or unreadable. Untested backups are no backups.
You know what all automations are going to do if you leave them on.
You talked with the client about possible impacts, and the client is ready to check the data after you finish your operations.
You set up, with the client, a timeframe in which to do the data operation.
If the data operation impacts tables that users work on normally, you freeze all those users during that timeframe.
Remember to deactivate any PB, WF, APEX that can impact the migration. You didn't study them just to forget them.
If this is an LDV job, take into account any considerations listed above.
DATA OPERATION
- Go to your tool and edit the Sandbox jobs.
- Edit the job Login to point to production
- Save all the jobs.
- You run, in order, the jobs you prepared.
When the number of failures is low enough, study the failure files, take any corrective action necessary, then use those files as a new source for a new data load operation.
Continue this loop until the number of rejects is tolerable.
This will ensure that if some reason you need to redo the entire operation, you can take the same steps in a much easier fashion.
Once you are done, take the failure files, study them, and prepare a recap email detailing failures and why they failed. It's their data, they have a right to know.
POST-MIGRATION
- Make sure everything looks fine, that you carried everything over.
- Warn their PM that the migration is done and request testing from their side.
- If you deactivated Workflows or PBs or something so the migration passes, ACTIVATE THEM BACK AGAIN.
- Unfreeze users if needed.
Go drink champagne.
IF SHIT DOESN'T LOOK RIGHT
You have a backup. Don't panic.
- Identify WTF is causing data to be wrong.
- Fix that.
- Get your backup, restore data to where it was before the fuckup. Ideally, only restore affected fields. If needed, restore everything.
- Redo the data load if needed.
Getting the right (number of) Admins
Salesforce Success Services
Achieve Outstanding CRM Administration
Because Salesforce takes care of many traditional administration tasks, system administration is easier than ever before. Setting up, customizing the application, training users, and “turning on” the new features that become available with each release—all are just a few clicks away. The person responsible for these tasks is your Salesforce CRM administrator. Because this person is one of the most important resources in making your implementation a success, it’s important to carefully choose your administrator and to continually invest in his or her professional development. You can also choose to have Salesforce handle administrator tasks for you.
Note: Larger enterprise implementations often use a role called Business Analyst or Business Application Manager as well, particularly for planning the implementation and ensuring adoption once the solution is live. Although the most common customization tasks don’t require coding, you may want to consider using a professional developer for some custom development tasks, such as writing Force.com code (Apex), developing custom user interfaces with Force.com pages (Visualforce), or completing complex integration or data migration tasks.
In many ways, the administrator fills the role played by traditional IT departments: answering user questions, working with key stakeholders to determine requirements, customizing the application to appeal to users, setting up reporting and dashboards to keep managers happy, keeping an eye on availability and performance, activating the features in new releases, and much more. This paper will help you to make important choices when it comes to administering your Salesforce CRM application, including:
Finding the right person(s)
Investing in your administrator(s)
Providing adequate staffing
Getting help from Salesforce
Find the right administrator
Who would make an ideal Salesforce CRM administrator? Experience shows that successful administrators can come from a variety of backgrounds, including sales, sales operations, marketing, support, channel management, and IT. A technical background may be helpful, but is not necessary. What matters most is that your administrator is thoroughly familiar with the customization capabilities of the application and responsive to your users. Here are some qualities to look for in an administrator:
A solid understanding of your business processes
Knowledge of the organizational structure and culture to help build relationships with key groups
Excellent communication, motivational, and presentation skills
The desire to be the voice of the user in communicating with management
Analytical skills to respond to requested changes and identify customizations
Invest in your administrator
Investing in your administrator will do wonders for your Salesforce CRM solution. With an administrator who is thoroughly familiar with Salesforce CRM, you’ll ensure that your data is safe, your users are productive, and you get the most from your solution.
Salesforce offers both self-paced training and classroom training for administrators. For a list of free, self-paced courses, go to Salesforce Training & Certification. To ensure that your administrator is fully trained on all aspects of security, user management, data management, and the latest Salesforce CRM features, enrol your administrator in Administration Essentials (ADM201). The price of this course includes the cost of the certification that qualifies your administrators to become Salesforce.com Certified Administrators. For experienced administrators, Salesforce offers the Administration Essentials for Experienced Admins (ADM211) course.
Providing adequate staffing
The number of administrators (and, optionally, business analysts) required depends on the size of your business, the complexity of your implementation, the volume of user requests, and so on. One common approach for estimating the number of administrators you need is based on the number of users.
| Number of users | Administration resources |
| 1 – 30 users | < 1 full-time administrator |
| 31 – 74 users | 1+ full-time administrator |
| 75 – 149 users | 1 senior administrator; 1 junior administrator |
| 140 – 499 users | 1 business analyst, 2–4 administrators |
| 500 – 750 users | 1–2 business analysts, 2–4 administrators |
| > 750 users | Depends on a variety of factors |
In addition to the user base, also consider the points below:
In small businesses, the role of the administrator is not necessarily a full-time position. In the initial stages of the implementation, the role requires more concentrated time (about 50 percent). After go-live, managing Salesforce CRM day to day requires much less time (about 10–25 percent)
If you have several business units that use Salesforce CRM solutions—such as sales, marketing, support, professional services, and so on—consider using separate administrators for each group, to spend between 50–100 percent of their time supporting their solutions.
Another common practice for large implementations is to use “delegated administrators” for specific tasks such as managing users, managing custom objects, or building reports.
If you operate in multiple geographic regions, consider using one administrator for each major region, such as North America, EMEA, and APAC. To decide how to classify regions, consider whether they have a distinct currency, language, business processes, and so on, and train your administrators in the multicurrency and multilanguage features. Also appoint a lead analyst or administrator who will coordinate the various regions.
If you need customization beyond the metadata (click not code) capabilities of Salesforce CRM or want to develop new applications, you may also need a developer to create, test, and implement custom code.
https://help.salesforce.com/HTViewSolution?id=000007548
Big Objects
Big objects are Salesforce's take on NoSQL (although it works just like common SQL). It allows large data storage on Salesforce's servers. Ideal for Big Data and compliance scenarios.
Sample scenario - store all field changes for an object
In this scenario, the customer wants, for whatever reason, to track changes of all the fields in a single record. Salesforce provides the default field tracking, but it is available for only twenty fields per object. If this object we are talking about has more, then it is impossible to solve it with the standard, declarative tools.
Big objects are the ideal candidate for this, because we are talking about data that users probably don't need to report (big objects do not support reporting), there's a change that it is a lot of data (if the record is changed frequently), and possibly there's a legal reason for keeping those changes stored (compliance).
So to do that we'll need a trigger on the object, running preferably on the after update trigger event. At this point the record is already saved but the transaction is not yet committed to the database, so the changes were made and we get the difference using Trigger.oldMap to get the old version of the changed records.
After iterating through all the fields on the object, we check for differences, and for each one we instantiate a new big object. When the iteration ends we insert them immediately (using Database.insertImmediate()).
In this configuration, the big object's index would be the related record's Id, the field that was modified and the date/time stamp of the change (depending on requirements, one might want to spend some time thinking if it is best to have the timestamp before the field name). This way, if we wanted to display the data in a Lightning Component, for example, we could query the specific record data synchronously in Apex because of the indices created:
SELECT
    RecordId__c,
    Field__c,
    Timestamp__c,
    OldValue__c,
    NewValue__c
FROM ObjectHistory__b
WHERE RecordId__c = :theRecordId
Mass Update Access to Objects And Fields For Profiles And Permission Sets
If you need to update Object-level permissions (CRED) or Field level Permissions (FLS) for a large number of Objects, Fields, Profiles, or Permission Sets, rather than manually clicking dozens of checkboxes on multiple pages, it is sometimes easier and faster to make those updates using tools like Data Loader.
This article describes how to make those updates, as well as relevant information about the data model regarding FLS and CRED. It is intended for declarative developers.
Object Permissions - Basic Functionality
When dealing with Profiles and CRED there are three objects involved:
- Profile object
- PermissionSet object
- ObjectPermissions object
Note: Every Profile has a corresponding child PermissionSet record, as indicated by the ProfileId field on the PermissionSet record. When dealing with Permission Sets, the Profile object doesn’t factor in.
For every combination of Profile and Object, there is a corresponding ObjectPermissions record with six boolean fields that control the access level for that Profile to that object. The same goes for Permission Sets. Those six fields are:
PermissionsCreatePermissionsDeletePermissionsEditPermissionsReadPermissionsViewAllRecordsPermissionsModifyAllRecords
Note: If a Profile or Permission Set has no access to an object, then there is no ObjectPermissions record for that object/profile combination. You cannot have an ObjectPermissions record where all “permissions” fields are FALSE.
In addition to these boolean fields, there are two other uneditable fields which indicate which object the record is related to (sObjectType), as well as the related Permission Set (ParentId). Remember, even if the ObjectPermissions record is controlling access for a Profile, it will be related to a Permission Set. That Permission Set will have the Id of the corresponding Profile in the ProfileId field.
When a Profile or Permission Set is granted access to an Object, Salesforce automatically creates a new ObjectPermissions record. When access to that Object is removed, Salesforce deletes that record.
Field Permissions - Basic Functionality
Field-Level Security works very similarly to Object-Level Permissions. When dealing with Profiles and FLS, there are three objects involved:
- Profile object
- PermissionSet object
- FieldPermissions object
Note: Every Profile has a corresponding child PermissionSet record, as indicated by the ProfileId field on the PermissionSet record. When dealing with Permission Sets, the Profile object doesn’t factor in.
For every combination of Profile and Field, there is a corresponding FieldPermissions record. Each record has two boolean fields that control the access level for that Profile to that field. The same goes for Permission Sets. Those two fields are:
PermissionsEditPermissionsRead
Note: If a Profile or Permission Set has no access to a Field, then there is no FieldPermissions record for that Field/Profile combination. You cannot have a FieldPermissions record where all “permissions” fields are FALSE.
In addition to these boolean fields, there are three other uneditable fields which indicate which Object the record is related to (sObjectType), which specific Field this record controls access to (Field), and the related Permission Set (ParentId). Remember, even if the FieldPermissions record is controlling access for a Profile, it will be related to a Permission Set. That Permission Set will have the Id of the corresponding Profile in the ProfileId field.
When a Profile or Permission Set is granted access to a Field, Salesforce automatically creates a new FieldPermissions record. When access to that Field is removed, Salesforce deletes that record.
Query CRED And FLS Permissions - Examples
To get a list of every CRED setting for every Profile and Permission Set in Salesforce run the following query, or use Data Loader to export all ObjectPermissions records with the following fields:
SELECT Id, ParentId, Parent.ProfileId, Parent.Profile.Name, SobjectType, PermissionsCreate, PermissionsDelete, PermissionsEdit, PermissionsRead, PermissionsViewAllRecords, PermissionsModifyAllRecords
FROM ObjectPermissions
To query all Field permissions use a similar query:
SELECT Id, ParentId, Parent.ProfileId, Parent.Profile.Name, SobjectType, Field, PermissionsEdit, PermissionsRead
FROM FieldPermissionsIn order to limit your search to specific profiles, add a filter to the end using the Parent.ProfileId field . Example:
SELECT Id, (...)
FROM (...)
WHERE Parent.Profile.Name = 'Sales Manager'
Or if you have a list of profiles:
SELECT Id, (...)
FROM (...)
WHERE Parent.Profile.Name IN ('Sales Manager', 'Sales', 'Marketing')To limit your query to only see permissions related to Profiles and not Permission Sets, add a filter to the end using the Parent.ProfileId field to make sure it’s not empty:
SELECT Id, (...)
FROM (...)
WHERE Parent.ProfileId != null
Conversely, to limit your query to only show permissions related to Permission Sets, adjust the filter:
WHERE Parent.ProfileId = nullIn order to limit the Objects you want permissions for, add a filter to the end using the SobjectType field. Example:
SELECT Id, (...)
FROM (...)
WHERE SobjectType IN ('Account','Opportunity','Contact')In order to limit the Fields you want permissions for, add a filter to the end using the Field field. Note that the values in the Field field include API name of the Object, followed by a period, then the API name of the Field. Example:
SELECT Id, (...)
FROM (...)
WHERE Field IN ('Account.Customer__c','Opportunity.Total__c','Contact.LastName')Updating, Deleting, and Adding Permissions
After running your query you will have a table describing access for all objects/fields where at least one profile or permission set has some kind of access. This is an important concept to understand. If no Profiles or Permission Sets have access to an Object or Field, there will not be a record for that object/field.
For existing ObjectPermissions/FieldPermissions records, you can make updates to the TRUE and FALSE values in each column, then use Data Loader to upload the changes using the Update feature.
To remove all access to an Object/Field, you will need to use the Delete feature in Data Loader to delete the appropriate ObjectPermissions/FieldPermissions records, using a list of Ids.
To add access where there is none, you will need to use the Insert feature in Data Loader to create new ObjectPermissions/FieldPermissions records.
To data load ObjectPermissions records, include the following fields:
sObjectTypeParentIdPermissionsCreatePermissionsDeletePermissionsEditPermissionsReadPermissionsViewAllRecordsPermissionsModifyAllRecords
To data load FieldPermissions records, include the following fields:
sObjectTypeFieldParentIdPermissionsEditPermissionsRead
Important Notes
- Upserts are generally not recommended due to the extremely slow speed. It will most likely take much longer to make the upsert than it would to split the records into separate Insert and Update files.
- As stated above, you cannot have an ObjectPermissions or FieldPermissions record where all “permissions” fields are FALSE. If you try to update or insert one, you will get an error. Instead, to remove all access to an object, you have to delete the ObjectPermissions record.
- Custom Settings and Custom Metadata Types don’t have ObjectPermissions records related to them. Trying to insert or update them will just return an error.
- Watch out for permissions dependencies. When updating permission using the Profile edit page for example, Salesforce will automatically enable dependent permissions when needed. When data loading permissions, Salesforce will not automatically update user or system permissions on the profile if you try to update an object permission that has a dependency. Instead the update or insert will fail and you will get an error on that row. Accounts in particular have a large number of dependencies. Example:
FIELD_INTEGRITY_EXCEPTION: Permission Convert Leads depends on permission(s): Create Account; Permission Read All Asset depends on permission(s): Read All Account; Permission Read All Contract depends on permission(s): Read All Account; Permission Read All Dsx_Invoice__c depends on permission(s): Read All Account; Permission Read All Orders__c depends on permission(s): Read All Account; Permission Read All OrgChartPlus__ADP_OrgChartEntityCommon__c depends on permission(s): Read All Account; Permission Read All OrgChartPlus__ADP_OrgChart__c depends on permission(s): Read All Account; Permission Read All Partner_Keyword_Mapping__c depends on permission(s): Read All Account; Permission Read All Zuora__CustomerAccount__c depends on permission(s): Read All Account- Additionally, keep in mind what is required at the Object level when setting certain permissions. For example, all levels of access (Edit, Create, etc..) require Read access. Delete access requires Read as well as Edit. Modify All requires all levels of access except Create. Salesforce will not allow you to data load permissions with illegal combinations of CRED access.
- When using SOQL to query object permissions, be aware that some object permissions are enabled because a user permission requires them. The exception to this rule is when “Modify All Data” is enabled on the Profile or Permission Set (note: not to be confused with the "Modify All" CRED permission). While it enables all object permissions, it doesn’t physically store any object permission records in the database. As a result, unlike object permissions that are required by a user permission - such as “View All Data” or “Import Leads” - the query still returns permission sets with “Modify All Data,” but the object permission record will contain an invalid ID that begins with “000”. This ID indicates that the profile has full access due to “Modify All Data” and the object permission record can’t be updated or deleted.
- To remove full access from these objects, disable “Modify All Data” at the Profile level, and then delete the resulting object permission record.
Object Permissions:
https://developer.salesforce.com/docs/atlas.en-us.api.meta/api/sforce_api_objects_objectpermissions.htm
Field Permissions:
https://developer.salesforce.com/docs/atlas.en-us.api.meta/api/sforce_api_objects_fieldpermissions.htm
Flow Conventions
Naming and structural conventions related to Flows and the Cloud Flow Engine.
Flow General Notes
Generalities
As of writing this page, August 10th 2023, Flows are primary source of automation on the Salesforce platform. We left this sentence because the earlier iteration (from 2021) identified that Flows would replace Process Builder and we like being right.
It is very important to note that Flows have almost nothing to do, complexity-wise, with Workflows, Process Builder, or Approval Processes. Where the old tools did a lot of (over)-simplifying for you, Flow exposes a lot of things that you quite simply never had to think about before, such as execution context, DML optimization, batching, variables, variable passing, etc.
So if you are an old-timer upgrading your skills, note that a basic understanding of programming (batch scripting is more than enough) helps a lot with Flow.
If you're a newcomer to Salesforce and you're looking to learn Flow, same comment - this is harder than most of the platform (apart from Permissions) to learn and manipulate. This is normal.
Intended Audience
These conventions are written for all types of Salesforce professionals to read, but the target audience is the administrator of an organization. If you are an ISV, you will have considerations regarding packaging that we do not, and if you are a consultant, you should ideally use whatever the client wants (or the most stringent convention available to you, to guarantee quality).
On Conventions
As long as we're doing notes: conventions are opinionated, and these are no different. Much like you have different APEX trigger frameworks, you'll find different conventions for Flow. These specific conventions are made to be maintainable at scale, with an ease of modification and upgrade. This means that they by nature include boilerplate that you might find redundant, and specify very strongly elements (to optimize cases where you have hundreds of Flows in an organization). This does not mean you need to follow everything. A reader should try to understand why the conventions are a specific way, and then decide whether or not this applies to their org.
At the end of the day, as long as you use any convention in your organization, we're good. This one, another one, a partial one, doesn't matter. Just structure your flows and elements.
On our Notation
Finally, regarding the naming of sub-elements in the Flows: we've had conversations in the past about the pseudo-hungarian notation that we recommend using. To clarify: we don't want to use Hungarian notation. We do so because Flow still doesn't split naming schemes between variables, screen elements, or data manipulation elements. This basically forces you to use Hungarian notation so you can have a var_boolUserAccept and a S01_choiceUserAccept (a variable holding the result of whether a user accepts some conditions, and the presentation in radio buttons of said acceptance), because you can't have two elements just named UserAccept even if technically they're different.
On custom code, plugins, and unofficialSF
On another note: Flow allows you to use custom code to extend its functionality. We define "custom code" by any LWC, APEX Class, and associated that are written by a human and plug into flow. We recommend using as little of these elements as possible, and as many as needed. This includes UnofficialSF.
Whether you code stuff yourself, or someone else does it for you, Custom Code always requires audit and maintenance. Deploying UnofficialSF code to your org basically means that you own the maintenance and audit of it, much like if you had developed it yourself. We emit the same reservations as using any piece of code on GitHub - if you don't know what it does exactly, you shouldn't be using it. This is because any third-party code is not part of your MSA with Salesforce, and if it breaks, is a vector of attack, or otherwise negatively impacts your business, you have no official support or recourse.
This is not to say that these things are not great, or value-adding - but you are (probably) an admin of a company CRM, which means your first consideration should be user data and compliance, and ease of use coming second.
Bonus useless knowledge: Flows themselves are just an old technology that Salesforce released in 2010: Visual Process Manager. That itself is actually just a scripting language: “The technology powering the Visual Process Manager is based on technology acquired from Informavores, a call scripting startup Salesforce bought last year.” (2009) Source
What Automation do I create Flowchart
Flow Meta Conventions
Read these Resources first
-
The official Flows best practice doc. Note we agree on most things. Specifically the need to plan out your Flow first.
-
The Flows limits doc. If you don't know the platform limits, how can you build around them?
-
The Transactions limits doc. Same as above, gotta know limits to play around them.
- The What Automation Do I Create Flowchart. Not everything needs to be a Flow.
- The Record-Triggered Automation Guide, if applicable.
Best Practices
These are general best practices that do not pertain to individual flows but more to Flows in regards to their usage within an Organization.
On Permissions
Flows should ALWAYS execute in the smallest amount of permissions possible for it to execute a task.
Users should also ideally not have access to Flows they don't require.
Giving Setup access so someone can access DeveloperName is bad, and you should be using custom labels to store the ids and reference that instead, just to limit setup access.
Use System mode sparingly. It is dangerous.
If used in a Communities setting, I REALLY hope you know why you're exposing data publicly over the internet or that you're only committing information with no GETs.
Users can have access granted to specific Flows via their Profiles and Permission Sets, which you should really be using to ensure that normal users can't use the Flow that massively updates the client base for example.
Record-Triggered Flows, and Triggers should ideally not coexist on the same object in the same Context.
"Context" here means the APEX Trigger Context. Note that not all of these contexts are exposed in Flow:
- Screen Flows execute outside of these contexts, but Update elements do not allow you to carry out operations in the before context.
- Record Triggered Flow execute either in before or after contexts, depending on what you chose at the Flow creation screen (they are named "Fast Record Updates" and "Other Objects and Related Actions", respectively, because it seems Salesforce and I disagree that training people on proper understanding of how the platform works is important).
The reason for the "same context" exclusivity is in case of multiple Flows and heavy custom APEX logic: in short, unless you plan explicitly for it, the presence of one or the other forces you to audit both in case of additional development, or routine maintenance.
You could technically leverage Flows and APEX perfectly fine together, but if you have a before Flow and a before Trigger both doing updates to fields, and you accidentally reference a field in both... debugging that is going to be fun.
So if you start relying on APEX Triggers, while this doesn’t mean you have to change all the Flows to APEX logic straight away, it does mean you need to plan for a migration path.
In the case were some automations need to be admin editable but other automations require custom code, you should be migrating the Triggers to APEX, and leveraging sub-flows which get called from your APEX logic.
Flow List Views should be used to sort and manage access to your Flows easily
The default list view is not as useful as others can be.
We generally suggest doing at minimum one list view, and two if you have installed packages that ship Flows:
-
- One List View that shows all active flows, with the following fields displayed:
Active, Is Using an Older Version, Triggering Object or Platform Event Label, Process Type, Trigger, Flow Label, Flow API Name, Flow Description, Last Modified Date This will allow you to easily find your flows by Object (apart from Scheduled Flows or Sub-Flows, but this is handled via Naming Conventions), see if you started working on a Flow but didn't activate the last version, and view the beautiful descriptions that you will have set everywhere.
 - One List View that shows all Package flows, which contains
Active, Is Using an Older Version, Flow Namespace, Overridable, Overridden By, Overrides
This allows you to easily manage your updates to these Flows that are sourced from outside your organization.
- One List View that shows all active flows, with the following fields displayed:
Flows are considered Code for maintenance purposes
Do NOT create or edit Flows in Production, especially a Record-Triggered flow.
If any user does a data load operation and you corrupt swaths of data, you will know the meaning of “getting gray hairs”, unless you have a backup - which I am guessing you will not have if you were doing live edits in production.
No, this isn't a second helping of our note in the General Notes.
This is about your Flows - the ones you built, the ones you know very well and are proud of.
There are a swath of reasons to consider Flows to be Code for maintenance purposes, but in short:
- if you're tired, mess up, or are otherwise wrong, Production updates of Flows can have HUGE repercussions depending on how many users are using the platform, and how impactful your Flow is
- updating Flows in Production will break your deployment lifecycle, and cause problems in CI/CD tools if you use them
- updating Flows in Production means that you have no safe reproducibility environment unless you refresh a sandbox
- unless you know every interaction with other parts of the system, a minor update can have impact due to other automation - whether it be APEX, or other Flows.
In short - it's a short and admin-friendly development, but it's still development.
On which automation to create
In addition to our (frankly not very beautiful Flowchart), when creating automations, the order of priority should be:
-
-
Object-bound, BEFORE Flows
These are the most CPU-efficient Flows to create.
They should be used to set information that is required on Objects that are created or updated. -
User-bound Flows
Meaning Screen flows. These aren’t tied to automation, and so are very CPU efficient and testable. -
Object-bound, Scheduled Flows
If you can, create your flows as a Schedule rather than something that will spend a lot of time waiting for an action - a great example of this are scheduled emails one month after something happens.
Do test your batch before deploying it, though. -
Object-bound, AFTER Flows
These are last because they are CPU intensive, can cause recursion, and generally can have more impact in the org than other sources of automation.
-
On APEX and LWCs in Flows
-
APEX or LWCs that are specifically made to be called from Flows should be clearly named and defined in a way that makes their identification and maintenance easier.
-
Flows that call APEX or LWCs are subject to more limits and potential bugs than fully declarative ones.
When planning to do one, factor in the maintenance cost of these parts.
Yes, this absolutely includes actions and components from the wonderful UnofficialSF. If you install unpackaged code in your organization, YOU are responsible for maintaining it. -
On a related note, Don't use non-official components without checking their limits.
Yes UnofficialSF is great, and it also contains components that are not bulkified or contain bugs.
To reiterate, if you install unpackaged code in your organization, YOU are responsible for maintaining it.
Flow Testing and Flow Tests
If at all possible, Flows should be Tested. This isn't always possible because of these considerations, (which aren't actually exhaustive - I have personally seen edge cases where Tests fail but actual function runs, because of the way Tests are build, and I have also seen deployment errors linked to Tests). Trailheads exist to help you get there.
A Flow Test is not just a way to check your Flow works. A proper test should:
- Test the Flow works
- Test the Flow works in other Permission situations
- Test the Flow doesn't work in critical situations you want to avoid [if you're supposed to send one email, you should probably catch the situation where you're sending 5 mil]
... and in addition to that, a proper Flow Test will warn you if things stop working down the line.
Most of these boilerplates are negative bets against the future - we are expecting things to break, people to forget configuration, and updates to be made out of process. Tests are a way to mitigate that.
We currently consider Flow Tests to be "acceptable but still bad", which we expect to change as time goes on, but as it's not a critical feature, we aren't sure when they'll address the current issues with the tool.
Note that proper Flow Testing will probably become a requirement at some point down the line.
On Bypasses
Flows, like many things in Salesforce, can be configured to respect Bypasses.
In the case of Flows, you might want to call these "feature flags".
This is a GREAT best practice, but is generally overkill unless you are a very mature org with huge amounts of processes.
Flow Structural Conventions - Common Core
As detailed in the General Notes section, these conventions are heavily opinionated towards maintenance and scaling in large organizations. The conventions contain:
- a "common core" set of structural conventions that apply everywhere (this page!)
- conventions for Record Triggered Flows specifically
- conventions for Scheduled Flows specifically
Due to their nature of being triggered by the user and outside of a specific record context, Screen Flows do not require specific structural adaptations at the moment that are not part of the common core specifications.
Common Core Conventions
On System-Level Design
Do not do DMLs or Queries in Loops.
Simpler: No pink squares in loops.
DML is Data Manipulation Language. Basically it is what tells the database to change stuff. DML Operations include Insert, Update, Upsert, and Delete, which you should know from Data Loader or other such tools.
Salesforce now actually warns you when you're doing this, but it still bears saying.
 Don't do this
- it can break your Flow. Salesforce will still try to optimize your DML operations, but it will often fail due to the changing context of the loop. This will result in you doing one query or update per record in your loop, which will send you straight into Governor Limit territory.
- even if it doesn't break your Flow, it will be SLOW AS HELL, due to the overhead of all the operations you're doing
- it's unmaintainable at best, because trying to figure out the interaction between X individual updates and all the possible automations you're triggering on the records you're updating or creating is nigh impossible.
All Pink (DML or Query) elements should have Error handling
Error, or Fault Paths, are available both in Free Design mode and the Auto-Layout Mode. In Free mode, you need to handle all possible other paths before the Fault path becomes available. In Auto-Layout mode, you can simply select Fault Path.
Screen Flow? Throw a Screen, and display what situation could lead to this. Maybe also send the Admin an email explaining what happened.
 Record-triggered Flow? Throw an email to the APEX Email Exception recipients, or emit a Custom Notification.
Hell, better yet throw that logic into a Subflow and call it from wherever.
(Note that if you are in a sandbox with email deliverability set to System Only, regular flow emails and email alerts will not get sent.)
Handling Errors this way allows you to:
- not have your users presented with UNEXPECTED EXCEPTION - YOUR ADMIN DID THINGS BADLY
- maybe deflect a few error messages, in case some things can be fixed by the user doing things differently
- have a better understanding of how often Errors happen.
You want to supercharge your error handling? Audit Nebula Logger to see if it can suit your needs. With proper implementation (and knowledge of how to service it, remember that installed code is still code that requires maintenance), Nebula Logger will allow you to centralize all logs in your organization, and have proper notification when something happens - whether in Flow, APEX, or whatever.
Don't exit loops based on decision checks
The Flow engine doesn't support that well and you will have weird and confusing issues if you ever go back to the main loop.

Don’t do this either - always finish the loop
Issues include variables not being reset, DML errors if you do come back to the loop, and all around general unpredictable situations.
You can still do this if you absolutely NEVER come back to the loop, but it's bad design.
Do not design Flows that will have long Wait elements
This is often done by Admins coming from Workflow or Process Builder space, where you could just say "do that 1 week before contract end date" or "1 day after Opportunity closure". This design is sadly as outdated as the tools that permitted it.
Doing this will have you exceed your Paused Interview limits, and actions just won't be carried out.
A proper handling of "1 day before/after whenever", in Flow, is often via a Scheduled Flow.
Scheduled Flows execute once daily (or more if you use plugins to allow it), check conditions, and execute based on these conditions. In the above case, you would be creating a Scheduled Flow that :
- Queries all Contract that have an End Date at
TODAY()-7 - Proceeds to loop over them and do whatever you need it to
Despite it not being evident in the Salesforce Builder, there is a VERY big difference between the criteria in the Schedule Flow execution start, and an initial GET.
- Putting criteria in the Start Element has less conditions available, but effectively limits the scope of the Flow to only these records, which is great in big environments. It also fires One Flow Interview per Record, and then bulkifies operations at the end - so doing a GET if you put a criteria in the Start element should be done after due consideration only.
- On the opposite, putting no criteria and relying on an initial Get does a single Flow Interview, and so will run less effectively on huge amounts of records, but does allow you to handle more complex selection criteria.
Do not Over-Optimize your Flows
When Admins start becoming great at Flows, everything looks like a Flow.
The issue with that is that sometimes, Admins will start building Flows that shouldn't be built because Users should be using standard features (yes, I know, convincing Users to change habits can be nigh impossible but is sometimes still the right path)... and sometimes, they will keep at building Flows that just should be APEX instead.
If you are starting to hit CPU timeout errors, Flow Element Count errors, huge amounts of slowness... You're probably trying to shove things in Flow that should be something else instead.
APEX has more tools than Flows, as do LWCs. Sometimes, admitting that Development is necessary is not a failure - it's just good design.
On Flow-Specific Design
Flows should have one easily identifiable Triggering Element
This relates to the Naming Conventions.
| Flow Type |
Triggering Element |
| Record-Triggered Flows | It is the Record that triggers the DML |
| Event-based Flows | It should be a single event, as simple as possible. |
| Screen Flows | This should be either a single recordId, a single sObject variable, or a single sObject list variable. In all cases, the Flow that is being called should query what it needs by itself, and output whatever is needed in its context. |
| Subflows | The rule can vary - it can be useful to pass multiple collections to a Subflow in order to avoid recurring queries on the same object. However, passing multiple single-record variables, or single text variables, to a Subflow generally indicates a design that is overly coupled with the main flow and should be more abstracted. |

Fill in the descriptions
You'll thank yourself when you have to maintain it in two years.
Descriptions should not be technical, but functional. A Consultant should be able to read your Flow and know what it does technically. The Descriptions should therefore explain what function the Flow provides within the given Domain (if applicable) of the configuration.
 Descriptions shouldn’t be too technical.
Don't use the "Set Fields manually" part of Update elements
Yes, it's possible. It's also bad practice. You should always rely on a record variable, which you Assign values to, before using Update with "use the values from a record variable". This is mainly for maintenance purposes (in 99% of cases you can safely ignore pink elements in maintenance to know where something is set), but is also impactful when you do multi-record edits and you have to manipulate the record variable and store the resulting manipulation in a record collection variable.
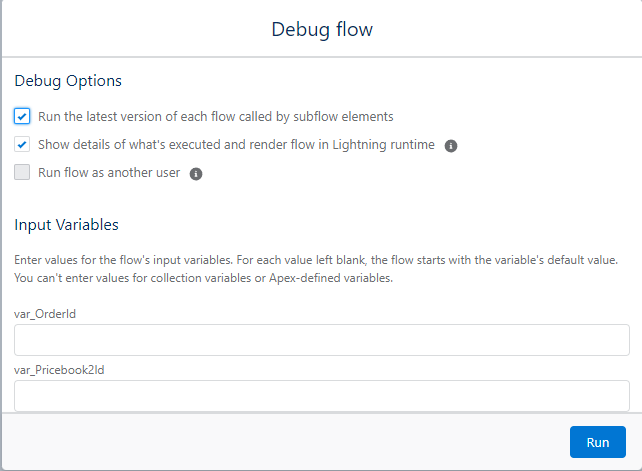
Try to pass only one Record variable or one Record collection to a Flow or Subflow
See "Tie each Flow to a Domain".
Initializing a lot of Record variables on run often points to you being able to split that subflow into different functions. Passing Records as the Triggering Element, and configuration information as variables is fine within reason.
In the example below, the Pricebook2Id variable should be taken from the Order variable.
Try to make Subflows that are reusable as possible.
A Subflow that does a lot of different actions will probably be single-use, and if you need a subpart of it in another logic, you will probably build it again, which may lead to higher technical debt.
If at all possible, each Subflow should execute a single function, within a single Domain.
Yes, this ties into "service-based architecture" - we did say Flows were code.
Do not rely on implicit references
This is when you query a record, then fetch parent information via {MyRecord.ParentRecord__c.SomeField__c}. While this is useful, it’s also very prone to errors (specifically with fields like RecordType ) and makes for wonky error messages if the User does not have access to one of the intermediary records.
Do an explicit Query instead if possible, even if it is technically slower.
Tie each Flow to a Domain
This is also tied to Naming Conventions. Note that in the example below, the Domain is the Object that the Flow lives on. One might say it is redundant with the Triggering Object, except Scheduled Flows and Screen Flows don't have this populated, and are often still linked to specific objects, hence the explicit link.
Domains are definable as Stand-alone groupings of function which have a clear Responsible Persona.
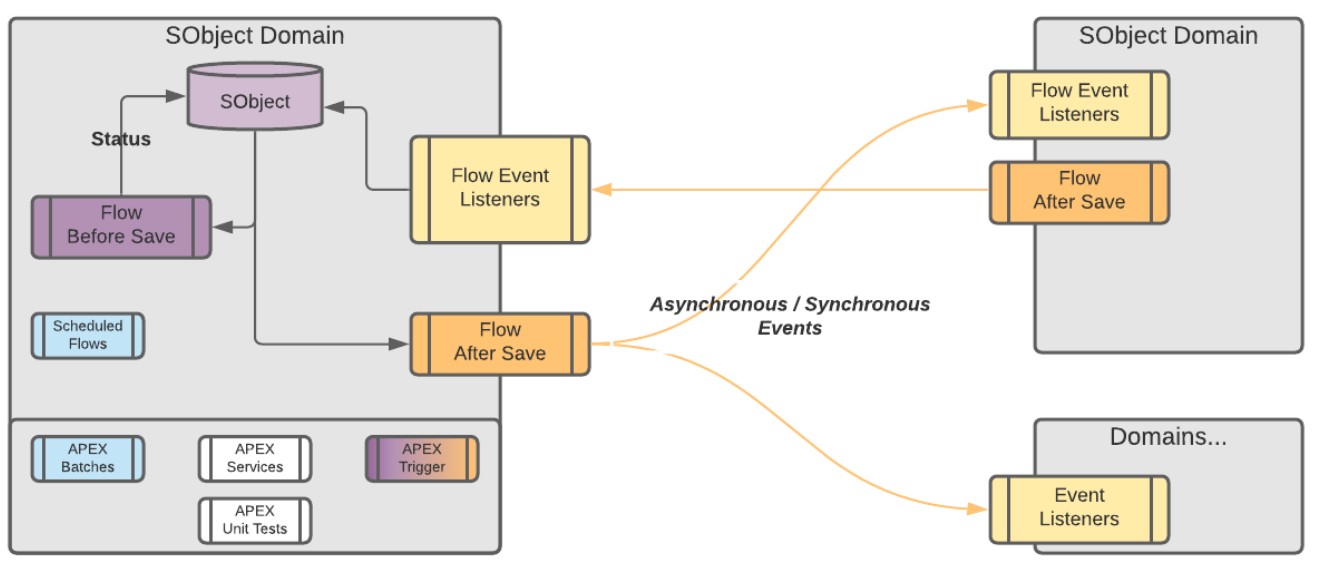
Communication between Domains should ideally be handled via Events
In short, if a Flow starts in Sales (actions that are taken when an Opportunity closes for example) and finishes in Invoicing (creates an invoice and notifies the people responsible for those invoices), this should be two separate Flows, each tied to a single Domain.
Note that the Salesforce Event bus is mostly built for External Integrations.
The amount of events we specify here is quite high, and as such on gigantic organisations it might not be best practice to handle things this way - you might want to rely on an external event bus instead.
That being said if you are in fact an enterprise admin I expect you are considering the best usecase in every practice you implement, and as such this disclaimer is unnecessary.
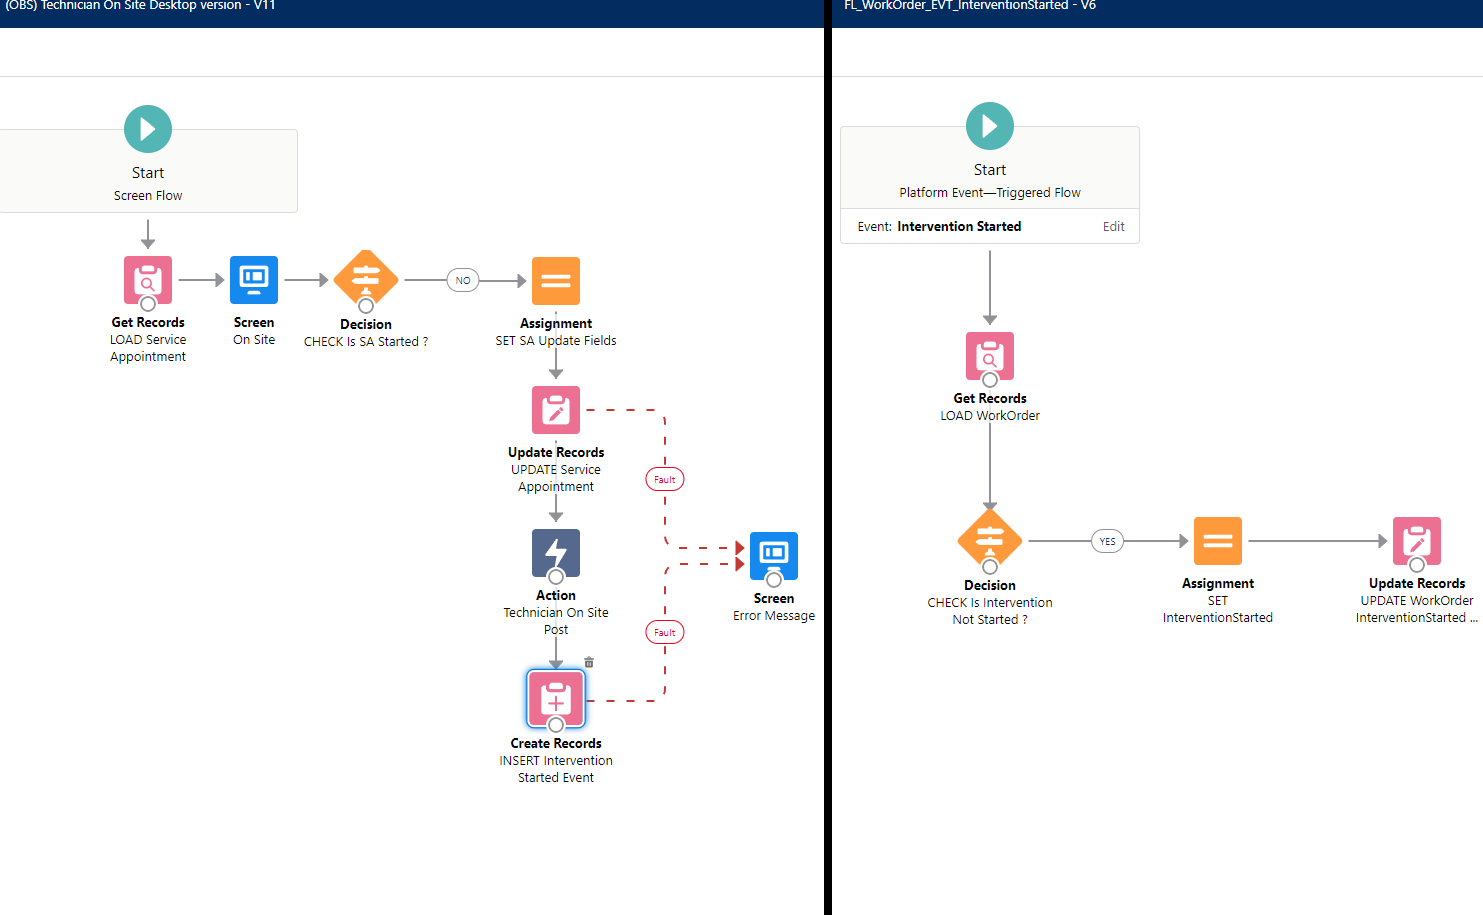
Example of Event-Driven decoupling
Avoid cascading Subflows wherein one calls another one that call another one
Unless the secondary subflows are basically fully abstract methods handling inputs from any possible Flow (like one that returns a collection from a multipicklist), you're adding complexity in maintenance which will be costly
Flow Structural Conventions - Record-Triggered
As detailed in the General Notes section, these conventions are heavily opinionated towards maintenance and scaling in large organizations. The conventions contain:
- a "common core" set of structural conventions that apply everywhere
- conventions for Record Triggered Flows specifically (this page!)
- conventions for Scheduled Flows specifically
This page directly changes conventions that were emitted by SFXD in 2019, and reiterated in 2021.
This is because the platform has changed since then, and as such we are recommending new, better, more robust way to build stuff.
If you recently used our old guides - they are still fine, we just consider this new version to be better practice.
Record-Triggered Flow Design
Before Creating a Flow
Ensure there are no sources of automation touching the Object or Fields
If the same field is updated in another automation, default to that automation instead, or refactor that automation to Flow.
If the Object is used in other sources of automation, you might want to default to that as well, or refactor that automation to Flow, unless you can ensure that both that source of automation and the Flow you will create will not cross-impact each other.
You can leverage "where is this used" in sandbox orgs to check if a field is already referenced in a Flow - or take the HULK SMASH approach and just create a new sandbox, and try to delete the field. If it fails deletion, it'll tell you where it is referenced.
Verify the list of existing Flows and Entry Criterias you have
You don't want to have multiple sources of the same entry criteria in Flows because it will make management harder, and you also don't want to have multiple Flows that do almost the same thing because of scale.
Identifying if you can refactor a Flow into a Subflow that will be called from multiple places is best done before trying to build anything.
Ask yourself if it can't be a Scheduled Flow instead
Anything date based, anything that has wait times, anything that doesn't need to be at the instant the record changes status but can instead wait a few hours for the flow to run - all these things can be scheduled Flows. This will allow you to have better save times on records.
Prioritize BEFORE-save operations whenever possible
This is more efficient in every way for the database, and avoids recurring SAVE operations.
It also mostly avoid impacts from other automation sources (apart from Before-Save APEX).
Designing your Flow to have the most possible before-save elements will save you time and effort in the long run.
Check if you need to update your bypasses
Specifically for Emails, using bypasses remains something that is important. Because sending emails to your entire database when you're testing stuff is probably not what you want.
Consider the worst case
Do not build your system for the best user but the worst one. Ensure that faults are handled, ensure that a suser subject to every single piece of automation still has a usable system, etc.
On the number of Flows per Object and Start Elements
- Before-Save Flows
Use as many before-save flows as you require.
You should, but do not have to, set Entry Conditions on your Flows.
Each individual Flow should be tied to a functional Domain, or a specific user story, as you see most logical. The order of the Flows in the Flow Trigger Explorer should not matter, as a single field should never be referenced in multiple before save flows as the target of an assignment or update. - After-Save Flows Use one Flow for actions that should trigger without entry criteria, and orchestrate them with Decision elements.
Use one Flow to handle Email Sends if you have multiple email actions on the Object and need to orchestrate them.
Use as many additional flows as you require, as long as they are tied to unique Entry Criteria.
Set the Order of the Flows manually in the Flow Trigger Explorer to ensure you know how these elements chain together.Offload any computationally complex operation that doesnt need to be done immediately to a scheduled path.
Entry Criteria specify when a Flow is evaluated. It is a very efficient way to avoid Flows triggering unduly and saves a lot of CPU time. Entry Criteria however do require knowledge of Formulas to use fully (the basic "AND" condition doesn't allow a few things that the Formula editor does in fact handle properly), and it is important to note that the entire Flow does not execute if the Entry Criteria isn't met, so you can't catch errors or anything.
To build open what's written above:
- Before-Save flows are very fast, generally have no impact on performance unless you do very weird stuff, and should be easy to maintain as log as you name them properly, even if you have multiple per object. "Tieing" a flow to a Domain or Object means by its name and structure. You can technically do a Flow that does updates both for Sales and Invoicing, but this is generally meh if you need to update a specific function down the line.
Logical separation of responsabilities is a topic you'll find not only here but also in a lot of development books.
Before-Save Flows don't actually require an Update element - this is just for show and to allow people to feel more comfortable with it. You can technically just use Assignments to manipulate the $Record variable with the same effect. It actually used to be the only way to do before-save, but was thought too confusing.
- After-Save flows, while more powerful, require you to do another DML operation to commit anything you are modifying. This has a few impacts, such as the possibility to re-run automtions if you update the record that already triggered your automation. The suggestions we make above are based on the following:
- Few actions on records should not have entry criteria set. This allows more flows to be present on each object without slowdowns. The limit of One flow is because it should pretty much not exist, or be small.
- Emails sent from Objects are always stress inducing in case of data loads, and while a proper bypass usage does not require grouping all emails in a Flow,knowing that all email alerts are in a specific place does make maintenance easier.
- Entry-Criteria filtered Flows are quite efficient, and so do not need to be restricted in number anymore.
- Ordering Flows manually is to avoid cases where the order of Flows is unkown, and interaction between Flows that you ahve not identified yields either positive or negative results that can't be reproduced without proper ordering.
- Scheduled Paths are great if you are updating related Objects, sending notifications, or doing any other operation that isn't time-sensitive for the user.
We used to recommend a single Flow per context. This is obviously no longer the case.
This is because anything that pattern provided, other tools now provide, and do better.
The "One flow per Object pattern" was born because:
- Flows only triggered in after contexts
- Flows didn't have a way to be orchestrated between themselves
- Performance impact of Flows was huge because of the lack of entry criteria
None of that is true anymore.
The remnant of that pattern still exists in the "no entry criteria, after context, flow that has decision nodes", so it's not completely gone.
So while the advent of Flow Trigger Explorer was one nail in the coffin for that pattern, the real final one was actual good entry criteria logic.
Entry Criteria are awesome but are not properly disclosed either in the Flow List View, nor the Start Element. Ensure that you follow proper Description filling so you can in fact know how these elements work, otherwise you will need to open every single Flow to check what is happening.
On Delayed Actions
Flows allows you to do complex queries and loops as well as schedules. As such, there is virtually no reason to use wait elements or delayed actions, unless said waits are for a platform event, or the delayed actions are relatively short.
Any action that is scheduled for a month in the future for example should instead set a flag on the record, and let a Scheduled Flow evaluate the records daily to see if they fit criteria for processing. If they do in fact fit criteria, then execute the action.
A great example of this is Birthday emails - instead of triggering an action that waits for a year, do a Scheduled flow running daily on contacts who's birthday it is. This makes it a lot easier to debug and see what’s going on.
Flow Structural Conventions - Scheduled
As detailed in the General Notes section, these conventions are heavily opinionated towards maintenance and scaling in large organizations. The conventions contain:
- a "common core" set of structural conventions that apply everywhere
- conventions for Record Triggered Flows specifically
- conventions for Scheduled Flows specifically (this page!)
Scheduled Flow Design
As detailed in the Common Core conventions, despite it not being evident in the Salesforce Builder, there is a VERY big difference between the criteria in the Schedule Flow execution start, and an initial GET element in a Scheduled Flow that has no Object defined.
- Putting criteria in the Start Element has less conditions available, but effectively limits the scope of the Flow to only these records, which is great in big environments. It also fires One Flow Interview per Record, and then bulkifies operations at the end.

An often-done mistake is to do the above selection, say "Accounts where Active = TRUE" for example, and then doing a Get Records afterwards, querying the accounts again, because of habits tied to Record-Triggered Flows.
If you do this, you are effectively querying the entire list of Accounts X times, where X is the number of Accounts in your original criteria. Which is bad.
- On the opposite, putting no criteria and relying on an initial Get does a single Flow Interview, and so will run less effectively on huge amounts of records, but does allow you to handle more complex selection criteria.

In the first case, you should consider that there is only one record selected by the Flow, which is populated in $Record - much like in Record-Triggered Flows.
In the second screenshot, you can see that the Choose Object is empty, but the GET is done afterwards - $Record is as such empty, but the Get Active Accounts will generate a collection variable containing multiple accounts, which you will need to iterate over (via a loop element) to handle the different cases
Flow Naming Conventions
Meta-Flow Naming
-
A Flow name shall always start by the name of the Domain from which it originates, followed by an underscore.
In most cases, for Flows, the Domain is equivalent to the Object that it is hosted on.
As per structural conventions, cross-object Flows should be avoided and reliance on Events to synchronize flows that do cross-object operations should be used.In
Account_BeforeSave_SetClientNumber, the Domain is Account, as this is where the automation is started. It could also be something likeAccountManagement, if the Account Management team owned the process for example. -
The Domain of the shall be followed by a code indicating the type of the Flow, respecting the cases as follows:
-
If the flow is a Screen Flow, the code shall be SCR.
-
If the flow is a SubFlow, the code shall be SFL.
-
If the flow is specifically designed to be a scheduled flow that runs on a schedule, the code shall be SCH.
-
If the flow is a Record Triggered flow, the code shall instead indicate the contexts in where the Record Triggered Flow executes.
In addition, the flow name shall contain the context of execution, meaning either Beforeor After, followed by either Create, Update or Delete. -
If the flow is an Event Triggered flow, the code shall be EVT instead.
-
If the flow is specifically designed to be a Record Triggered flow that ONLY handles email sends, the code shall be EML instead.
In
Account_AftercreateAftersave_StatusUpdateActions, you identify that it is Record-Triggered, execute both on creation and update, in the After Context, and that it carries out actions related to when the entry criteria (the status has changed) are met.In the case of
Invoice_SCR_CheckTaxExemption, you know that it is a Screen Flow, executing from the Invoice Lightning Page, that handles Tax Exemption related matters.
-
-
A Flow name shall further be named after the action being carried out in the most precise manner possible. For Record Triggered Flows, this is limited to what triggers it. See example table for details.
-
A Flow Description should always indicate what the Flow requires to run, what the entry criteria are, what it does functionally, and what it outputs.
|
Type |
Name |
Description |
|---|---|---|
|
Screen Flow |
Quote_SCR_addQuoteLines |
[Entry = None] |
|
Scheduled Flow |
Contact_SCH_SendBirthdayEmails |
[Entry = None] |
|
Before Update Flow, on Account |
Account_BeforeUpdate_SetTaxInformation |
[Entry = IsChanged(ShippingCountry)] Changes the tax information, rate, and required elements based on the new country. |
|
After Update Flow, on Account |
Account_AfterUpdate_NewBillingInfo |
[Entry = IsChanged(ShippingCountry)] |
|
Event-Triggered Flow, creating Invoices, which triggers when a Sales Finished event gets fired |
Invoice_EVT_SalesFinished |
Creates an Invoice and notifies Invoicing about the new invoice to validate based on Sales information |
|
Record-triggered Email-sending Flow, on Account. |
Account_EML_AfterUpdate |
[Entry = None] |
Flow Elements
DMLs
-
Any Query shall always start by Getfor any Objects, followed by an underscore, or Fetchfor CMTD or Settings.
-
Any Update shall always start by Updatefollowed by an underscore. If it Updates a Collection, it shall also be prefixed by Listafter the aforementioned underscore.
-
Any Create shall always start by Createfollowed by an underscore. If it Creates a Collection, it shall also be prefixed by Listafter the aforementioned underscore.
-
Any Delete shall always start by Delfollowed by an underscore. If it Deletes a Collection, it shall also be prefixed by Listafter the aforementioned underscore.
|
Type |
Name |
Description |
|---|---|---|
| Get accounts matching active = true |
Get_ActiveAccounts |
Fetches all accounts where IsActive = True |
| Update Modified Contacts |
Update_ListModifiedContacts |
Commits all changes from previous assignments to the database |
Creates an account configured during a Screen Flow in a variable called var_thisAccount |
Create_ThisAccount |
Commits the Account to the database based on previous assignments. |
Interactions
-
Any Screen SHALL always start by S, followed by a number corresponding to the current number of Screens in the current Flow plus 1, followed by an underscore.
-
Any Action SHALL always start by ACT, followed by an underscore. The Action Name SHOULD furthermore indicate what the action carries out.
-
Any APEX Action SHALL always start by APEX instead, followed by an underscore, followed by a shorthand of the outcome expected. Properly named APEX functions should be usable as-is for naming.
-
Any Subflow SHALL always start by SUB instead, followed by an underscore, followed by the code of the Flow triggered (FL01 for example), followed by an underscore, followed by a shorthand of the outcome expected.
-
-
Any Email Alert SHALL always start by EA, followed by an underscore, followed by the code of the Email Template getting sent, an underscore, and a shorthand of what email should be sent.
|
Type |
Name |
Description |
|---|---|---|
|
Screen within a Flow |
Label: Select Price Book Entries Name: S01_SelectPBEs |
Allows selection of which products will be added to the quote, based on pricebookentries fetched. |
|
Screen that handles errors based on a DML within a Flow |
SERR01_GET_PBE |
Happens if the GET on Pricebook Entries fails. Probably related to Permissions. |
|
Text element in the first screen of the flow |
S01_T01 |
Fill with actual Text from the Text element - there is no description field |
|
DataTable in the first screen of the flow |
S01_LWCTable_Products |
May be inapplicable as the LWCs may not offer a Description field. |
Screen Elements
-
Any variable SHALL always start by var followed by an underscore.
-
Any variable that stores a Collection SHALL always in addition start by coll followed by an underscore.
-
Any variable that stores a Record SHALL always in addition start by sObj followed by an underscore.
-
Any other variable type SHALL always in addition start by an indicator of the variable type, followed by an underscore.
-
-
Any formula SHALL always start by form followed by an underscore, followed by the data type returned, and an underscore.
-
Any choice SHALL always start by ch followed by an underscore. The Choice name should reflect the outcome of the choice.
|
Type |
Name |
Description |
|---|---|---|
|
Formula to get the total number of Products sold |
formula_ProductDiscountWeighted |
Weights the discount by product type and calculates actual final discount. Catches null values for discounts or prices and returns 0. |
|
Variable to store the recordId |
recordId |
Stores the record Id that starts the flow. Exempt from normal conventions because legacy Salesforce behavior. |
|
Record that we create from calculated values in the Flow in a Loop, before storing it in a collection variable to create them all |
sObj_This_OpportunityProduct |
The Opportunity Product the values of which we calculate. |

Logics
-
Any Decision SHALL start by DEC if the decision is an open choice, or CHECK if it is a logical terminator, followed by an underscore. The Action Name SHOULD furthermore be prefixed by Is, Can, or another adverb indicating the nature of the decision, as well as a short description of what is checked.
-
Any Decision Outcome SHALL start with the Decision Name without any Prefixes, followed by an underscore, followed by the Outcome.
-
The Default Outcome SHOULD be used for error handling and relabeled ERROR where applicable - you can relabel the default outcome!
-
-
Any Assignment SHALL always start with SET, ASSIGN, STORE, REMOVE or CALC (depending on the type of the assignation being done) followed by an underscore.
-
SET SHOULD be used for variable updates, mainly for Object variables, where the variable existed before.
-
ASSIGN SHOULD be used for variable initialization, or updates on Non-Object variables.
-
STORE SHOULD be used for adding elements to Collections.
-
REMOVE SHOULD be used for removing elements from Collections.
-
CALC SHOULD be used for any mathematical assignment or complex collection manipulation.
-
-
Any Loop SHALL always start with LOOP, followed by an underscore, followed by the description of what is being iterated over. This can vary from the Collection name.
|
Type |
Name |
Description |
|---|---|---|
|
Assignment to set the sObj_This_OpportunityProduct record values |
SET_OppProdValues |
Sets the OppProd based on calculated discounts and quantities. |
|
Assignment to store the Opportunity Product for later creation in a collection variable |
Name: STORE_ThisOppProd |
Adds the calculated Opp Prod lines to the collvar to create. |
|
DML to create multiple records store in a collection sObj variable |
CREATE_OppProds |
Creates the configured OppProd. |
|
Decision to check selected elements for processing |
Decision: CHECK_PBESelected |
Check if at least one row was selected. Otherwise terminates to an error screen. |
|
Decision to sort elements based on criteria |
Decision: DEC_SortOverrides |
Based on user selection, check if we need to override information within the records, and which information needs to be overridden. |
|
Email Alert sent from Flow informing user of Invoice reception |
EA01_EI10_InvoiceReceived |
Sends template EI10 with details of the Invoice to pay |
Deployments
Deployment Best Practices. Focuses on CI/CD as this is the current best practice.
Introduction - Why are we even doing it like this
Salesforce deployments are essential for managing and evolving Salesforce environments, especially in a consulting company setting. There are several methods for deploying metadata between organizations, including Change Sets, the Metadata API, and the Salesforce Command Line Interface (CLI). Each method has its unique advantages, but the introduction of Salesforce DX (SFDX) has revolutionized the process, making SFDX-based deployments the standard for the future.
The main reasons are because it is easy to deploy, and easy to revert to a prior version of anything you deploy as well - proper CI/CD depends on GIT being used, which ensures that everything you do can be rolled back in case of bugs.
| Deployment Method | Advantages | Disadvantages |
|---|---|---|
| Change Sets |
- Easy to use with a graphical interface - No additional setup required |
- Limited to connected orgs - Manual and time-consuming - No version control - Can be done ad-hoc |
| Metadata API |
- Supports complex deployments - Can be automated - Broad coverage |
- Requires programming knowledge - Steeper learning curve |
| Salesforce CLI (sf) |
- Advanced automation - Supports modern DevOps practices - Version control |
- Steeper learning curve - Initial setup and configuration required - Requires trained staff to maintain |
| Third-Party Tools |
- User-friendly interfaces - Advanced features and integrations |
- Additional costs - May have proprietary limitations |
Despite the complexity inherent in SFcli-based deployments, the benefits are substantial. They enable easy and frequent deployments, better testing by customers, smoother go-lives, and a general reduction in stress around project development and deployment cycles. The structured approach of SF ensures that deployments are reliable, repeatable, and less prone to errors.
To stay fact-based: SF deployments allow deploying multiple times a week in a few minutes per deployment. This allows very easy user testing, and also allows finding why a specific issue cropped up. You can check the Examples section to see how and why this is useful.
It is perfectly true that these deployments require more technical knowledge than third-party tools like Gearset or Changesets. It is our opinion that the tradeoff in productivity is worth the extra training and learning curve.
One thing that is often overlooked - you can NOT do proper CI/CD without plugging the deployment to your project management. This means the entire project management MUST be thought around the deployment logic.
This training is split into the following chapters:
-
Chapter 1: The Why, When and By Whom This chapter explores the fundamental considerations of Salesforce deployments within the context of consulting projects. It addresses:
- Why Deploy: The importance and benefits of deploying Salesforce metadata throughout the project lifecycle, from the build phase to UAT to GoLive.
- When: When in the project timeline should deployments be planned and executed to ensure smooth progress and mitigate risks. (Hint - it's often, but not in every org)
- By Whom: Roles and responsibilities involved in the deployment process, such as consultants committing changes, architects reviewing commits and system elements, and release managers overseeing and executing deployments.
Chapter 2: The What, How and How Frequently This chapter delves into the practical aspects of Salesforce deployments:
- What: Overview of the deployment tools used, including GIT, SFDX, SGD, Bitbucket, and your trusty Command Line.
- How: Detailed workflows and methodologies for using these tools effectively, tailored to specific roles within the project team (consultants, architects, release managers).
- How Frequently: Recommendations on the frequency of deployments throughout the project timeline to maintain agility, minimize conflicts, and ensure continuous integration and delivery.
Chapter 3: An Example Project and Deployment Flow This chapter provides a hands-on example to illustrate a typical project scenario and the corresponding deployment processes:
- Example Project: Overview of a hypothetical Salesforce consulting project, including its scope and objectives.
- Deployment Flow: Step-by-step walkthrough of the deployment lifecycle, from initial planning and setup through to execution and validation.
- Best Practices: Highlighting best practices and potential challenges encountered during the deployment process.
Chapter 4: Configurations, Templates and Setup This chapter focuses on the essential configurations and setup required to streamline the deployment process:
- Configurations: Detailed guidance on configuring Salesforce environments for efficient deployment management.
- Templates: Templates and reusable patterns for standardizing deployments and ensuring consistency across projects.
- Setup: Practical tips and strategies for setting up deployment pipelines, integrating with version control systems, and automating deployment tasks.
These chapters collectively provide a comprehensive guide to mastering Salesforce deployments within a consulting company, covering both strategic considerations and practical implementation details.
Chapters 5 and further contain information for daily work and should be viewed as cheat sheets. - Why Deploy: The importance and benefits of deploying Salesforce metadata throughout the project lifecycle, from the build phase to UAT to GoLive.
Chapter 1: The Why, When and By Whom
This chapter explores the fundamental considerations of Salesforce deployments within the context of consulting projects. It addresses:
- Why Deploy: The importance and benefits of deploying Salesforce metadata throughout the project lifecycle, from the build phase to UAT to GoLive.
- When: When in the project timeline should deployments be planned and executed to ensure smooth progress and mitigate risks. (Hint - it's often, but not in every org)
- By Whom: Roles and responsibilities involved in the deployment process, such as consultants committing changes, architects reviewing commits and system elements, and release managers overseeing and executing deployments.
Why do I Deploy ?
In traditional software development, deployments often occur to migrate changes between environments for testing or production releases. However, in the context of Continuous Integration (CI) and Salesforce development, deployments are just synchronization checkpoints for the application, irrelevant of the organization.
Said differently, in CI/CD Deployments are just a way to push commits to the environments that require them.
CI deployments are frequent, automated, and tied closely to the development cycle.
Deployments are never the focus in CI/CD, and what is important is instead the commits and the way that they tie into the project management - ideally into a ticket for each commit.
In software development, a commit is the action of saving changes to a version-controlled repository. It captures specific modifications to files, accompanied by a descriptive message. Commits are atomic, meaning changes are applied together as a single unit, ensuring version control, traceability of changes, and collaboration among team members.
Commits are part of using Git.
Git is a distributed version control system used to track changes in source code during software development. It is free and widely used, within Salesforce and elsewhere.
So if deployments are just here to sync commits...
Why do I commit ?
As soon as a commit is useful, or whenever a day has ended.
Commits should pretty much be done "as soon as they are useful", which often means you have fulfilled one of the following conditions:
- you have finished working a ticket;
- you have finished configuring or coding a self-contained logic, business domain, or functional domain;
- you have finished correcting something that you want to be able to revert easily;
- you have finished a hotfix;
- you have finished a feature.
This will allow you to pull your changes from the org, commit your changes referencing the ticket number in the Commit Message, and then push to the repository.
This will allow others to work on the same repository without issues and to easily find and revert changes if required.
You should also commit to your local repository whenever the day ends - in any case you can squash those commits together when you merge back to Main, so trying to delay commits is generally a bad idea.
Take the Salesforce-built "Devops Center" for example.
They tie every commit to a Work Item and allow you to chose which elements from the metadata should be added to the commit. They then ask you to add a quick description and you're done.
This is the same logic we apply to tickets in the above description.
If you're wondering "why not just use DevOps Center", the answer is generally "you definitely should if you can, but you sometimes can't because it is proprietary and it has limitations you can't work around".
Also because if you learn how to use the CLI, you'll realise pretty fast that it goes WAY faster than DevOps Center.
To tie back to our introduction - this forces a division of work into Work Items, Tickets, or whatever other Agile-ism you use internally, and the project management level.
DevOps makes sense when you work iteratively, probably in sprints, and when the work to be delivered is well defined and packaged.
This is because....
When do I Deploy ?
Pretty much all the time, but not everywhere.
In Salesforce CI/CD, the two main points of complexity in your existing pipeline are going to be:
- The first integration of a commit into the pipeline
- The merging of multiple commits, especially if you have the unfortunate situation where multiple people work in the same org.
The reasons for this are similar but different.
In the case of the first integration of a commit into the pipeline, most of the time, things should be completely fine. The problem is one that everyone in the Salesforce space knows very well. The Metadata API sucks. And sadly, SFDX... also isn't perfect.
So sometimes, you might do everything right, but the MDAPI will throw some file or some setting that while valid in output, is invalid in input. Meaning Salesforce happily gives you something you can't deploy.
If this happens, you will get an error when you first try to integrate your commit to an org. This is why some pre-merge checks ensure that the commit you did can be deployed back to the org.
In the case of merging multiple commits, the reasons is also that the Metadata API sucks. It will answer the same calls with metadata that is not ordered the same way within the same file, which will lead Git to think there's tons-o-changes... Except not really. This is mostly fine as long as you don't have to merge your work with someone else's where they worked on the same piece of metadata - if so, there is a non-zero chance that the automated merging will fail.
In both cases, the answer is "ask your senior how to solve this if the pipeline errors out". In both cases also, the pipeline should be setup to cover these cases and error out gracefully.
"What does that have to do with when I deploy? Like didn't you get lost somewhere?"
The relation is simple - you should deploy pretty much ASAP to your remote repo, and merge frequently to the main work repository. You should also pull the remote work frequently to ensure you are in sync with others.
Deploying to remote will run the integration checks to ensure things can be merged, and merging will allow others to see your work. Pulling the other's work will ensure you don't overwrite stuff.
Deploying to QA or UAT should be something tied to the project management cycle and is not up to an individual contributor.
For example, you can deploy to QA every sprint end, and deploy to UAT once EPICs are flagged as ready for UAT (a manual step).
Who Deploys ?
Different people across the lifecycle of the project.
On project setup, the DevOps engineer that sets up the pipeline should deploy and setup.
For standard work, you should deploy to your own repo, and the automated system should merge to common if all's good.
For end of sprints, the automated pipeline should deploy to QA.
For UAT, the Architect assigned to the project should run the required pipelines.
In most cases, the runs should be automatic, and key points should be covered by technical people.
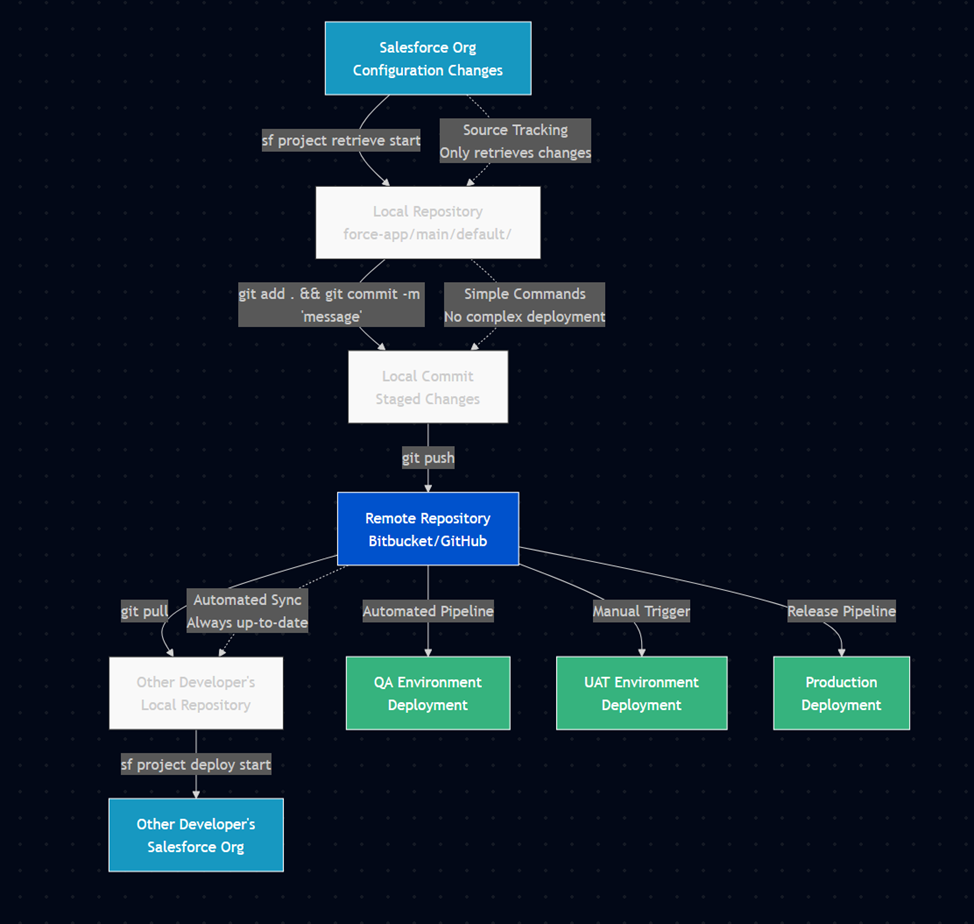
Chapter 2: Software List
This chapter explores the actual tools we are using in our example, the basic understanding needed for each tool, and an explanation of why we're doing things this way.
In short, our example relies on:
- Git
- A Git frontend if you are unused to Git - gitkraken is nice for Windows, or sourcetree.
- There's a quite nice VSCode extension that handles Git properly.
- Bitbucket
- A good text editor (VSCode is fine, I prefer Sublime Text)
- The SF command line
- SFDMU, a SF command line extension
- SGD, a SF command line extension
- Code Analyzer, a SF command line extension
- JIRA
- A terminal emulator (Cmdr is nice for windows, iTerm2 for MAC is fine)
You can completely use other tools if your project, your client, or your leadership want you do use other things.
The main reason we are using these in this example is that it relies on a tech stack that is very present with customers and widely used at a global level, while also leveraging reusable things as much as possible - technically speaking a lot of the configuration we do here is directly reusable in another pipeline provider, and the link to tickets is also something that can be integrated using another provider.
In short "use this, or something else if you know what you're doing".
So What are we using
The CLI
The first entrypoint into the pipeline is going to be the Salesforce Command Line.You can download it here.
If you want a graphical user interface, you should set up VSCode, which you can do by following this Trailhead. You can start using the CLI directly via the terminal if you already know what you're doing otherwise. If you're using VSCode, download Azul as well to avoid errors down the line.
We'll be using the Salesforce CLI to:
- login to organizations, and avoid that pesky MFA;
- pull changes from an organization once our config is done;
- rarely, push hotfixes to a UAT org.
For some roles, mainly architects and developers, we will also use it to:
- validate deploys to specific orgs in cases of hotfixes;
- setup SGD jobs in cases of commit-based deploys or destructive changes;
- setup SFDMU jobs for any data-based transfers.
What this actually does is allow you to interact with Salesforce. We will use it to get the configuration, security, and setting files that we will then deploy.
This allows us not only to deploy, but also to have a backup of the configuration, and an easy way to edit it via text edition software.
The configuration needed is literally just the installation to start - we'll set up a full project later down the line.
GIT
You'll then need to download Git, as well as a GUI if you're not used to using it directly from the command line. Git is VERY powerful but also quite annoying to learn fully, which is why we will keep its usage simple in our case.
We'll be using Git to:
- version our work so we can easily go back to earlier configurations in case of issues;
- document what we did when we modified something;
- get the work that other people have done;
- upload our work to the repositories for the project.
You'll need a bit more configuration once you're done installing - depending on the GUI you use (or if you're using the command line) the how depends on the exact software, but in short you'll need to configure git with your user name and your user email.
Logging in to Bitbucket and getting your repository from there will come later - once you've given your username and email, and configured your UI, we will consider that you are done for now.
If you're a normal user, this is all you'll see of git.
If you're a Dev or an Architect, you'll also be using the Branches and Merges functions of Git - mostly through the Bitbucket interface (and as such, with Pull Requests instead of Merges).
Bitbucket
As said in intro, we're using bitbucket because we're using bitbucket. You can use Github, Gitlab, Gitea, whatever - but this guide is for bitbucket.
Bitbucket, much like Salesforce, is a cloud solution. It is part of the Atlassian cloud offering, which also hosts JIRA, which we'll be configuring as well. You'll need to authenticate to your workspace (maybe get your Administrator to get you logins), in the format https://bitbucket.org/myworkspace
You will see that Bitbucket is a Git Server that contains Git Repositories.
In short, it is the central place where we'll host the different project repositories that we are going to use.
Built on top of the Git server are also subordinate functions such as Pull Requests, Deployments, Pipelines - which we're all going to use.
Seeing as we want this to be connected with our Atlassian cloud, we'll also ask you to go to https://bitbucket.org/account/settings/app-passwords/ which allows you to create application passwords, and to create one for Git.
In detail:
- Repositories: Developers store their Salesforce metadata and code in Bitbucket repositories. Each repository can represent a project or a component of a larger Salesforce application.
- Branching: Developers create branches for new features, bug fixes, or enhancements. This allows multiple developers to work on different parts of the codebase simultaneously without interfering with each other.
- Pull Requests: When a feature or bug fix is complete, a pull request is created. Other team members review the changes before they are merged into the main branch, ensuring code quality and consistency.
- Commits: Developers commit their changes to Bitbucket, providing a detailed commit message. These messages often include references to JIRA ticket numbers (e.g., "Fixed bug in login flow [JIRA-123]").
- JIRA: When a commit message includes a JIRA ticket number, JIRA can automatically update the status of the ticket, link the commit to the ticket, and provide traceability from issue identification to resolution.
- Pipelines: Bitbucket Pipelines can be configured to automatically build, test, and deploy Salesforce code changes. This ensures that changes are validated before being merged and deployed to production. It does so using Deployments - which in bitbucket means "the installation of code on a remote server", in our case Salesforce.
Extra Stuff
CLI Extensions
SGD
SGD, or Salesforce-Git-Delta is a command line plugin that allows the CLI to automatically generate a package.xml and a destructivechanges.xml based on the difference between two commits.
It allows you to do in Git what the CLI does alone using Source Tracking.
Why is it useful then ? Because Source Tracking is sometimes buggy, and also because in this case we're using Bitbucket, so it makes generating these deployment files independent from our machines.
SGD is very useful for inter-org deployment, which should technically be quite rare.
SFDMU
SFDMU, or the Salesforce Data Move Utility, is another command line plugin which is dataloader on steroids for when you want to migrate data between orgs or back stuff up to CSVs.
We use this because it allows migrating test data or config data (that last one should be VERY rare what with the presence of CMTD now) very easily including if you have hierarchies (Contacts of Accounts, etc).
Code Analyzer
AzulJDK
Basically just Java, but free. We don't use the old Java runtime because licensing is now extremely expensive.
A terminal emulator
If you don't spend a lot of time in the Terminal, you might not see that terminals aren't all equal.
A nice terminal emulator gives you things like copy/paste, better UX in general.
It's just quality of life.
A text editor
You should use VSCode unless you really want to do everything in separate apps.
If you're an expert you can use whatever floats your boat.
Chapter 3: Basic Machine Setup
1 - Install Local Software
If you are admin on your machine, download Visual Studio Code from this link. Otherwise, use whatever your IT has to install software, whether it be Software Center, opening a ticket, or anything else of that ilk.
As long as you're doing that, you can also install a JDK like AZUL, as well as Git, and a nice terminal emulator.
Also remember to install the Salesforce CLI.
These elements are all useful down the line, and doing all the setup at once avoids later issues.
2 - Configure the environment
Open your beautiful terminal emulator that you installed - we'll run a few commands in it to set it up.
SF CLI
Run the following command to update the sf cli. This is necessary because some installation sources won't have the latest version.sf update
You should see @salesforce/cli: Updating CLI run for a bit.
If you see an error saying sf is not a command or program, something went wrong during the installation in step 1. Contact your IT (or check the installation page of the CLI if you're Admin or not in an enterprise context).
Once that's done, run the following command to install the plugins we mentioned earlier - sfdmu, sgd, and code analyzerecho y | sf plugins install sfdmu sfdx-git-delta code-analyzer
Because sgd is not signed, you will get a warning saying that "This plugin is not digitally signed and its authenticity cannot be verified". This is expected, and you will have to answer y (yes) to proceed with the installation.
GIT
Once you've done that, run the following commands to configure git:
git config --global user.name "FirstName LastName" replacing Firstname and Lastname with your own.
git config --global user.email "email@server.tld" replacing the email with yours.
If you're running Windows - git config --global core.autocrlf true, followed by git config --global core.longpaths true - these allow git to properly handle line returns and long path names, which we have a lot of. For authentication, you should be using gcm by default, but just in case your installation got broken, run git config --global credential.helper manager to allow git to store logins.
If you're running Mac or Linux - git config --global core.autocrlf input and then go to the GCM Releases page, find the .pkg file, and install it.
All of this setup has to be done once, and you will probably never touch it again.
Finally, run
java --version
If you don't see an error, and you see something like openjdk 21.0.3 2024-04-16 LT then you installed Zulu properly and you're fine.
3 - Link Git to Bitbucket
Before proceeding, verify that Git is properly configured:
# Verify Git configuration
git config --global user.name
git config --global user.email
git config --global credential.helper
Create Atlassian API Token
-
Configure Token Scopes
- In the search bar, type
repositoryand select all repository-related scopes: Repositories: ReadRepositories: WriteRepositories: Admin(if you need admin access)- In the search bar, type
pull requestsand select: Pull requests: ReadPull requests: Write
- In the search bar, type
-
Copy and Secure Token
- Important: Copy the token immediately - you won't be able to see it again
- Store it securely (password manager recommended)
Treat this API token like a password.
Anyone with this token can access your Bitbucket repositories with the permissions you've granted.
Clone Repository and Authenticate
-
Navigate to Your Project Repository
- Go to your Bitbucket workspace:
https://bitbucket.org/your-workspace - Find your project repository
- Click the "Clone" button
- Copy the HTTPS clone URL

- Go to your Bitbucket workspace:
- Clone Repository Locally
# Navigate to your projects directory cd /path/to/your/projects # Clone the repository git clone https://bitbucket.org/workspace/repo-name.git cd repo-name -
Authentication Process
When prompted for credentials:-
If prompted to choose between "web" and "password/token", select "token"
-
Paste the token - the bitbucket username should be prefilled from the git clone URL
-
- Verify Authentication
git fetch origin
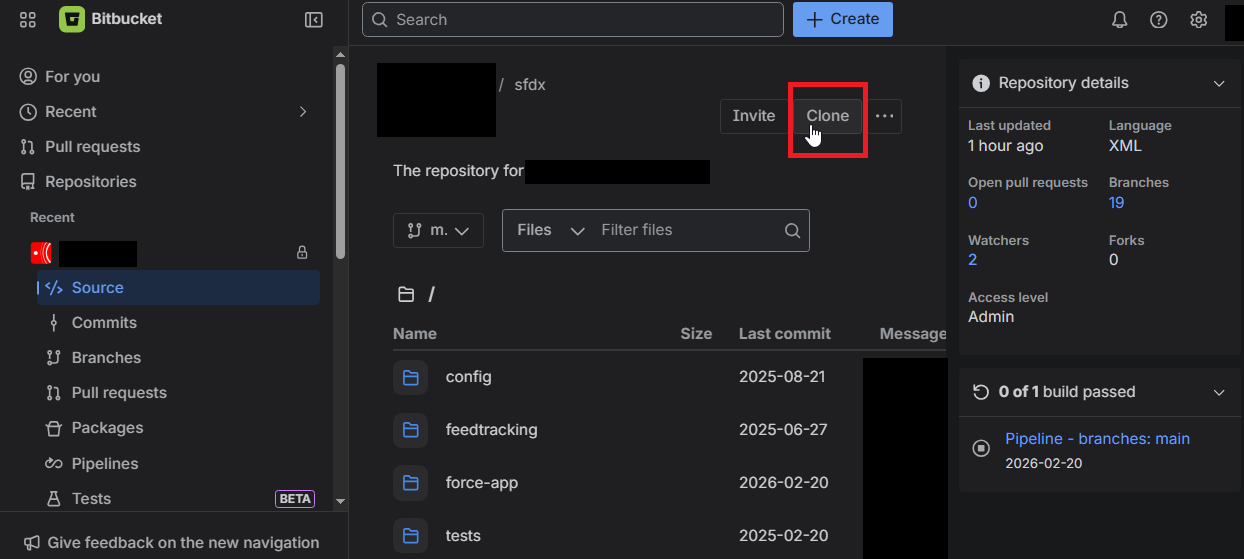
If the command completes without asking for credentials again, your authentication is properly configured and stored in Git Credential Manager (GCM).
4 - Configure VSCode
Open up VSCode.
Go to the Extensions in the side panel (it looks like three squares)  and search for "Salesforce", then install
- Salesforce Extensions Pack
- Salesforce Extensions Pack (Expanded)
- Salesforce Package.xml Generator for VS Code
- Salesforce CLI Command Builder
- Salesforce XML Formatter
Then search for Atlassian and install "Jira and Bitbucket (Atlassian Labs)".
Finally, search for and install "GitLens - Git supercharged".
Then go to Preferences > Settings > Salesforcedx-vscode-core: Detect Conflicts At Sync and check this checkbox.
Once all this is done, I recommend you go to the side panel, click on Source Control, and drag-and-drop both the Commit element and the topmost element to the right of the editor.
All this setup allows you to have more visual functions and shortcuts. If you fail to install some elements, it cannot be guaranteed that you will have all the elements you are supposed to.
This concludes basic machine setup.
All of this should not have to be done again on an already configured machine.
Chapter 4 - Base Project Setup
This chapter covers everything needed to make the bitbucket-pipelines.yml operational, and explains what the pipeline does and when. Once completed, these configurations rarely need modification.
4.1 Repository Setup
SFDX Project Creation
Create the base Salesforce DX project structure:
# Create new SFDX project
sf project generate --name "your-project-name" --template standard

# Navigate to project directory
cd your-project-name

# Initialize Git repository
git init
git add .
git commit -m "Initial SFDX project setup"
Required Project Structure
Your project should have this structure. Note the extra Config elements - we'll set these up here. They're used for the scratch org creation mostly.
your-project-name/
├── config/
│   ├── project-scratch-def.json
│   ├── packagestoinstall.txt
│   ├── permsets.txt
│   ├── codeanalyzer/
│   │   └── code-analyzer.yml
│   ├── sfdmu-currency/
│   ├── sfdmu-demodata/
│   └── payload.json.template.*
├── force-app/
│   └── main/
│       └── default/
├── pre-deploy-dependencies/
├── scripts/
├── tests/
├── .forceignore
├── .gitignore
├── .sgdignore
├── bitbucket-pipelines.yml
├── package.json
└── sfdx-project.json
Essential Configuration Files
.forceignore - Exclude metadata from deployments:
# List files or directories below to ignore them when running force:source:push, force:source:pull, and force:source:status
# More information: https://developer.salesforce.com/docs/atlas.en-us.sfdx_dev.meta/sfdx_dev/sfdx_dev_exclude_source.htm


# Package.xml and autogenerated package files
package.xml
package/**

# LWC configuration files
**/jsconfig.json
**/.eslintrc.json

# LWC Jest
**/__tests__/**

# Standard Elements that should never be retrieved
*.flexipages/LightningSalesConsole_UtilityBar**

# These metadata files are ignored when promoting (deploying)
**/appMenus/**
**/appSwitcher/**
**/fieldRestrictionRules/**
**/settings/**
**/AuthProvider/**

# User Access Policies error on Deploy due to a KI https://issues.salesforce.com/issue/a028c00000zKnmrAAC/undefined
**/useraccesspolicies/**

# These metadata files are ignored when pulling (retrieving) and are mostly things that are not deployable
*.appMenu
*.appSwitcher
*.rule
*.AuthProvider
*.featureParameters
# *.featureParametersInteger
# *.featureParametersBoolean


# Settings can cause issues
# *.settings

# Profiles are negated except the ones we want
# *.profile
**/profiles/**
!**/profiles/Admin*
!**/profiles/Read*

# Permissions on retrieve
*.sharingRules
**/sharingRules/**
*.profilePasswordPolicy
*.profileSessionSetting

# Permissions on deploy
**/profilePasswordPolicy/**
**/profileSessionSetting/**

# Translations
# .objectTranslations
# **/objectTranslations/**

# Project-Specific Exclusions
**/duplicateRules/**
.gitignore - Exclude files from version control:
# Salesforce cache
.sf/
.sfdx/
.localdevserver/

# IDE files
.vscode/
*.log
.DS_Store

# Node modules
node_modules/
.sgdignore - Exclude from SGD delta deployments:
# Exclude profiles and permission sets from delta
**/profiles/**
**/permissionsets/**

# UAPs don't deploy well via MDAPI, and there's a KI for UAPs with Groups
**/useraccesspolicies/**.sgddestrdignore - Tells SGD which files should never appear in destructive changes, even if deleted from the repo.
# Never auto-delete objects or their fields
force-app/main/default/objects/

# Never auto-delete permission sets
force-app/main/default/permissionsets/
Be conservative here. It is always safer to block a destructive change and apply it manually than to accidentally delete a field in production.
4.2 Bitbucket Repository Integration
4.2.1 Create Bitbucket Repository
-
In Bitbucket workspace:
- Create new repository:
your-project-name - Access level: Private
- Do not include README or .gitignore (we have our own)
- Create new repository:
-
Link local project to remote:
git remote add origin https://bitbucket.org/your-workspace/your-project-name.git
git push -u origin main
4.2.2 Repository Variables Configuration
Repository variables are accessible by all pipelines and users with push permissions. Configure these in Repository Settings → Pipelines → Repository variables.
Core Authentication Variables
| Variable Name | Type | Description | Example Value |
|---|---|---|---|
DEVHUB_TOKEN |
Secured | SFDX authentication URL for Dev Hub org | force://PlatformCLI::... |
ACCESS_TOKEN |
Secured | Default authentication token for deployments | force://PlatformCLI::... |
Notification & Communication
| Variable Name | Type | Description | Example Value |
|---|---|---|---|
TEAMS_WEBHOOK |
Secured | Microsoft Teams webhook URL for notifications | https://outlook.office.com/webhook/... |
BB_EMAIL |
Unsecured | Email for Bitbucket operations | cicd_projectnameb@company.com |
BB_EMAIL_PASSWORD |
Secured | Password for Bitbucket email account | •••••• |
Code Quality & Testing
| Variable Name | Type | Description | Example Value |
|---|---|---|---|
SEV_THRESH |
Unsecured | Code Analyzer severity threshold (1-3) | 1 |
Scratch Org Management
| Variable Name | Type | Description | Example Value |
|---|---|---|---|
SNAPSHOT_NAME |
Unsecured | Name for scratch org snapshots | Client_Project_Snap |
SF_DISABLE_SOURCE_MEMBER_POLLING |
Unsecured | Disable source member polling for performance | TRUE |
Setting Up Repository Variables
4.3 Deployment Environments
Configure in Repository Settings → Deployments. These are environment-specific variables and allow for example storing Salesforce login information.
| ariable Name | Type | Description | Example Value |
|---|---|---|---|
ACCESS_TOKEN |
Secured | Authentication URL | force://PlatformCLI::... |
INSTANCE_URL |
Unsecured | Salesforce instance URL | https://stuff--dev.sandbox.my.salesforce.com |
TESTLEVEL |
Unsecured | Test execution level for deployments | NoTestRun |
4.4 Salesforce Environment Setup
Authentication Token Generation
For Salesforce Orgs
-
Generate SFDX Auth URL:
# Login to the target org
sf org login web --alias target-org

# Generate auth URL
sf org display --target-org target-org --verbose

# Copy the "Sfdx Auth Url" value
- Format for Bitbucket:
- The auth URL format:
force://PlatformCLI::5Aep861...::user@example.com - Use this complete string as the
ACCESS_TOKENvalue - Always mark as Secured
- The auth URL format:
For Dev Hub
-
Enable Dev Hub in Production:
- Setup → Dev Hub → Enable Dev Hub
- Enable Source Tracking in Developer Sandboxes
-
Generate Dev Hub Token:
# Login to Production org (Dev Hub)
sf org login web --alias devhub --set-default-dev-hub

# Get auth URL
sf org display --target-org devhub --verbose
Dev Hub Configuration
In your Production org:
4.5 Teams Webhook Configuration
Create Teams Webhook
-
In Microsoft Teams:
- Navigate to your project channel
- Click ⋯ (More options) → Connectors
- Search for "Incoming Webhook"
- Click Configure
-
Configure Webhook:
- Name:
Salesforce CI/CD Pipeline - Upload icon (optional)
- Click Create
- Copy the webhook URL
- Name:
-
Add to Bitbucket:
- Use the webhook URL as
TEAMS_WEBHOOKvalue - Always mark as Secured
- Use the webhook URL as
4.6 Scratch Org Definition
Create config/project-scratch-def.json. The documentation for scratch org features are listed here, and settings are here. Trailhead about Scratch orgs.
{
  "orgName": "My Project Name Scratch Org",
  "adminEmail":"myprojectalias@company.com",
  "country":"US",
  "language":"en_US",
  "description": "Scratch Org for project blablabla.",
  "hasSampleData": true,
  "edition": "Enterprise",
  "features": [
    "ContactsToMultipleAccounts",
    "DebugApex",
    "EnableSetPasswordInApi",
    "EntityTranslation",
    "Entitlements",
    "ForceComPlatform",
    "Interaction",
    "FlowSites",
    "FieldService:5",
    "FieldServiceDispatcherUser:5",
    "FieldServiceMobileExtension",
    "FieldServiceMobileUser:5",
    "FieldServiceSchedulingUser:5",
    "LiveAgent",
    "MarketingUser",
    "SalesUser",
    "SalesforceContentUser",
    "StateAndCountryPicklist",
    "RecordTypes",
    "RefreshOnInvalidSession",
    "ServiceCloud",
    "ServiceUser"
  ],
  "settings": {
    "caseSettings": {
      "closeCaseThroughStatusChange" : true
    },
    "CustomAddressFieldSettings": {
     "enableCustomAddressField" : true
      },
    "userManagementSettings": {
        "permsetsInFieldCreation": true,
        "userAccessPoliciesEnabled" : true
      },
    "currencySettings":{
        "enableMultiCurrency": true
      },
    "languageSettings": {
          "enableTranslationWorkbench": true
      },
    "pathAssistantSettings": {
          "pathAssistantEnabled": true
      },
    "lightningExperienceSettings": {
      "enableS1DesktopEnabled": true,
      "enableUsersAreLightningOnly": true,
      "enableLexEndUsersNoSwitching": true
    },
    "mobileSettings": {
      "enableS1EncryptedStoragePref2": false
    },
    "opportunitySettings": {
      "enableOpportunityTeam": true
    },
    "quoteSettings": {
    "enableQuote": true,
    "enableQuotesWithoutOppEnabled": true
    },
    "securitySettings": {
      "enableAdminLoginAsAnyUser": true,
      "passwordPolicies": {
        "expiration": "Never",
        "historyRestriction": "0"
      },
      "sessionSettings": {
        "sessionTimeout": "TwelveHours"
      }
    },
   "sharingSettings": {
     "enableAssetSharing": true
    },
    "fieldServiceSettings": {
      "enableDocumentBuilder": true,
      "enableWorkOrders": true,
      "fieldServiceNotificationsOrgPref": true,
      "fieldServiceOrgPref": true
      },
    "chatterSettings": {
      "enableChatter": true
    }
  },
  "objectSettings": {
    "product2": {
      "sharingModel": "read"
    },
    "account": {
      "sharingModel": "read"
    },
  	"asset": {
      "sharingModel": "ControlledByParent"
    },
    "contact": {
      "sharingModel": "Private"
    }
  }
}
Package Installation List
Create config/packagestoinstall.txt:
# List package IDs to install in scratch orgs
# One per line, comments start with #
04t000000000000AAA
04t000000000001AAA
Permission Set Assignment
Create config/permsets.txt:
# Permission sets to assign after deployment
# One per line
MyCustomPermissionSet
AnotherPermissionSet
4.5 Code Quality Configuration
Code Analyzer Setup
Create config/codeanalyzer/code-analyzer.yml:
# ======================================================================
# CODE ANALYZER CONFIGURATION
# To learn more about this configuration, visit:
# https://developer.salesforce.com/docs/platform/salesforce-code-analyzer/guide/config-custom.html
# ======================================================================
# The absolute folder path to which all other path values in this configuration may be relative to.
# If unspecified, or if specified as null, then the value is automatically chosen to be the parent folder of your Code Analyzer
# configuration file if it exists, or the current working directory otherwise.
config_root: null
# Folder where to store log files. May be an absolute path or a path relative to config_root.
# If unspecified, or if specified as null, then the value is automatically chosen to be your machine's default temporary directory.
# log_folder: "./config/codeanalyzer/logs/"
# Level at which to log messages to log files.
# Possible values are:
# 1 or 'Error' - Includes only error messages in the log.
# 2 or 'Warn' - Includes warning and error messages in the log.
# 3 or 'Info' - Includes informative, warning, and error messages in the log.
# 4 or 'Debug' - Includes debug, informative, warning, and error messages in the log.
# 5 or 'Fine' - Includes fine detail, debug, informative, warning, and error messages in the log.
# If unspecified, or if specified as null, then the 'Debug' log level will be used.
log_level: 1
# Rule override settings of the format rules.{engine_name}.{rule_name}.{property_name} = {override_value} where:
# {engine_name} is the name of the engine containing the rule that you want to override.
# {rule_name} is the name of the rule that you want to override.
# {property_name} can either be:
# 'severity' - [Optional] The severity level value that you want to use to override the default severity level for the rule
# Possible values: 1 or 'Critical', 2 or 'High', 3 or 'Moderate', 4 or 'Low', 5 or 'Info'
# 'tags' - [Optional] The string array of tag values that you want to use to override the default tags for the rule
# ---- [Example usage]: ---------------------
# rules:
# eslint:
# sort-vars:
# severity: "Info"
# tags: ["Recommended", "Suggestion"]
# -------------------------------------------
rules:
# ======================================================================
# ESLINT ENGINE RULE OVERRIDES
# ======================================================================
eslint:
"@lwc/lwc-platform/no-aura":
severity: 3
tags:
- Recommended
- LWC
- ErrorProne
- JavaScript
"@lwc/lwc-platform/no-aura-libs":
severity: 3
tags:
- Recommended
- LWC
- ErrorProne
- JavaScript
"@lwc/lwc-platform/no-community-import":
severity: 3
tags:
- Recommended
- LWC
- ErrorProne
- JavaScript
"@lwc/lwc-platform/no-create-context-provider":
severity: 3
tags:
- Recommended
- LWC
- BestPractices
- JavaScript
"@lwc/lwc-platform/no-deprecated-module-import":
severity: 3
tags:
- Recommended
- LWC
- BestPractices
- JavaScript
"@lwc/lwc-platform/no-dynamic-import-identifier":
severity: 3
tags:
- Recommended
- LWC
- BestPractices
- JavaScript
"@lwc/lwc-platform/no-inline-disable":
severity: 3
tags:
- Recommended
- LWC
- BestPractices
- JavaScript
"@lwc/lwc-platform/no-interop":
severity: 3
tags:
- Recommended
- LWC
- BestPractices
- JavaScript
"@lwc/lwc-platform/no-interop-create":
severity: 3
tags:
- Recommended
- LWC
- BestPractices
- JavaScript
"@lwc/lwc-platform/no-interop-dispatch":
severity: 3
tags:
- Recommended
- LWC
- BestPractices
- JavaScript
"@lwc/lwc-platform/no-interop-execute":
severity: 3
tags:
- Recommended
- LWC
- BestPractices
- JavaScript
"@lwc/lwc-platform/no-interop-execute-privileged":
severity: 3
tags:
- Recommended
- LWC
- BestPractices
- JavaScript
"@lwc/lwc-platform/no-interop-execute-raw-response":
severity: 3
tags:
- Recommended
- LWC
- BestPractices
- JavaScript
"@lwc/lwc-platform/no-interop-get-event":
severity: 3
tags:
- Recommended
- LWC
- BestPractices
- JavaScript
"@lwc/lwc-platform/no-interop-get-module":
severity: 3
tags:
- Recommended
- LWC
- BestPractices
- JavaScript
"@lwc/lwc-platform/no-interop-is-external-definition":
severity: 3
tags:
- Recommended
- LWC
- BestPractices
- JavaScript
"@lwc/lwc-platform/no-interop-load-definitions":
severity: 3
tags:
- Recommended
- LWC
- BestPractices
- JavaScript
"@lwc/lwc-platform/no-interop-module-instrumentation":
severity: 3
tags:
- Recommended
- LWC
- BestPractices
- JavaScript
"@lwc/lwc-platform/no-interop-module-storage":
severity: 3
tags:
- Recommended
- LWC
- BestPractices
- JavaScript
"@lwc/lwc-platform/no-interop-register":
severity: 3
tags:
- Recommended
- LWC
- BestPractices
- JavaScript
"@lwc/lwc-platform/no-interop-render":
severity: 3
tags:
- Recommended
- LWC
- BestPractices
- JavaScript
"@lwc/lwc-platform/no-interop-sanitize":
severity: 3
tags:
- Recommended
- LWC
- BestPractices
- JavaScript
"@lwc/lwc-platform/no-process-env":
severity: 3
tags:
- Recommended
- LWC
- BestPractices
- JavaScript
"@lwc/lwc-platform/no-restricted-namespaces":
severity: 3
tags:
- Recommended
- LWC
- ErrorProne
- JavaScript
"@lwc/lwc-platform/no-site-import":
severity: 3
tags:
- Recommended
- LWC
- ErrorProne
- JavaScript
"@lwc/lwc-platform/no-wire-service":
severity: 3
tags:
- Recommended
- LWC
- ErrorProne
- JavaScript
"@lwc/lwc-platform/valid-dynamic-import-hint":
severity: 3
tags:
- Recommended
- LWC
- BestPractices
- JavaScript
"@lwc/lwc/no-api-reassignments":
severity: 3
tags:
- Recommended
- LWC
- BestPractices
- JavaScript
"@lwc/lwc/no-async-operation":
severity: 3
tags:
- Recommended
- LWC
- BestPractices
- JavaScript
"@lwc/lwc/no-attributes-during-construction":
severity: 3
tags:
- Recommended
- LWC
- ErrorProne
- JavaScript
"@lwc/lwc/no-deprecated":
severity: 3
tags:
- Recommended
- LWC
- BestPractices
- JavaScript
"@lwc/lwc/no-disallowed-lwc-imports":
severity: 3
tags:
- Recommended
- LWC
- BestPractices
- JavaScript
"@lwc/lwc/no-document-query":
severity: 3
tags:
- Recommended
- LWC
- ErrorProne
- JavaScript
"@lwc/lwc/no-inner-html":
severity: 2
tags:
- Recommended
- LWC
- Security
- JavaScript
"@lwc/lwc/no-leading-uppercase-api-name":
severity: 3
tags:
- Recommended
- LWC
- ErrorProne
- JavaScript
"@lwc/lwc/no-template-children":
severity: 3
tags:
- Recommended
- LWC
- ErrorProne
- JavaScript
"@lwc/lwc/no-unexpected-wire-adapter-usages":
severity: 3
tags:
- Recommended
- LWC
- BestPractices
- JavaScript
"@lwc/lwc/no-unknown-wire-adapters":
severity: 3
tags:
- Recommended
- LWC
- BestPractices
- JavaScript
"@lwc/lwc/prefer-custom-event":
severity: 3
tags:
- Recommended
- LWC
- BestPractices
- JavaScript
"@lwc/lwc/valid-api":
severity: 3
tags:
- Recommended
- LWC
- ErrorProne
- JavaScript
"@lwc/lwc/valid-graphql-wire-adapter-callback-parameters":
severity: 3
tags:
- Recommended
- LWC
- ErrorProne
- JavaScript
"@lwc/lwc/valid-track":
severity: 3
tags:
- Recommended
- LWC
- ErrorProne
- JavaScript
"@lwc/lwc/valid-wire":
severity: 3
tags:
- Recommended
- LWC
- ErrorProne
- JavaScript
"@salesforce/lightning/valid-apex-method-invocation":
severity: 3
tags:
- Recommended
- LWC
- ErrorProne
- JavaScript
"@typescript-eslint/adjacent-overload-signatures":
severity: 3
tags:
- BestPractices
- TypeScript
"@typescript-eslint/array-type":
severity: 3
tags:
- BestPractices
- TypeScript
"@typescript-eslint/await-thenable":
severity: 2
tags:
- ErrorProne
- TypeScript
"@typescript-eslint/ban-ts-comment":
severity: 2
tags:
- Recommended
- ErrorProne
- TypeScript
"@typescript-eslint/ban-tslint-comment":
severity: 3
tags:
- BestPractices
- TypeScript
"@typescript-eslint/class-literal-property-style":
severity: 2
tags:
- ErrorProne
- TypeScript
"@typescript-eslint/class-methods-use-this":
severity: 3
tags:
- BestPractices
- TypeScript
"@typescript-eslint/consistent-generic-constructors":
severity: 3
tags:
- BestPractices
- TypeScript
"@typescript-eslint/consistent-indexed-object-style":
severity: 3
tags:
- BestPractices
- TypeScript
"@typescript-eslint/consistent-return":
severity: 3
tags:
- BestPractices
- TypeScript
"@typescript-eslint/consistent-type-assertions":
severity: 3
tags:
- BestPractices
- TypeScript
"@typescript-eslint/consistent-type-definitions":
severity: 3
tags:
- BestPractices
- TypeScript
"@typescript-eslint/consistent-type-exports":
severity: 3
tags:
- BestPractices
- TypeScript
"@typescript-eslint/consistent-type-imports":
severity: 3
tags:
- BestPractices
- TypeScript
"@typescript-eslint/default-param-last":
severity: 3
tags:
- BestPractices
- TypeScript
"@typescript-eslint/dot-notation":
severity: 3
tags:
- BestPractices
- TypeScript
"@typescript-eslint/explicit-function-return-type":
severity: 2
tags:
- ErrorProne
- TypeScript
"@typescript-eslint/explicit-member-accessibility":
severity: 2
tags:
- ErrorProne
- TypeScript
"@typescript-eslint/explicit-module-boundary-types":
severity: 2
tags:
- ErrorProne
- TypeScript
"@typescript-eslint/init-declarations":
severity: 3
tags:
- BestPractices
- TypeScript
"@typescript-eslint/max-params":
severity: 3
tags:
- BestPractices
- TypeScript
"@typescript-eslint/member-ordering":
severity: 3
tags:
- BestPractices
- TypeScript
"@typescript-eslint/method-signature-style":
severity: 3
tags:
- BestPractices
- TypeScript
"@typescript-eslint/naming-convention":
severity: 3
tags:
- BestPractices
- TypeScript
"@typescript-eslint/no-array-constructor":
severity: 3
tags:
- Recommended
- BestPractices
- TypeScript
"@typescript-eslint/no-array-delete":
severity: 2
tags:
- ErrorProne
- TypeScript
"@typescript-eslint/no-base-to-string":
severity: 3
tags:
- BestPractices
- TypeScript
"@typescript-eslint/no-confusing-non-null-assertion":
severity: 2
tags:
- ErrorProne
- TypeScript
"@typescript-eslint/no-confusing-void-expression":
severity: 2
tags:
- ErrorProne
- TypeScript
"@typescript-eslint/no-deprecated":
severity: 2
tags:
- ErrorProne
- TypeScript
"@typescript-eslint/no-dupe-class-members":
severity: 2
tags:
- ErrorProne
- TypeScript
"@typescript-eslint/no-duplicate-enum-values":
severity: 2
tags:
- Recommended
- ErrorProne
- TypeScript
"@typescript-eslint/no-duplicate-type-constituents":
severity: 3
tags:
- BestPractices
- TypeScript
"@typescript-eslint/no-dynamic-delete":
severity: 3
tags:
- BestPractices
- TypeScript
"@typescript-eslint/no-empty-function":
severity: 3
tags:
- BestPractices
- TypeScript
"@typescript-eslint/no-empty-object-type":
severity: 3
tags:
- Recommended
- BestPractices
- TypeScript
"@typescript-eslint/no-explicit-any":
severity: 3
tags:
- Recommended
- BestPractices
- TypeScript
"@typescript-eslint/no-extra-non-null-assertion":
severity: 2
tags:
- Recommended
- ErrorProne
- TypeScript
"@typescript-eslint/no-extraneous-class":
severity: 3
tags:
- BestPractices
- TypeScript
"@typescript-eslint/no-floating-promises":
severity: 2
tags:
- ErrorProne
- TypeScript
"@typescript-eslint/no-for-in-array":
severity: 2
tags:
- ErrorProne
- TypeScript
"@typescript-eslint/no-implied-eval":
severity: 3
tags:
- BestPractices
- TypeScript
"@typescript-eslint/no-import-type-side-effects":
severity: 2
tags:
- ErrorProne
- TypeScript
"@typescript-eslint/no-inferrable-types":
severity: 3
tags:
- BestPractices
- TypeScript
"@typescript-eslint/no-invalid-this":
severity: 3
tags:
- BestPractices
- TypeScript
"@typescript-eslint/no-invalid-void-type":
severity: 2
tags:
- ErrorProne
- TypeScript
"@typescript-eslint/no-loop-func":
severity: 3
tags:
- BestPractices
- TypeScript
"@typescript-eslint/no-magic-numbers":
severity: 3
tags:
- BestPractices
- TypeScript
"@typescript-eslint/no-meaningless-void-operator":
severity: 3
tags:
- BestPractices
- TypeScript
"@typescript-eslint/no-misused-new":
severity: 2
tags:
- Recommended
- ErrorProne
- TypeScript
"@typescript-eslint/no-misused-promises":
severity: 2
tags:
- ErrorProne
- TypeScript
"@typescript-eslint/no-misused-spread":
severity: 2
tags:
- ErrorProne
- TypeScript
"@typescript-eslint/no-mixed-enums":
severity: 2
tags:
- ErrorProne
- TypeScript
"@typescript-eslint/no-namespace":
severity: 3
tags:
- Recommended
- BestPractices
- TypeScript
"@typescript-eslint/no-non-null-asserted-nullish-coalescing":
severity: 2
tags:
- ErrorProne
- TypeScript
"@typescript-eslint/no-non-null-asserted-optional-chain":
severity: 2
tags:
- Recommended
- ErrorProne
- TypeScript
"@typescript-eslint/no-non-null-assertion":
severity: 2
tags:
- ErrorProne
- TypeScript
"@typescript-eslint/no-redeclare":
severity: 3
tags:
- BestPractices
- TypeScript
"@typescript-eslint/no-redundant-type-constituents":
severity: 3
tags:
- BestPractices
- TypeScript
"@typescript-eslint/no-require-imports":
severity: 2
tags:
- Recommended
- ErrorProne
- TypeScript
"@typescript-eslint/no-restricted-imports":
severity: 3
tags:
- BestPractices
- TypeScript
"@typescript-eslint/no-restricted-types":
severity: 3
tags:
- BestPractices
- TypeScript
"@typescript-eslint/no-shadow":
severity: 3
tags:
- BestPractices
- TypeScript
"@typescript-eslint/no-this-alias":
severity: 3
tags:
- Recommended
- BestPractices
- TypeScript
"@typescript-eslint/no-unnecessary-boolean-literal-compare":
severity: 3
tags:
- BestPractices
- TypeScript
"@typescript-eslint/no-unnecessary-condition":
severity: 3
tags:
- BestPractices
- TypeScript
"@typescript-eslint/no-unnecessary-parameter-property-assignment":
severity: 3
tags:
- BestPractices
- TypeScript
"@typescript-eslint/no-unnecessary-qualifier":
severity: 3
tags:
- BestPractices
- TypeScript
"@typescript-eslint/no-unnecessary-template-expression":
severity: 3
tags:
- BestPractices
- TypeScript
"@typescript-eslint/no-unnecessary-type-arguments":
severity: 3
tags:
- BestPractices
- TypeScript
"@typescript-eslint/no-unnecessary-type-assertion":
severity: 3
tags:
- BestPractices
- TypeScript
"@typescript-eslint/no-unnecessary-type-constraint":
severity: 3
tags:
- Recommended
- BestPractices
- TypeScript
"@typescript-eslint/no-unnecessary-type-parameters":
severity: 2
tags:
- ErrorProne
- TypeScript
"@typescript-eslint/no-unsafe-argument":
severity: 2
tags:
- ErrorProne
- TypeScript
"@typescript-eslint/no-unsafe-assignment":
severity: 2
tags:
- ErrorProne
- TypeScript
"@typescript-eslint/no-unsafe-call":
severity: 2
tags:
- ErrorProne
- TypeScript
"@typescript-eslint/no-unsafe-declaration-merging":
severity: 2
tags:
- Recommended
- ErrorProne
- TypeScript
"@typescript-eslint/no-unsafe-enum-comparison":
severity: 3
tags:
- BestPractices
- TypeScript
"@typescript-eslint/no-unsafe-function-type":
severity: 2
tags:
- Recommended
- ErrorProne
- TypeScript
"@typescript-eslint/no-unsafe-member-access":
severity: 2
tags:
- ErrorProne
- TypeScript
"@typescript-eslint/no-unsafe-return":
severity: 2
tags:
- ErrorProne
- TypeScript
"@typescript-eslint/no-unsafe-type-assertion":
severity: 2
tags:
- ErrorProne
- TypeScript
"@typescript-eslint/no-unsafe-unary-minus":
severity: 2
tags:
- ErrorProne
- TypeScript
"@typescript-eslint/no-unused-expressions":
severity: 3
tags:
- Recommended
- BestPractices
- TypeScript
"@typescript-eslint/no-unused-vars":
severity: 2
tags:
- Recommended
- ErrorProne
- TypeScript
"@typescript-eslint/no-use-before-define":
severity: 2
tags:
- ErrorProne
- TypeScript
"@typescript-eslint/no-useless-constructor":
severity: 2
tags:
- ErrorProne
- TypeScript
"@typescript-eslint/no-useless-empty-export":
severity: 3
tags:
- BestPractices
- TypeScript
"@typescript-eslint/no-wrapper-object-types":
severity: 2
tags:
- Recommended
- ErrorProne
- TypeScript
"@typescript-eslint/non-nullable-type-assertion-style":
severity: 3
tags:
- BestPractices
- TypeScript
"@typescript-eslint/only-throw-error":
severity: 2
tags:
- ErrorProne
- TypeScript
"@typescript-eslint/parameter-properties":
severity: 2
tags:
- ErrorProne
- TypeScript
"@typescript-eslint/prefer-as-const":
severity: 3
tags:
- Recommended
- BestPractices
- TypeScript
"@typescript-eslint/prefer-destructuring":
severity: 3
tags:
- BestPractices
- TypeScript
"@typescript-eslint/prefer-enum-initializers":
severity: 3
tags:
- BestPractices
- TypeScript
"@typescript-eslint/prefer-find":
severity: 3
tags:
- BestPractices
- TypeScript
"@typescript-eslint/prefer-for-of":
severity: 3
tags:
- BestPractices
- TypeScript
"@typescript-eslint/prefer-function-type":
severity: 3
tags:
- BestPractices
- TypeScript
"@typescript-eslint/prefer-includes":
severity: 3
tags:
- BestPractices
- TypeScript
"@typescript-eslint/prefer-literal-enum-member":
severity: 3
tags:
- BestPractices
- TypeScript
"@typescript-eslint/prefer-namespace-keyword":
severity: 3
tags:
- Recommended
- BestPractices
- TypeScript
"@typescript-eslint/prefer-nullish-coalescing":
severity: 3
tags:
- BestPractices
- TypeScript
"@typescript-eslint/prefer-optional-chain":
severity: 3
tags:
- BestPractices
- TypeScript
"@typescript-eslint/prefer-promise-reject-errors":
severity: 3
tags:
- BestPractices
- TypeScript
"@typescript-eslint/prefer-readonly":
severity: 3
tags:
- BestPractices
- TypeScript
"@typescript-eslint/prefer-readonly-parameter-types":
severity: 3
tags:
- BestPractices
- TypeScript
"@typescript-eslint/prefer-reduce-type-parameter":
severity: 2
tags:
- ErrorProne
- TypeScript
"@typescript-eslint/prefer-regexp-exec":
severity: 3
tags:
- BestPractices
- TypeScript
"@typescript-eslint/prefer-return-this-type":
severity: 3
tags:
- BestPractices
- TypeScript
"@typescript-eslint/prefer-string-starts-ends-with":
severity: 3
tags:
- BestPractices
- TypeScript
"@typescript-eslint/promise-function-async":
severity: 3
tags:
- BestPractices
- TypeScript
"@typescript-eslint/related-getter-setter-pairs":
severity: 2
tags:
- ErrorProne
- TypeScript
"@typescript-eslint/require-array-sort-compare":
severity: 2
tags:
- ErrorProne
- TypeScript
"@typescript-eslint/require-await":
severity: 3
tags:
- BestPractices
- TypeScript
"@typescript-eslint/restrict-plus-operands":
severity: 2
tags:
- ErrorProne
- TypeScript
"@typescript-eslint/restrict-template-expressions":
severity: 2
tags:
- ErrorProne
- TypeScript
"@typescript-eslint/return-await":
severity: 2
tags:
- ErrorProne
- TypeScript
"@typescript-eslint/strict-boolean-expressions":
severity: 3
tags:
- BestPractices
- TypeScript
"@typescript-eslint/switch-exhaustiveness-check":
severity: 3
tags:
- BestPractices
- TypeScript
"@typescript-eslint/triple-slash-reference":
severity: 3
tags:
- Recommended
- BestPractices
- TypeScript
"@typescript-eslint/typedef":
severity: 3
tags:
- BestPractices
- TypeScript
"@typescript-eslint/unbound-method":
severity: 2
tags:
- ErrorProne
- TypeScript
"@typescript-eslint/unified-signatures":
severity: 3
tags:
- BestPractices
- TypeScript
"@typescript-eslint/use-unknown-in-catch-callback-variable":
severity: 3
tags:
- BestPractices
- TypeScript
"accessor-pairs":
severity: 3
tags:
- BestPractices
- JavaScript
- TypeScript
"array-callback-return":
severity: 2
tags:
- ErrorProne
- JavaScript
- TypeScript
"arrow-body-style":
severity: 3
tags:
- BestPractices
- JavaScript
- TypeScript
"block-scoped-var":
severity: 3
tags:
- BestPractices
- JavaScript
- TypeScript
"camelcase":
severity: 3
tags:
- BestPractices
- JavaScript
- TypeScript
"capitalized-comments":
severity: 3
tags:
- BestPractices
- JavaScript
- TypeScript
"class-methods-use-this":
severity: 3
tags:
- BestPractices
- JavaScript
"complexity":
severity: 3
tags:
- BestPractices
- JavaScript
- TypeScript
"consistent-return":
severity: 3
tags:
- BestPractices
- JavaScript
"consistent-this":
severity: 3
tags:
- BestPractices
- JavaScript
- TypeScript
"constructor-super":
severity: 2
tags:
- Recommended
- ErrorProne
- JavaScript
"curly":
severity: 3
tags:
- BestPractices
- JavaScript
- TypeScript
"default-case":
severity: 3
tags:
- BestPractices
- JavaScript
- TypeScript
"default-case-last":
severity: 3
tags:
- BestPractices
- JavaScript
- TypeScript
"default-param-last":
severity: 3
tags:
- BestPractices
- JavaScript
"dot-notation":
severity: 3
tags:
- BestPractices
- JavaScript
"eqeqeq":
severity: 3
tags:
- BestPractices
- JavaScript
- TypeScript
"for-direction":
severity: 2
tags:
- Recommended
- ErrorProne
- JavaScript
- TypeScript
"func-name-matching":
severity: 3
tags:
- BestPractices
- JavaScript
- TypeScript
"func-names":
severity: 3
tags:
- BestPractices
- JavaScript
- TypeScript
"func-style":
severity: 3
tags:
- BestPractices
- JavaScript
- TypeScript
"getter-return":
severity: 2
tags:
- Recommended
- ErrorProne
- JavaScript
"grouped-accessor-pairs":
severity: 3
tags:
- BestPractices
- JavaScript
- TypeScript
"guard-for-in":
severity: 3
tags:
- BestPractices
- JavaScript
- TypeScript
"id-denylist":
severity: 3
tags:
- BestPractices
- JavaScript
- TypeScript
"id-length":
severity: 3
tags:
- BestPractices
- JavaScript
- TypeScript
"id-match":
severity: 3
tags:
- BestPractices
- JavaScript
- TypeScript
"init-declarations":
severity: 3
tags:
- BestPractices
- JavaScript
"line-comment-position":
severity: 4
tags:
- CodeStyle
- JavaScript
- TypeScript
"logical-assignment-operators":
severity: 3
tags:
- BestPractices
- JavaScript
- TypeScript
"max-classes-per-file":
severity: 3
tags:
- BestPractices
- JavaScript
- TypeScript
"max-depth":
severity: 3
tags:
- BestPractices
- JavaScript
- TypeScript
"max-lines":
severity: 3
tags:
- BestPractices
- JavaScript
- TypeScript
"max-lines-per-function":
severity: 3
tags:
- BestPractices
- JavaScript
- TypeScript
"max-nested-callbacks":
severity: 3
tags:
- BestPractices
- JavaScript
- TypeScript
"max-params":
severity: 3
tags:
- BestPractices
- JavaScript
"max-statements":
severity: 3
tags:
- BestPractices
- JavaScript
- TypeScript
"multiline-comment-style":
severity: 3
tags:
- BestPractices
- JavaScript
- TypeScript
"new-cap":
severity: 3
tags:
- BestPractices
- JavaScript
- TypeScript
"no-alert":
severity: 3
tags:
- BestPractices
- JavaScript
- TypeScript
"no-array-constructor":
severity: 3
tags:
- BestPractices
- JavaScript
"no-async-promise-executor":
severity: 2
tags:
- Recommended
- ErrorProne
- JavaScript
- TypeScript
"no-await-in-loop":
severity: 2
tags:
- ErrorProne
- JavaScript
- TypeScript
"no-bitwise":
severity: 3
tags:
- BestPractices
- JavaScript
- TypeScript
"no-caller":
severity: 3
tags:
- BestPractices
- JavaScript
- TypeScript
"no-case-declarations":
severity: 3
tags:
- Recommended
- BestPractices
- JavaScript
- TypeScript
"no-class-assign":
severity: 2
tags:
- Recommended
- ErrorProne
- JavaScript
"no-compare-neg-zero":
severity: 2
tags:
- Recommended
- ErrorProne
- JavaScript
- TypeScript
"no-cond-assign":
severity: 2
tags:
- Recommended
- ErrorProne
- JavaScript
- TypeScript
"no-console":
severity: 3
tags:
- BestPractices
- JavaScript
- TypeScript
"no-const-assign":
severity: 2
tags:
- Recommended
- ErrorProne
- JavaScript
"no-constant-binary-expression":
severity: 2
tags:
- ErrorProne
- JavaScript
- TypeScript
"no-constant-condition":
severity: 2
tags:
- Recommended
- ErrorProne
- JavaScript
- TypeScript
"no-constructor-return":
severity: 2
tags:
- ErrorProne
- JavaScript
- TypeScript
"no-continue":
severity: 3
tags:
- BestPractices
- JavaScript
- TypeScript
"no-control-regex":
severity: 2
tags:
- Recommended
- ErrorProne
- JavaScript
- TypeScript
"no-debugger":
severity: 2
tags:
- Recommended
- ErrorProne
- JavaScript
- TypeScript
"no-delete-var":
severity: 3
tags:
- Recommended
- BestPractices
- JavaScript
- TypeScript
"no-div-regex":
severity: 3
tags:
- BestPractices
- JavaScript
- TypeScript
"no-dupe-args":
severity: 2
tags:
- Recommended
- ErrorProne
- JavaScript
"no-dupe-class-members":
severity: 2
tags:
- Recommended
- ErrorProne
- JavaScript
"no-dupe-else-if":
severity: 2
tags:
- Recommended
- ErrorProne
- JavaScript
- TypeScript
"no-dupe-keys":
severity: 2
tags:
- Recommended
- ErrorProne
- JavaScript
"no-duplicate-case":
severity: 2
tags:
- Recommended
- ErrorProne
- JavaScript
- TypeScript
"no-duplicate-imports":
severity: 2
tags:
- ErrorProne
- JavaScript
- TypeScript
"no-else-return":
severity: 3
tags:
- BestPractices
- JavaScript
- TypeScript
"no-empty":
severity: 3
tags:
- Recommended
- BestPractices
- JavaScript
- TypeScript
"no-empty-character-class":
severity: 2
tags:
- Recommended
- ErrorProne
- JavaScript
- TypeScript
"no-empty-function":
severity: 3
tags:
- BestPractices
- JavaScript
"no-empty-pattern":
severity: 2
tags:
- Recommended
- ErrorProne
- JavaScript
- TypeScript
"no-empty-static-block":
severity: 3
tags:
- BestPractices
- JavaScript
- TypeScript
"no-eq-null":
severity: 3
tags:
- BestPractices
- JavaScript
- TypeScript
"no-eval":
severity: 3
tags:
- BestPractices
- JavaScript
- TypeScript
"no-ex-assign":
severity: 2
tags:
- Recommended
- ErrorProne
- JavaScript
- TypeScript
"no-extend-native":
severity: 3
tags:
- BestPractices
- JavaScript
- TypeScript
"no-extra-bind":
severity: 3
tags:
- BestPractices
- JavaScript
- TypeScript
"no-extra-boolean-cast":
severity: 3
tags:
- Recommended
- BestPractices
- JavaScript
- TypeScript
"no-extra-label":
severity: 3
tags:
- BestPractices
- JavaScript
- TypeScript
"no-fallthrough":
severity: 2
tags:
- Recommended
- ErrorProne
- JavaScript
- TypeScript
"no-func-assign":
severity: 2
tags:
- Recommended
- ErrorProne
- JavaScript
"no-global-assign":
severity: 3
tags:
- Recommended
- BestPractices
- JavaScript
- TypeScript
"no-implicit-coercion":
severity: 3
tags:
- BestPractices
- JavaScript
- TypeScript
"no-implicit-globals":
severity: 3
tags:
- BestPractices
- JavaScript
- TypeScript
"no-implied-eval":
severity: 3
tags:
- BestPractices
- JavaScript
"no-import-assign":
severity: 2
tags:
- Recommended
- ErrorProne
- JavaScript
"no-inline-comments":
severity: 3
tags:
- BestPractices
- JavaScript
- TypeScript
"no-inner-declarations":
severity: 2
tags:
- Recommended
- ErrorProne
- JavaScript
- TypeScript
"no-invalid-regexp":
severity: 2
tags:
- Recommended
- ErrorProne
- JavaScript
- TypeScript
"no-invalid-this":
severity: 3
tags:
- BestPractices
- JavaScript
"no-irregular-whitespace":
severity: 2
tags:
- Recommended
- ErrorProne
- JavaScript
- TypeScript
"no-iterator":
severity: 3
tags:
- BestPractices
- JavaScript
- TypeScript
"no-label-var":
severity: 3
tags:
- BestPractices
- JavaScript
- TypeScript
"no-labels":
severity: 3
tags:
- BestPractices
- JavaScript
- TypeScript
"no-lone-blocks":
severity: 3
tags:
- BestPractices
- JavaScript
- TypeScript
"no-lonely-if":
severity: 3
tags:
- BestPractices
- JavaScript
- TypeScript
"no-loop-func":
severity: 3
tags:
- BestPractices
- JavaScript
"no-loss-of-precision":
severity: 2
tags:
- Recommended
- ErrorProne
- JavaScript
- TypeScript
"no-magic-numbers":
severity: 3
tags:
- BestPractices
- JavaScript
"no-misleading-character-class":
severity: 2
tags:
- Recommended
- ErrorProne
- JavaScript
- TypeScript
"no-multi-assign":
severity: 3
tags:
- BestPractices
- JavaScript
- TypeScript
"no-multi-str":
severity: 3
tags:
- BestPractices
- JavaScript
- TypeScript
"no-negated-condition":
severity: 3
tags:
- BestPractices
- JavaScript
- TypeScript
"no-nested-ternary":
severity: 3
tags:
- BestPractices
- JavaScript
- TypeScript
"no-new":
severity: 3
tags:
- BestPractices
- JavaScript
- TypeScript
"no-new-func":
severity: 3
tags:
- BestPractices
- JavaScript
- TypeScript
"no-new-native-nonconstructor":
severity: 2
tags:
- ErrorProne
- JavaScript
"no-new-symbol":
severity: 2
tags:
- Recommended
- ErrorProne
- JavaScript
"no-new-wrappers":
severity: 3
tags:
- BestPractices
- JavaScript
- TypeScript
"no-nonoctal-decimal-escape":
severity: 3
tags:
- Recommended
- BestPractices
- JavaScript
- TypeScript
"no-obj-calls":
severity: 2
tags:
- Recommended
- ErrorProne
- JavaScript
"no-object-constructor":
severity: 3
tags:
- BestPractices
- JavaScript
- TypeScript
"no-octal":
severity: 2
tags:
- Recommended
- ErrorProne
- JavaScript
- TypeScript
"no-octal-escape":
severity: 3
tags:
- BestPractices
- JavaScript
- TypeScript
"no-param-reassign":
severity: 3
tags:
- BestPractices
- JavaScript
- TypeScript
"no-plusplus":
severity: 3
tags:
- BestPractices
- JavaScript
- TypeScript
"no-promise-executor-return":
severity: 2
tags:
- ErrorProne
- JavaScript
- TypeScript
"no-proto":
severity: 3
tags:
- BestPractices
- JavaScript
- TypeScript
"no-prototype-builtins":
severity: 2
tags:
- Recommended
- ErrorProne
- JavaScript
- TypeScript
"no-redeclare":
severity: 3
tags:
- Recommended
- BestPractices
- JavaScript
"no-regex-spaces":
severity: 3
tags:
- Recommended
- BestPractices
- JavaScript
- TypeScript
"no-restricted-exports":
severity: 3
tags:
- BestPractices
- JavaScript
- TypeScript
"no-restricted-globals":
severity: 3
tags:
- BestPractices
- JavaScript
- TypeScript
"no-restricted-imports":
severity: 3
tags:
- BestPractices
- JavaScript
"no-restricted-properties":
severity: 3
tags:
- BestPractices
- JavaScript
- TypeScript
"no-restricted-syntax":
severity: 3
tags:
- BestPractices
- JavaScript
- TypeScript
"no-return-assign":
severity: 3
tags:
- BestPractices
- JavaScript
- TypeScript
"no-script-url":
severity: 3
tags:
- BestPractices
- JavaScript
- TypeScript
"no-self-assign":
severity: 2
tags:
- Recommended
- ErrorProne
- JavaScript
- TypeScript
"no-self-compare":
severity: 2
tags:
- ErrorProne
- JavaScript
- TypeScript
"no-sequences":
severity: 3
tags:
- BestPractices
- JavaScript
- TypeScript
"no-setter-return":
severity: 2
tags:
- Recommended
- ErrorProne
- JavaScript
"no-shadow":
severity: 3
tags:
- BestPractices
- JavaScript
"no-shadow-restricted-names":
severity: 3
tags:
- Recommended
- BestPractices
- JavaScript
- TypeScript
"no-sparse-arrays":
severity: 2
tags:
- Recommended
- ErrorProne
- JavaScript
- TypeScript
"no-template-curly-in-string":
severity: 2
tags:
- ErrorProne
- JavaScript
- TypeScript
"no-ternary":
severity: 3
tags:
- BestPractices
- JavaScript
- TypeScript
"no-this-before-super":
severity: 2
tags:
- Recommended
- ErrorProne
- JavaScript
"no-throw-literal":
severity: 3
tags:
- BestPractices
- JavaScript
"no-undef":
severity: 2
tags:
- Recommended
- ErrorProne
- JavaScript
"no-undef-init":
severity: 3
tags:
- BestPractices
- JavaScript
- TypeScript
"no-undefined":
severity: 3
tags:
- BestPractices
- JavaScript
- TypeScript
"no-underscore-dangle":
severity: 3
tags:
- BestPractices
- JavaScript
- TypeScript
"no-unexpected-multiline":
severity: 2
tags:
- Recommended
- ErrorProne
- JavaScript
- TypeScript
"no-unmodified-loop-condition":
severity: 2
tags:
- ErrorProne
- JavaScript
- TypeScript
"no-unneeded-ternary":
severity: 3
tags:
- BestPractices
- JavaScript
- TypeScript
"no-unreachable":
severity: 2
tags:
- Recommended
- ErrorProne
- JavaScript
"no-unreachable-loop":
severity: 2
tags:
- ErrorProne
- JavaScript
- TypeScript
"no-unsafe-finally":
severity: 2
tags:
- Recommended
- ErrorProne
- JavaScript
- TypeScript
"no-unsafe-negation":
severity: 2
tags:
- Recommended
- ErrorProne
- JavaScript
"no-unsafe-optional-chaining":
severity: 2
tags:
- Recommended
- ErrorProne
- JavaScript
- TypeScript
"no-unused-expressions":
severity: 3
tags:
- BestPractices
- JavaScript
"no-unused-labels":
severity: 3
tags:
- Recommended
- BestPractices
- JavaScript
- TypeScript
"no-unused-private-class-members":
severity: 2
tags:
- ErrorProne
- JavaScript
- TypeScript
"no-unused-vars":
severity: 2
tags:
- Recommended
- ErrorProne
- JavaScript
"no-use-before-define":
severity: 2
tags:
- ErrorProne
- JavaScript
"no-useless-backreference":
severity: 2
tags:
- Recommended
- ErrorProne
- JavaScript
- TypeScript
"no-useless-call":
severity: 3
tags:
- BestPractices
- JavaScript
- TypeScript
"no-useless-catch":
severity: 3
tags:
- Recommended
- BestPractices
- JavaScript
- TypeScript
"no-useless-computed-key":
severity: 3
tags:
- BestPractices
- JavaScript
- TypeScript
"no-useless-concat":
severity: 3
tags:
- BestPractices
- JavaScript
- TypeScript
"no-useless-constructor":
severity: 3
tags:
- BestPractices
- JavaScript
"no-useless-escape":
severity: 3
tags:
- Recommended
- BestPractices
- JavaScript
- TypeScript
"no-useless-rename":
severity: 3
tags:
- BestPractices
- JavaScript
- TypeScript
"no-useless-return":
severity: 3
tags:
- BestPractices
- JavaScript
- TypeScript
"no-var":
severity: 3
tags:
- Recommended
- BestPractices
- JavaScript
- TypeScript
"no-void":
severity: 3
tags:
- BestPractices
- JavaScript
- TypeScript
"no-warning-comments":
severity: 3
tags:
- BestPractices
- JavaScript
- TypeScript
"no-with":
severity: 3
tags:
- Recommended
- BestPractices
- JavaScript
"object-shorthand":
severity: 3
tags:
- BestPractices
- JavaScript
- TypeScript
"one-var":
severity: 3
tags:
- BestPractices
- JavaScript
- TypeScript
"operator-assignment":
severity: 3
tags:
- BestPractices
- JavaScript
- TypeScript
"prefer-arrow-callback":
severity: 3
tags:
- BestPractices
- JavaScript
- TypeScript
"prefer-const":
severity: 3
tags:
- Recommended
- BestPractices
- JavaScript
- TypeScript
"prefer-destructuring":
severity: 3
tags:
- BestPractices
- JavaScript
"prefer-exponentiation-operator":
severity: 3
tags:
- BestPractices
- JavaScript
- TypeScript
"prefer-named-capture-group":
severity: 3
tags:
- BestPractices
- JavaScript
- TypeScript
"prefer-numeric-literals":
severity: 3
tags:
- BestPractices
- JavaScript
- TypeScript
"prefer-object-has-own":
severity: 3
tags:
- BestPractices
- JavaScript
- TypeScript
"prefer-object-spread":
severity: 3
tags:
- BestPractices
- JavaScript
- TypeScript
"prefer-promise-reject-errors":
severity: 3
tags:
- BestPractices
- JavaScript
"prefer-regex-literals":
severity: 3
tags:
- BestPractices
- JavaScript
- TypeScript
"prefer-rest-params":
severity: 3
tags:
- Recommended
- BestPractices
- JavaScript
- TypeScript
"prefer-spread":
severity: 3
tags:
- Recommended
- BestPractices
- JavaScript
- TypeScript
"prefer-template":
severity: 3
tags:
- BestPractices
- JavaScript
- TypeScript
"radix":
severity: 3
tags:
- BestPractices
- JavaScript
- TypeScript
"require-atomic-updates":
severity: 2
tags:
- ErrorProne
- JavaScript
- TypeScript
"require-await":
severity: 3
tags:
- BestPractices
- JavaScript
"require-unicode-regexp":
severity: 3
tags:
- BestPractices
- JavaScript
- TypeScript
"require-yield":
severity: 3
tags:
- Recommended
- BestPractices
- JavaScript
- TypeScript
"sort-imports":
severity: 3
tags:
- BestPractices
- JavaScript
- TypeScript
"sort-keys":
severity: 3
tags:
- BestPractices
- JavaScript
- TypeScript
"sort-vars":
severity: 3
tags:
- BestPractices
- JavaScript
- TypeScript
"strict":
severity: 3
tags:
- BestPractices
- JavaScript
- TypeScript
"symbol-description":
severity: 3
tags:
- BestPractices
- JavaScript
- TypeScript
"unicode-bom":
severity: 4
tags:
- CodeStyle
- JavaScript
- TypeScript
"use-isnan":
severity: 2
tags:
- Recommended
- ErrorProne
- JavaScript
- TypeScript
"valid-typeof":
severity: 2
tags:
- Recommended
- ErrorProne
- JavaScript
- TypeScript
"vars-on-top":
severity: 3
tags:
- BestPractices
- JavaScript
- TypeScript
"yoda":
severity: 3
tags:
- BestPractices
- JavaScript
- TypeScript
# ======================================================================
# RETIRE-JS ENGINE RULE OVERRIDES
# ======================================================================
retire-js:
"LibraryWithKnownCriticalSeverityVulnerability":
severity: 1
tags:
- Recommended
- Security
- JavaScript
"LibraryWithKnownHighSeverityVulnerability":
severity: 2
tags:
- Recommended
- Security
- JavaScript
"LibraryWithKnownMediumSeverityVulnerability":
severity: 3
tags:
- Recommended
- Security
- JavaScript
"LibraryWithKnownLowSeverityVulnerability":
severity: 4
tags:
- Recommended
- Security
- JavaScript
# ======================================================================
# REGEX ENGINE RULE OVERRIDES
# ======================================================================
regex:
"NoTrailingWhitespace":
severity: 5
tags:
- Recommended
- CodeStyle
- Apex
"AvoidTermsWithImplicitBias":
severity: 5
tags:
- Recommended
- BestPractices
"AvoidOldSalesforceApiVersions":
severity: 2
tags:
- Recommended
- Security
- XML
"AvoidGetHeapSizeInLoop":
severity: 2
tags:
- Recommended
- Performance
- Apex
"MinVersionForAbstractVirtualClassesWithPrivateMethod":
severity: 2
tags:
- Recommended
- BestPractices
- Apex
# ======================================================================
# CPD ENGINE RULE OVERRIDES
# ======================================================================
cpd:
"DetectCopyPasteForApex":
severity: 5
tags:
- Recommended
- Design
- Apex
"DetectCopyPasteForHtml":
severity: 5
tags:
- Design
- Html
"DetectCopyPasteForJavascript":
severity: 5
tags:
- Recommended
- Design
- Javascript
"DetectCopyPasteForTypescript":
severity: 5
tags:
- Recommended
- Design
- Typescript
"DetectCopyPasteForVisualforce":
severity: 5
tags:
- Recommended
- Design
- Visualforce
"DetectCopyPasteForXml":
severity: 5
tags:
- Design
- Xml
# ======================================================================
# PMD ENGINE RULE OVERRIDES
# ======================================================================
pmd:
"ApexAssertionsShouldIncludeMessage":
severity: 3
tags:
- BestPractices
- Apex
"ApexBadCrypto":
severity: 2
tags:
- Recommended
- Security
- Apex
"ApexCRUDViolation":
severity: 2
tags:
- Recommended
- Security
- Apex
"ApexCSRF":
severity: 1
tags:
- Recommended
- Security
- Apex
"ApexDangerousMethods":
severity: 3
tags:
- Recommended
- Security
- Apex
"ApexDoc":
severity: 4
tags:
- Recommended
- Documentation
- Apex
"ApexInsecureEndpoint":
severity: 2
tags:
- Recommended
- Security
- Apex
"ApexOpenRedirect":
severity: 2
tags:
- Recommended
- Security
- Apex
"ApexSharingViolations":
severity: 3
tags:
- Recommended
- Security
- Apex
"ApexSOQLInjection":
severity: 2
tags:
- Recommended
- Security
- Apex
"ApexSuggestUsingNamedCred":
severity: 2
tags:
- Recommended
- Security
- Apex
"ApexUnitTestClassShouldHaveAsserts":
severity: 3
tags:
- Recommended
- BestPractices
- Apex
"ApexUnitTestClassShouldHaveRunAs":
severity: 4
tags:
- Recommended
- BestPractices
- Apex
"ApexUnitTestMethodShouldHaveIsTestAnnotation":
severity: 2
tags:
- Recommended
- BestPractices
- Apex
"ApexUnitTestShouldNotUseSeeAllDataTrue":
severity: 2
tags:
- Recommended
- BestPractices
- Apex
"ApexXSSFromEscapeFalse":
severity: 2
tags:
- Recommended
- Security
- Apex
"ApexXSSFromURLParam":
severity: 2
tags:
- Recommended
- Security
- Apex
"AssignmentInOperand":
severity: 3
tags:
- CodeStyle
- JavaScript
"AvoidApiSessionId":
severity: 2
tags:
- AppExchange
- Security
- XML
"AvoidAuraWithLockerDisabled":
severity: 1
tags:
- AppExchange
- Security
- XML
"AvoidChangeProtectionUnprotected":
severity: 1
tags:
- AppExchange
- Security
- Apex
"AvoidConsoleStatements":
severity: 3
tags:
- Performance
- JavaScript
"AvoidCreateElementScriptLinkTag":
severity: 2
tags:
- AppExchange
- Security
- Visualforce
"AvoidDebugStatements":
severity: 4
tags:
- Recommended
- Performance
- Apex
"AvoidDeeplyNestedIfStmts":
severity: 3
tags:
- Recommended
- Design
- Apex
"AvoidDirectAccessTriggerMap":
severity: 3
tags:
- Recommended
- ErrorProne
- Apex
"AvoidDisableProtocolSecurityRemoteSiteSetting":
severity: 3
tags:
- AppExchange
- Security
- XML
"AvoidGetInstanceWithTaint":
severity: 3
tags:
- AppExchange
- Security
- Apex
"AvoidGlobalInstallUninstallHandlers":
severity: 1
tags:
- AppExchange
- Security
- Apex
"AvoidGlobalModifier":
severity: 3
tags:
- Recommended
- BestPractices
- Apex
"AvoidHardCodedCredentialsInAura":
severity: 2
tags:
- AppExchange
- Security
- HTML
"AvoidHardcodedCredentialsInFieldDecls":
severity: 3
tags:
- AppExchange
- Security
- Apex
"AvoidHardcodedCredentialsInHttpHeader":
severity: 3
tags:
- AppExchange
- Security
- Apex
"AvoidHardcodedCredentialsInSetPassword":
severity: 1
tags:
- AppExchange
- Security
- Apex
"AvoidHardcodedCredentialsInVarAssign":
severity: 3
tags:
- AppExchange
- Security
- Apex
"AvoidHardcodedCredentialsInVarDecls":
severity: 3
tags:
- AppExchange
- Security
- Apex
"AvoidHardcodedSecretsInVFAttrs":
severity: 2
tags:
- AppExchange
- Security
- Visualforce
"AvoidHardcodingId":
severity: 3
tags:
- Recommended
- ErrorProne
- Apex
"AvoidInlineStyles":
severity: 4
tags:
- BestPractices
- HTML
"AvoidInsecureHttpRemoteSiteSetting":
severity: 3
tags:
- AppExchange
- Security
- XML
"AvoidInvalidCrudContentDistribution":
severity: 3
tags:
- AppExchange
- Security
- Apex
"AvoidJavaScriptCustomObject":
severity: 2
tags:
- AppExchange
- Security
- XML
"AvoidJavaScriptHomePageComponent":
severity: 2
tags:
- AppExchange
- Security
- XML
"AvoidJavaScriptInUrls":
severity: 1
tags:
- AppExchange
- Security
- XML
"AvoidJavaScriptWebLink":
severity: 2
tags:
- AppExchange
- Security
- XML
"AvoidLmcIsExposedTrue":
severity: 2
tags:
- AppExchange
- Security
- XML
"AvoidLogicInTrigger":
severity: 3
tags:
- Recommended
- BestPractices
- Apex
"AvoidLwcBubblesComposedTrue":
severity: 3
tags:
- AppExchange
- Security
- JavaScript
"AvoidNonExistentAnnotations":
severity: 4
tags:
- Recommended
- ErrorProne
- Apex
"AvoidNonRestrictiveQueries":
severity: 4
tags:
- Recommended
- Performance
- Apex
"AvoidSControls":
severity: 1
tags:
- AppExchange
- Security
- XML
"AvoidSecurityEnforcedOldApiVersion":
severity: 3
tags:
- AppExchange
- Security
- Apex
"AvoidStatefulDatabaseResult":
severity: 3
tags:
- Recommended
- ErrorProne
- Apex
"AvoidTrailingComma":
severity: 2
tags:
- ErrorProne
- JavaScript
"AvoidUnauthorizedApiSessionIdInApex":
severity: 3
tags:
- AppExchange
- Security
- Apex
"AvoidUnauthorizedApiSessionIdInVisualforce":
severity: 3
tags:
- AppExchange
- Security
- Visualforce
"AvoidUnauthorizedGetSessionIdInApex":
severity: 3
tags:
- AppExchange
- Security
- Apex
"AvoidUnauthorizedGetSessionIdInVisualforce":
severity: 2
tags:
- AppExchange
- Security
- Visualforce
"AvoidUnescapedHtmlInAura":
severity: 2
tags:
- AppExchange
- Security
- HTML
"AvoidUnsafePasswordManagementUse":
severity: 1
tags:
- AppExchange
- Security
- Apex
"AvoidWithStatement":
severity: 2
tags:
- BestPractices
- JavaScript
"ClassNamingConventions":
severity: 3
tags:
- Recommended
- CodeStyle
- Apex
"CognitiveComplexity":
severity: 3
tags:
- Recommended
- Design
- Apex
"ConsistentReturn":
severity: 3
tags:
- BestPractices
- JavaScript
"CyclomaticComplexity":
severity: 3
tags:
- Recommended
- Design
- Apex
"DebugsShouldUseLoggingLevel":
severity: 4
tags:
- Recommended
- BestPractices
- Apex
"EagerlyLoadedDescribeSObjectResult":
severity: 2
tags:
- Recommended
- Performance
- Apex
"EmptyCatchBlock":
severity: 2
tags:
- Recommended
- ErrorProne
- Apex
"EmptyIfStmt":
severity: 3
tags:
- Recommended
- ErrorProne
- Apex
"EmptyStatementBlock":
severity: 3
tags:
- Recommended
- ErrorProne
- Apex
"EmptyTryOrFinallyBlock":
severity: 3
tags:
- Recommended
- ErrorProne
- Apex
"EmptyWhileStmt":
severity: 3
tags:
- Recommended
- ErrorProne
- Apex
"EqualComparison":
severity: 3
tags:
- ErrorProne
- JavaScript
"ExcessiveClassLength":
severity: 3
tags:
- Recommended
- Design
- Apex
"ExcessiveParameterList":
severity: 3
tags:
- Recommended
- Design
- Apex
"ExcessivePublicCount":
severity: 3
tags:
- Recommended
- Design
- Apex
"FieldDeclarationsShouldBeAtStart":
severity: 3
tags:
- Recommended
- CodeStyle
- Apex
"FieldNamingConventions":
severity: 3
tags:
- Recommended
- CodeStyle
- Apex
"ForLoopsMustUseBraces":
severity: 3
tags:
- Recommended
- CodeStyle
- Apex
"ForLoopsMustUseBraces-javascript":
severity: 3
tags:
- CodeStyle
- JavaScript
"FormalParameterNamingConventions":
severity: 3
tags:
- Recommended
- CodeStyle
- Apex
"GlobalVariable":
severity: 2
tags:
- BestPractices
- JavaScript
"IfElseStmtsMustUseBraces":
severity: 3
tags:
- Recommended
- CodeStyle
- Apex
"IfElseStmtsMustUseBraces-javascript":
severity: 3
tags:
- CodeStyle
- JavaScript
"IfStmtsMustUseBraces":
severity: 3
tags:
- Recommended
- CodeStyle
- Apex
"IfStmtsMustUseBraces-javascript":
severity: 3
tags:
- CodeStyle
- JavaScript
"InaccessibleAuraEnabledGetter":
severity: 3
tags:
- Recommended
- ErrorProne
- Apex
"InaccurateNumericLiteral":
severity: 3
tags:
- ErrorProne
- JavaScript
"LimitConnectedAppScope":
severity: 3
tags:
- AppExchange
- Security
- XML
"LoadCSSApexStylesheet":
severity: 2
tags:
- AppExchange
- Security
- Visualforce
"LoadCSSLinkHref":
severity: 2
tags:
- AppExchange
- Security
- Visualforce
"LoadJavaScriptHtmlScript":
severity: 2
tags:
- AppExchange
- Security
- Visualforce
"LoadJavaScriptIncludeScript":
severity: 2
tags:
- AppExchange
- Security
- Visualforce
"LocalVariableNamingConventions":
severity: 3
tags:
- Recommended
- CodeStyle
- Apex
"MethodNamingConventions":
severity: 3
tags:
- Recommended
- CodeStyle
- Apex
"MethodWithSameNameAsEnclosingClass":
severity: 3
tags:
- Recommended
- ErrorProne
- Apex
"MissingEncoding":
severity: 3
tags:
- BestPractices
- XML
"MistypedCDATASection":
severity: 3
tags:
- ErrorProne
- XML
"NcssConstructorCount":
severity: 4
tags:
- Recommended
- Design
- Apex
"NcssMethodCount":
severity: 4
tags:
- Recommended
- Design
- Apex
"NcssTypeCount":
severity: 4
tags:
- Design
- Apex
"NoElseReturn":
severity: 3
tags:
- CodeStyle
- JavaScript
"OneDeclarationPerLine":
severity: 3
tags:
- Recommended
- CodeStyle
- Apex
"OperationWithHighCostInLoop":
severity: 3
tags:
- Recommended
- Performance
- Apex
"OperationWithLimitsInLoop":
severity: 3
tags:
- Recommended
- Performance
- Apex
"OverrideBothEqualsAndHashcode":
severity: 2
tags:
- Recommended
- ErrorProne
- Apex
"PropertyNamingConventions":
severity: 3
tags:
- Recommended
- CodeStyle
- Apex
"ProtectSensitiveData":
severity: 3
tags:
- AppExchange
- Security
- XML
"QueueableWithoutFinalizer":
severity: 4
tags:
- Recommended
- BestPractices
- Apex
"ScopeForInVariable":
severity: 2
tags:
- BestPractices
- JavaScript
"StdCyclomaticComplexity":
severity: 3
tags:
- Design
- Apex
"TestMethodsMustBeInTestClasses":
severity: 3
tags:
- Recommended
- ErrorProne
- Apex
"TooManyFields":
severity: 3
tags:
- Recommended
- Design
- Apex
"UnnecessaryBlock":
severity: 3
tags:
- CodeStyle
- JavaScript
"UnnecessaryParentheses":
severity: 4
tags:
- CodeStyle
- JavaScript
"UnnecessaryTypeAttribute":
severity: 3
tags:
- BestPractices
- HTML
"UnreachableCode":
severity: 2
tags:
- CodeStyle
- JavaScript
"UnusedLocalVariable":
severity: 3
tags:
- Recommended
- BestPractices
- Apex
"UnusedMethod":
severity: 3
tags:
- Recommended
- Design
- Apex
"UseAltAttributeForImages":
severity: 3
tags:
- BestPractices
- HTML
"UseBaseWithParseInt":
severity: 2
tags:
- BestPractices
- JavaScript
"UseHttpsCallbackUrlConnectedApp":
severity: 3
tags:
- AppExchange
- Security
- XML
"VfCsrf":
severity: 2
tags:
- Recommended
- Security
- Visualforce
"VfHtmlStyleTagXss":
severity: 2
tags:
- Recommended
- Security
- Visualforce
"VfUnescapeEl":
severity: 2
tags:
- Recommended
- Security
- Visualforce
"WhileLoopsMustUseBraces":
severity: 3
tags:
- Recommended
- CodeStyle
- Apex
"WhileLoopsMustUseBraces-javascript":
severity: 3
tags:
- CodeStyle
- JavaScript
# ======================================================================
# SFGE ENGINE RULE OVERRIDES
# ======================================================================
sfge:
"ApexFlsViolation":
severity: 2
tags:
- DevPreview
- Security
- Apex
"ApexNullPointerException":
severity: 3
tags:
- DevPreview
- ErrorProne
- Apex
"AvoidDatabaseOperationInLoop":
severity: 2
tags:
- DevPreview
- Performance
- Apex
"AvoidMultipleMassSchemaLookups":
severity: 2
tags:
- DevPreview
- Performance
- Apex
"DatabaseOperationsMustUseWithSharing":
severity: 2
tags:
- DevPreview
- Security
- Apex
"MissingNullCheckOnSoqlVariable":
severity: 3
tags:
- DevPreview
- Performance
- Apex
"UnimplementedType":
severity: 4
tags:
- DevPreview
- Performance
- Apex
# Engine specific custom configuration settings of the format engines.{engine_name}.{property_name} = {value} where:
# {engine_name} is the name of the engine containing the setting that you want to override.
# {property_name} is the name of a property that you would like to override.
# Each engine may have its own set of properties available to help customize that particular engine's behavior.
engines:
# ======================================================================
# FLOW SCANNER ENGINE CONFIGURATION
# To learn more about this configuration, visit:
# https://developer.salesforce.com/docs/platform/salesforce-code-analyzer/guide/engine-flow.html#flow-scanner-configuration-reference
# ======================================================================
flow:
# Whether to turn off the 'flow' engine so that it is not included when running Code Analyzer commands.
disable_engine: false
# Indicates the specific Python command to use for the 'Flow Scanner' engine.
# May be provided as the name of a command that exists on the path, or an absolute file path location.
# If unspecified, or specified as null, then an attempt will be made to automatically discover a Python command from your environment.
python_command: null
# ======================================================================
# ESLINT ENGINE CONFIGURATION
# To learn more about this configuration, visit:
# https://developer.salesforce.com/docs/platform/salesforce-code-analyzer/guide/engine-eslint.html#eslint-configuration-reference
# ======================================================================
eslint:
# Whether to turn off the 'eslint' engine so that it is not included when running Code Analyzer commands.
disable_engine: false
# Your project's main ESLint configuration file. May be an absolute path or a path relative to the config_root.
# If null and auto_discover_eslint_config is true, then Code Analyzer will attempt to discover/apply it automatically.
# Currently only legacy ESLInt config files are supported.
# See https://eslint.org/docs/v8.x/use/configure/configuration-files to learn more.
eslint_config_file: null
# Your project's ".eslintignore" file. May be an absolute path or a path relative to the config_root.
# If null and auto_discover_eslint_config is true, then Code Analyzer will attempt to discover/apply it automatically.
# See https://eslint.org/docs/v8.x/use/configure/ignore#the-eslintignore-file to learn more.
eslint_ignore_file: null
# Whether to have Code Analyzer automatically discover/apply any ESLint configuration and ignore files from your workspace.
auto_discover_eslint_config: false
# Whether to turn off the default base configuration that supplies the standard ESLint rules for JavaScript files.
disable_javascript_base_config: false
# Whether to turn off the default base configuration that supplies the LWC rules for JavaScript files.
disable_lwc_base_config: false
# Whether to turn off the default base configuration that supplies the standard rules for TypeScript files.
disable_typescript_base_config: false
# Extensions of the files in your workspace that will be used to discover rules.
# To associate file extensions to the standard ESLint JavaScript rules, LWC rules, or custom JavaScript-based
# rules, add them under the 'javascript' language. To associate file extensions to the standard TypeScript
# rules or custom TypeScript-based rules, add them under the 'typescript' language. To allow for the
# discovery of custom rules that are associated with any other language, then add the associated file
# extensions under the 'other' language.
file_extensions:
javascript:
- .js
- .cjs
- .mjs
typescript:
- .ts
other: []
# ======================================================================
# RETIRE-JS ENGINE CONFIGURATION
# To learn more about this configuration, visit:
# https://developer.salesforce.com/docs/platform/salesforce-code-analyzer/guide/engine-retire-js.html#retirejs-configuration-reference
# ======================================================================
retire-js:
# Whether to turn off the 'retire-js' engine so that it is not included when running Code Analyzer commands.
disable_engine: false
# ======================================================================
# REGEX ENGINE CONFIGURATION
# To learn more about this configuration, visit:
# https://developer.salesforce.com/docs/platform/salesforce-code-analyzer/guide/engine-regex.html#regex-configuration-reference
# ======================================================================
regex:
# Whether to turn off the 'regex' engine so that it is not included when running Code Analyzer commands.
disable_engine: false
# Custom rules to be added to the 'regex' engine of the format custom_rules.{rule_name}.{rule_property_name} = {value} where:
# {rule_name} is the name you would like to give to your custom rule
# {rule_property_name} is the name of one of the rule properties. You may specify the following rule properties:
# 'regex' - The regular expression that triggers a violation when matched against the contents of a file.
# 'file_extensions' - The extensions of the files that you would like to test the regular expression against.
# 'description' - A description of the rule's purpose
# 'violation_message' - [Optional] The message emitted when a rule violation occurs.
# This message is intended to help the user understand the violation.
# Default: 'A match of the regular expression {regex} was found for rule {rule_name}: {description}'
# 'severity' - [Optional] The severity level to apply to this rule by default.
# Possible values: 1 or 'Critical', 2 or 'High', 3 or 'Moderate', 4 or 'Low', 5 or 'Info'
# Default: 3
# 'tags' - [Optional] The string array of tag values to apply to this rule by default.
# Default: ['Recommended']
# ---- [Example usage]: ---------------------
# engines:
# regex:
# custom_rules:
# "NoTodoComments":
# regex: /\/\/[ \t]*TODO/gi
# file_extensions: [".apex", ".cls", ".trigger"]
# description: "Prevents TODO comments from being in apex code."
# violation_message: "A comment with a TODO statement was found. Please remove TODO statements from your apex code."
# severity: "Info"
# tags: ["TechDebt"]
# -------------------------------------------
custom_rules:
# Object naming conventions
"ObjectNamingConvention":
regex: /<CustomObject>\s*<fullName>(?!([A-Z][a-zA-Z0-9]*__c))<\/fullName>/g
file_extensions: [".xml"]
description: "Object API names must follow naming conventions."
violation_message: "Custom object API names must be in PascalCase with __c suffix."
severity: "High"
tags: ["NamingConvention"]
# Field PascalCase validation
"FieldPascalCaseValidation":
regex: /<CustomField[^>]*>[\s\S]*?<fullName>(?!([A-Z][a-zA-Z0-9]*)(__c)?)<\/fullName>/g
file_extensions: [".xml"]
description: "Field API names must be in PascalCase."
violation_message: "Field API names must follow PascalCase convention."
severity: "High"
tags: ["NamingConvention"]
# Boolean field naming (must start with Is or IsCan)
"BooleanFieldNaming":
regex: /<CustomField[^>]*>[\s\S]*?<type>Checkbox<\/type>[\s\S]*?<fullName>(?!(Is|IsCan)[A-Za-z0-9]*(__c)?)<\/fullName>/g
file_extensions: [".xml"]
description: "Boolean fields must start with 'Is' or 'IsCan'."
violation_message: "Boolean field API names must start with 'Is' or 'IsCan'."
severity: "High"
tags: ["NamingConvention"]
# Lookup field naming (must end with Ref)
"LookupFieldNaming":
regex: /<CustomField[^>]*>[\s\S]*?<type>Lookup<\/type>[\s\S]*?<fullName>(?!.*Ref(__c)?)[A-Za-z0-9_]*<\/fullName>/g
file_extensions: [".xml"]
description: "Lookup fields must end with 'Ref'."
violation_message: "Lookup field API names must end with 'Ref__c'."
severity: "High"
tags: ["NamingConvention"]
# Master-Detail field naming (must end with Ref)
"MasterDetailFieldNaming":
regex: /<CustomField[^>]*>[\s\S]*?<type>MasterDetail<\/type>[\s\S]*?<fullName>(?!.*Ref(__c)?)[A-Za-z0-9_]*<\/fullName>/g
file_extensions: [".xml"]
description: "Master-Detail fields must end with 'Ref'."
violation_message: "Master-Detail field API names must end with 'Ref__c'."
severity: "High"
tags: ["NamingConvention"]
# Formula field naming (must end with Auto)
"FormulaFieldNaming":
regex: /<CustomField[^>]*>[\s\S]*?<type>Formula<\/type>[\s\S]*?<fullName>(?!.*Auto(__c)?)[A-Za-z0-9_]*<\/fullName>/g
file_extensions: [".xml"]
description: "Formula fields must end with 'Auto'."
violation_message: "Formula field API names must end with 'Auto__c'."
severity: "High"
tags: ["NamingConvention"]
# Rollup Summary field naming (must end with Auto)
"RollupSummaryFieldNaming":
regex: /<CustomField[^>]*>[\s\S]*?<type>Summary<\/type>[\s\S]*?<fullName>(?!.*Auto(__c)?)[A-Za-z0-9_]*<\/fullName>/g
file_extensions: [".xml"]
description: "Rollup Summary fields must end with 'Auto'."
violation_message: "Rollup Summary field API names must end with 'Auto__c'."
severity: "Moderate"
tags: ["NamingConvention"]
# Picklist field naming (must end with Pick)
"PicklistFieldNaming":
regex: /<CustomField[^>]*>[\s\S]*?<type>Picklist<\/type>[\s\S]*?<fullName>(?![A-Za-z0-9_]*Pick__c)[A-Za-z0-9_]+__c<\/fullName>/g
file_extensions: [".xml"]
description: "Picklist fields must end with 'Pick'."
violation_message: "Picklist field API names must end with 'Pick__c'."
severity: "High"
tags: ["NamingConvention"]
# Multipicklist field naming (must end with Pick)
"MultipicklistFieldNaming":
regex: /<CustomField[^>]*>[\s\S]*?<type>Picklist<\/type>[\s\S]*?<fullName>(?![A-Za-z0-9_]*Pick__c)[A-Za-z0-9_]+__c<\/fullName>/g
file_extensions: [".xml"]
description: "Multipicklist fields must end with 'Pick'."
violation_message: "Multipicklist field API names must end with 'Pick__c'."
severity: "High"
tags: ["NamingConvention"]
# Field filled by automation (must end with Trig)
"AutomationFieldNaming":
regex: /<CustomField[^>]*>[\s\S]*?<description>(?=.*\b(filled by apex|trigger|automation)\b)[\s\S]*?<\/description>[\s\S]*?<fullName>(?!.*Trig(__c)?)[A-Za-z0-9_]*<\/fullName>/gi
file_extensions: [".xml"]
description: "Fields filled by automation must end with 'Trig'."
violation_message: "Fields filled by automation must end with 'Trig__c'."
severity: "Moderate"
tags: ["NamingConvention"]
# Technical fields (must start with TECH_)
"TechnicalFieldNaming":
regex: /<CustomField[^>]*>[\s\S]*?<fullName>(?!TECH_)[A-Za-z0-9_]*<\/fullName>[\s\S]*?<description>(?=.*\b(technical|not displayed|shouldn't display)\b)[\s\S]*?<\/description>/gi
file_extensions: [".xml"]
description: "Technical fields must start with 'TECH_'."
violation_message: "Technical field API names must start with 'TECH_'."
severity: "Moderate"
tags: ["NamingConvention"]
# Enforce description for custom fields
"CustomFieldDescription":
regex: /<CustomField[^>]*>(?![\s\S]*?<description>[^<]+<\/description>)[\s\S]*?<fullName>(?!\w+__\w+__c)[^<]*__c<\/fullName>[\s\S]*?<\/CustomField>/g
file_extensions: [".xml"]
description: "Custom fields must have a non-empty description."
violation_message: "Custom field must have a non-empty description. Add a meaningful description to explain the field's purpose."
severity: "High"
tags: ["Documentation", "NamingConvention"]
# ======================================================================
# CPD ENGINE CONFIGURATION
# To learn more about this configuration, visit:
# https://developer.salesforce.com/docs/platform/salesforce-code-analyzer/guide/engine-cpd.html#cpd-configuration-reference
# ======================================================================
cpd:
# Whether to turn off the 'cpd' engine so that it is not included when running Code Analyzer commands.
disable_engine: true
# Indicates the specific 'java' command associated with the JRE or JDK to use for the 'cpd' engine.
# May be provided as the name of a command that exists on the path, or an absolute file path location.
# If unspecified, or specified as null, then an attempt will be made to automatically discover a 'java' command from your environment.
java_command: null # Last calculated by the config command as: "java"
# Specifies the list of file extensions to associate to each rule language.
# The rule(s) associated with a given language will run against all the files in your workspace containing one of
# the specified file extensions. Each file extension can only be associated to one language. If a specific language
# is not specified, then a set of default file extensions for that language will be used.
file_extensions:
apex:
- .cls
- .trigger
html:
- .html
- .htm
- .xhtml
- .xht
- .shtml
- .cmp
javascript:
- .js
- .cjs
- .mjs
typescript:
- .ts
visualforce:
- .page
- .component
xml:
- .xml
# Specifies the minimum tokens threshold for each rule language.
# The minimum tokens threshold is the number of tokens required to be in a duplicate block of code in order to be
# reported as a violation. The concept of a token may be defined differently per language, but in general it is a
# distinct basic element of source code. For example, this could be language specific keywords, identifiers,
# operators, literals, and more. See https://docs.pmd-code.org/latest/pmd_userdocs_cpd.html to learn more.
# If a value for a language is unspecified, then the default value of 100 will be used for that language.
minimum_tokens:
apex: 100
html: 100
javascript: 100
typescript: 100
visualforce: 100
xml: 100
# Indicates whether to ignore multiple copies of files of the same name and length.
skip_duplicate_files: false
# ======================================================================
# PMD ENGINE CONFIGURATION
# To learn more about this configuration, visit:
# https://developer.salesforce.com/docs/platform/salesforce-code-analyzer/guide/engine-pmd.html#pmd-configuration-reference
# ======================================================================
pmd:
# Whether to turn off the 'pmd' engine so that it is not included when running Code Analyzer commands.
disable_engine: false
# Indicates the specific 'java' command associated with the JRE or JDK to use for the 'pmd' engine.
# May be provided as the name of a command that exists on the path, or an absolute file path location.
# If unspecified, or specified as null, then an attempt will be made to automatically discover a 'java' command from your environment.
java_command: null # Last calculated by the config command as: "java"
# Specifies the list of file extensions to associate to each rule language.
# The rule(s) associated with a given language will run against all the files in your workspace containing one of
# the specified file extensions. Each file extension can only be associated to one language. If a specific language
# is not specified, then a set of default file extensions for that language will be used.
file_extensions:
apex:
- .cls
- .trigger
html:
- .html
- .htm
- .xhtml
- .xht
- .shtml
- .cmp
javascript:
- .js
- .cjs
- .mjs
typescript:
- .ts
visualforce:
- .page
- .component
xml:
- .xml
# List of jar files and/or folders to add the Java classpath when running PMD.
# Each entry may be given as an absolute path or a relative path to 'config_root'.
# This field is primarily used to supply custom Java based rule definitions to PMD.
# See https://pmd.github.io/pmd/pmd_userdocs_extending_writing_java_rules.html
java_classpath_entries: []
# List of xml ruleset files containing custom PMD rules to be made available for rule selection.
# Each ruleset must be an xml file that is either:
# - on disk (provided as an absolute path or a relative path to 'config_root')
# - or a relative resource found on the Java classpath.
# Not all custom rules can be fully defined within an xml ruleset file. For example, Java based rules may be defined in jar files.
# In these cases, you will need to also add your additional files to the Java classpath using the 'java_classpath_entries' field.
# See https://pmd.github.io/pmd/pmd_userdocs_making_rulesets.html to learn more about PMD rulesets.
custom_rulesets: []
# ======================================================================
# SFGE ENGINE CONFIGURATION
# This engine is in Developer Preview and is subject to change.
# To learn more about this configuration, visit:
# [PLACEHOLDER LINK]
# ======================================================================
sfge:
# Whether to turn off the 'sfge' engine so that it is not included when running Code Analyzer commands.
disable_engine: false
# Whether to prevent 'sfge' from throwing LimitReached violations for complex paths.
# By default, Salesforce Graph Engine attempts to detect complex paths that might cause OutOfMemory errors,
# and throws LimitReached violations for these paths to continue evaluating other paths safely. The allowed
# complexity is dynamically calculated based on the max Java heap size available, but in some cases you may
# desire to disable this check in addition to increasing java_max_heap_size.
disable_limit_reached_violations: false
# Indicates the specific 'java' command associated with the JRE or JDK to use for the 'sfge' engine.
# May be provided as the name of a command that exists on the path, or an absolute file path location.
# If unspecified, or specified as null, then an attempt will be made to automatically discover a 'java' command from your environment.
java_command: null # Last calculated by the config command as: "java"
# Specifies the maximum size (in bytes) of the Java heap. The specified value is appended to the '-Xmx' Java
# command option. The value must be a multiple of 1024, and greater than 2MB. Append the letters 'k', 'K', 'kb',
# or 'KB' to indicate kilobytes, 'm', 'M', 'mb', or 'MB' to indicate megabytes, and 'g', 'G', 'gb', or 'GB' to
# indicate gigabytes. If unspecified, or specified as null, then the JVM will dynamically choose a default value
# at runtime based on system configuration.
java_max_heap_size: null
# Specifies the number of Java threads available for parallel execution. Increasing the thread count allows for
# Salesforce Graph Engine to evaluate more paths at the same time.
java_thread_count: 4
# Specifies the maximum time (in milliseconds) a specific Java thread may execute before Salesforce Graph Engine
# issues a Timeout violation.
java_thread_timeout: 900000
# ======================================================================
# END OF CODE ANALYZER CONFIGURATION
# ======================================================================
4.6 JIRA Integration
Project Setup
-
Create JIRA project with these issue types:
- Epic
- Story
- Bug
- Task
-
Configure workflow states:
Backlog → In Progress → In Review → Ready for Deploy → Done- Link to Bitbucket:
- Enable Development integration in JIRA project settings
- Connect to your Bitbucket repository
Smart Commits Configuration
Enable automatic JIRA transitions based on commit messages:
# Commit message format
git commit -m "PROJ-123: Add validation rule to Account object

- Added required field validation
- Updated test classes
- Ready for UAT testing"
4.7 Notification Setup
Microsoft Teams Integration
- Create Teams webhook in your project channel
- Add webhook URL to Bitbucket environment variables
- Configure notification templates in
config/directory:
{
    "type":"message",
    "attachments":[
       {
          "contentType":"application/vnd.microsoft.card.adaptive",
          "contentUrl":null,
          "content":{
            "$schema":"http://adaptivecards.io/schemas/adaptive-card.json",
            "type":"AdaptiveCard",
            "version": "1.4",
            "body": [
                {
                    "type": "Container",
                    "items": [
                        {
                            "type": "TextBlock",
                            "text": "$TITLE",
                            "weight": "Bolder",
                            "size": "Medium",
                            "color": "Good"
                        },
                        {
                            "type": "ColumnSet",
                            "columns": [
                                {
                                    "type": "Column",
                                    "width": "auto",
                                    "items": [
                                        {
                                            "type": "Image",
                                            "url": "https://cdn-icons-png.flaticon.com/512/1907/1907742.png",
                                            "altText": "Pipeline Logo",
                                            "size": "Small"
                                        }
                                    ]
                                },
                                {
                                    "type": "Column",
                                    "width": "stretch",
                                    "items": [
                                        {
                                            "type": "TextBlock",
                                            "text": "Scratch Org Creation",
                                            "weight": "Bolder",
                                            "wrap": true
                                        },
                                        {
                                            "type": "TextBlock",
                                            "spacing": "None",
                                            "text": "$STATUS on $BITBUCKET_BRANCH",
                                            "isSubtle": true,
                                            "wrap": true,
                                            "color": "Good"
                                        }
                                    ]
                                }
                            ]
                        }
                    ]
                },
                {
                    "type": "Container",
                    "items": [
                        {
                            "type": "TextBlock",
                            "text": "The Login URL for the login command is ",
                            "wrap": true
                        },
                        {
                            "type": "TextBlock",
                            "text": "$SF_SCRATCH_AUTH",
                            "wrap": true,
                            "spacing": "Small",
                            "fontType": "Monospace",
                            "isSubtle": true,
                            "color": "Dark",
                            "weight": "Bolder"
                        },
                        {
                            "type": "TextBlock",
                            "text": "Please login using the command in  your terminal",
                            "wrap": true
                        },
                        {
                            "type": "TextBlock",
                            "text": "echo URL | sf org login sfdx-url --alias ALIAS --sfdx-url-stdin ",
                            "wrap": true,
                            "spacing": "Small",
                            "spacing": "Small",
                            "fontType": "Monospace",
                            "isSubtle": true,
                            "color": "Dark",
                            "weight": "Bolder"
                        },
                        {
                            "type": "TextBlock",
                            "text": "where URL is the URL above and ALIAS is your choice of alias to log in.",
                            "wrap": true
                        },
                        {
                            "type": "TextBlock",
                            "text": "If you prefer to use the VSCode, please select",
                            "wrap": true,
                            "weight": "Bolder"
                        },
                        {
                            "type": "TextBlock",
                            "text": "'Authorize an Org using SessionId'",
                            "wrap": true
                        },
                        {
                            "type": "TextBlock",
                            "text": "and paste the following token.",
                            "wrap": true
                        },
                        {
                            "type": "TextBlock",
                            "text": "$SF_SCRATCH_TOKEN",
                            "wrap": true,
                            "spacing": "Small",
                            "spacing": "Small",
                            "fontType": "Monospace",
                            "isSubtle": true,
                            "color": "Dark",
                            "weight": "Bolder"
                        },
                        {
                            "type": "FactSet",
                            "facts": [
                                {
                                    "title": "Status:",
                                    "value": "Success"
                                }
                            ]
                        }
                    ]
                }
            ]
        }
    }
 ]
}Chapter 4.5 - Using an Existing Project
Repository
- Go to Bitbucket
- Go the repository for the project.
- At the top right of "Source", click Clone, then "Clone in VS Code"

- Allow VSCode to open the link and install the extension if you are requested to do so. Also trust the publisher "Atlassian".
- If this is the first time, click on "Login to JIRA", follow the steps (including "back to vs code"), then also login to Bitbucket using the same screen.
- If during the Clone, Git requests a login, you might need an App Password. You can create one by going to the cog on the top right, going to Personal Bitbucket Settings, and App passwords.
- VScode will ask what to do - select "clone a new copy", and store it somewhere on your computer.

- Log in to the Org that you will be working against. Presumably a scratch org, but if you're still using persistent Orgs, this means login to Production, and Dev orgs as needed, using
- Ensure your workspace has Source Source Tracking, Atlassian, and Salesforce icons.
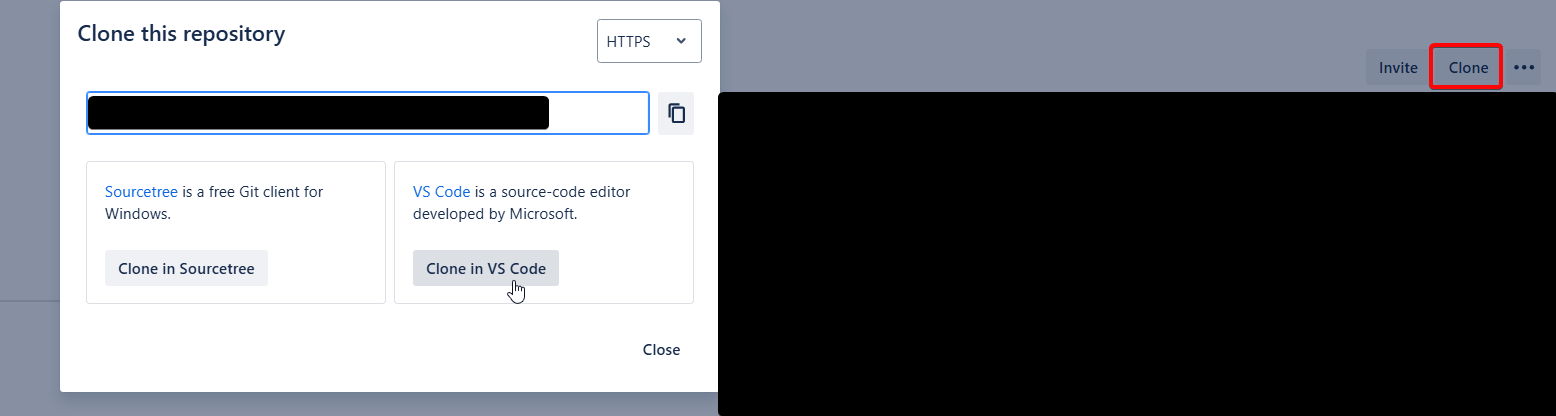
Salesforce
- Go to your Production, then navigate to Setup > Dev Hub. ensure
Enable Dev HubandEnable Source Tracking in Developer and Developer Pro Sandboxesare both checked.
These settings allow both the CLI and Change Sets to function with Source Tracking.
This fully replaces the usual "compare the source and the target organizations
VSCode
- Open VSCode and open your Repository Folder using VSCode.
- If necessary, run
sf org login --alias MyOrgwith MyOrg being the org type (examples:Client-Prod,Client-Dev,Client-ScratchFeatureName) - Start working in Salesforce, then go the Terminal and run
sf project retrieve start --target-org MyOrg --ignore-conflicts --wait 20where MyOrg is the organization you have logged in to which contains what you want. This assumes Source tracking is on.
This works best if you are the only one working in an Org. If you are not, you might want to start using Scratch orgs. Otherwise, you will see all the changes done by everyone.
- Go the Terminal and run
sf project deploy start --target-org MyOrg --ignore-conflicts --wait 20where MyOrg is the organization you have logged in to which must receive what you got. This assumes Source tracking is on. If Source Tracking is not on, or you want to do a full send, you can runsf project deploy start --target-org MyOrg --source-dir force-app --ignore-conflicts --wait 20 - Go to Source tab in VSCode, then add a commit message, Stage the changes required, and Commit.
- Push your changes (the cloud with an upwards arrow - name may change based on context)


Chapter 5: Daily Development Workflow
This chapter outlines the day-to-day development process that consultants follow when working with Salesforce deployments in a CI/CD environment. The workflow is designed to enable frequent, safe deployments while maintaining team collaboration and code quality.
The Core Development Cycle
The daily development workflow follows a simple but powerful pattern that ensures all changes are tracked, validated, and deployable:
- Pull from remote using Git
- Do your changes in your Salesforce org
- Retrieve your changes using the CLI
- Commit using Git with a ticket number for JIRA tracking
- Push to Bitbucket using Git
Things that happen automatically without you handling them:
- Differentials
- Syncs with other people working on the project
- Deployments to Salesforce on sprint end
This workflow transforms every local commit into a "mini-deployment" - a validated, deployable unit that can be applied to any Salesforce org later.
Understanding "When do I Deploy?"
Frequent Deployment, But Not Directly to Salesforce Orgs
The key principle is that you deploy frequently, but not directly to Salesforce orgs. Instead, you're constantly synchronizing with your team through the repository.
Metadata Retrieval and Local Development
You use the Salesforce CLI or Metadata API to retrieve metadata (XML files) from Salesforce orgs to your local file system. This creates a local copy of customizations like custom objects, page layouts, and configurations for development work.
Local Git Commit: The "Mini-Deployment"
A local commit saves the current state of Salesforce metadata on your computer. Think of it as a "mini-deployment" - you're packaging validated changes into a deployable unit. This commit acts as a snapshot that can be deployed to any Salesforce org later. It's stored locally as a "warehouse of things to deploy" until pushed to the remote repository.
Push to Remote Repository (Bitbucket)
Pushing syncs your local commits to the remote repository (Bitbucket). This action accomplishes two critical functions:
- Uploads your changes to the shared repository
- Downloads all changes made by other team members
Managing Conflicts
Prevention Through Frequent Syncing
Conflicts often happen if you're not syncing to remote often enough. Frequent pulling and pushing is essential to avoid merge conflicts. Merge conflicts occur when multiple developers modify the same Salesforce components in different environments 2.
Best Practice: Pull before starting work, push frequently during development. If you pull and push frequently, Salesforce should handle the conflicts itself.
Conflict Resolution
When conflicts arise, a Technical Architect must resolve them. Conflicts happen when the same metadata components are modified by different developers. Resolution requires understanding both sets of changes and determining the correct final state 2.
Daily Workflow Steps
1. Start of Day

Setup
# Navigate to your project directory
cd path/to/your-salesforce-project

# Pull latest changes from the team
git pull origin main

# Login to your development org (usually a scratch org)
sf org login web --alias my-scratch-org
2. Sync Team Changes to Your Org
# Deploy teammates' latest changes to your scratch org
sf project deploy start --target-org my-scratch-org --source-dir force-app --wait 20
3. Development Work
Work directly in your Salesforce org using the standard Salesforce interface:
- Create/modify custom objects, fields, validation rules
- Build flows, process builders, or other automation
- Develop Apex classes, triggers, and Lightning components
- Configure page layouts, record types, and other metadata
4. Retrieve Your Changes
# Retrieve metadata changes from your org to local files
sf project retrieve start --target-org my-scratch-org --ignore-conflicts --wait 20

# Alternative: Retrieve specific metadata types
sf project retrieve start --metadata ApexClass,CustomObject --target-org my-scratch-org
5. Review and Commit Changes
# Check what was retrieved
git status
git diff

# Stage specific files (selective commit)
git add force-app/main/default/classes/MyClass.cls
git add force-app/main/default/objects/MyObject__c/

# Commit with ticket number for JIRA integration
git commit -m "TICKET-123: Add validation rule to Account object

- Added required field validation for Account Name
- Updated related test classes
- Ready for UAT testing"
6. Push to Repository
# Push changes to remote repository
git push origin feature/my-ticket-branch
Automated Pipeline Integration
Once you push your changes, the automated pipeline takes over :
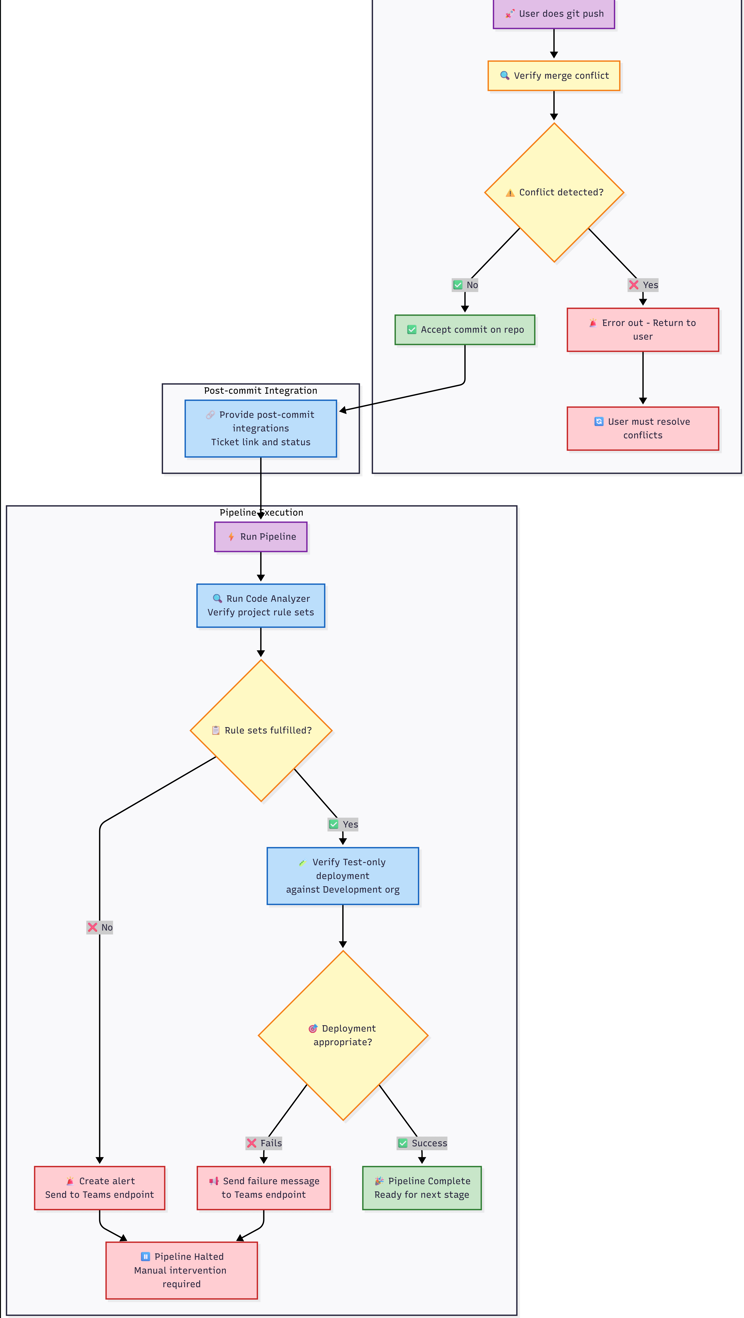
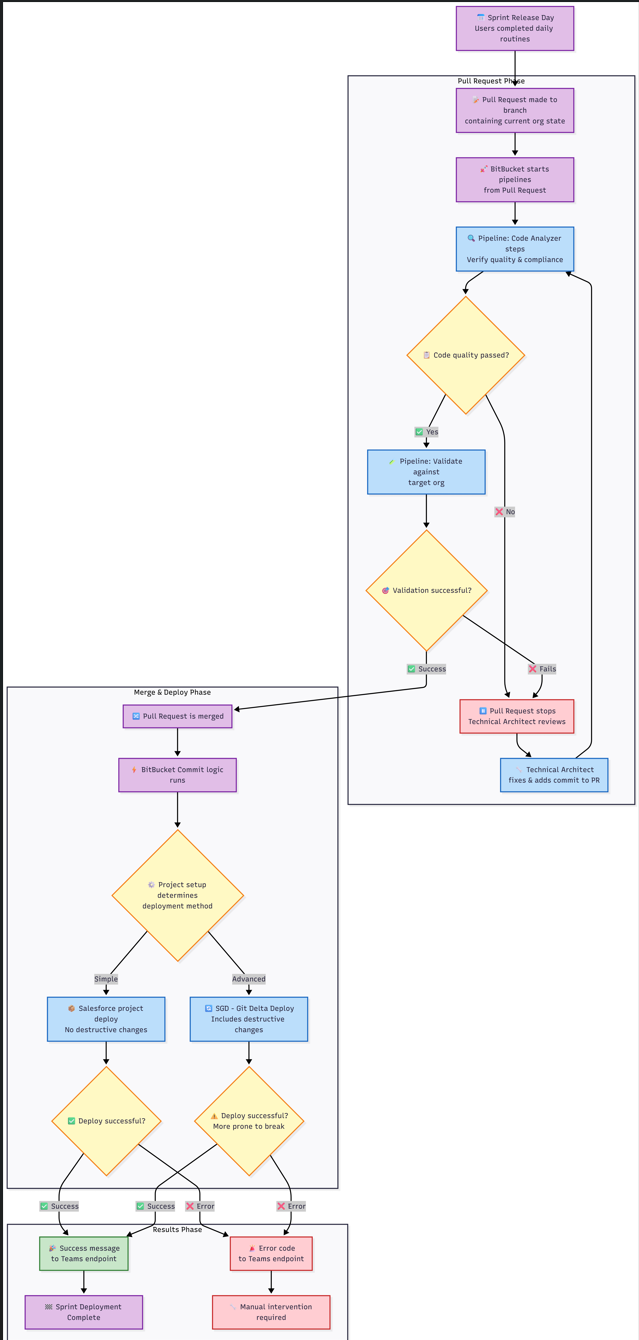
Code Quality Checks
The pipeline automatically runs code quality checks based on what you've changed:
- Apex Code Analysis: PMD, SFGE, and CPD checks for Apex classes and triggers
- LWC Analysis: ESLint and Retire-js checks for Lightning Web Components
- Flow Analysis: Flow Scanner checks for Salesforce Flows
- Security Scans: Comprehensive security and best practice validation
Validation Deployments
For pull requests, the pipeline runs validation deployments:
- Validates metadata can be deployed without errors
- Runs appropriate test levels based on target environment
- Checks for conflicts with existing metadata
Environment-Specific Actions
Based on your branch and target, different actions occur automatically:
- Feature branches → Dev: Validation against Dev environment
- Release branches → UAT: Full deployment to UAT
- Hotfix branches → Production: Comprehensive validation and testing
- Main branch: Continuous validation without deployment
Working with Scratch Orgs
Scratch Org Lifecycle
Scratch orgs are temporary development environments that typically last 7-30 days. The pipeline provides automated scratch org management:
- Creation: Automated scratch org creation with project-specific configuration
- Setup: Automatic package installation, permission set assignment, and data loading
- Snapshots: Template creation for faster future scratch org provisioning
Scratch Org Best Practices
- Use snapshots for faster org creation when available
- Load demo data from UAT for realistic testing scenarios
- Assign permission sets automatically through configuration files
- Refresh regularly to avoid expiration and maintain clean state
Integration with Project Management
JIRA Integration
Every commit should reference a JIRA ticket number in the commit message. This enables:
- Automatic ticket status updates
- Traceability from requirements to implementation
- Release notes generation
- Change impact analysis
Teams Notifications
The pipeline sends automatic notifications to Microsoft Teams channels :
- Code quality check results
- Deployment success/failure notifications
- Scratch org creation confirmations
- Validation results with artifact links
Troubleshooting Common Issues
Merge Conflicts
If you encounter merge conflicts:
- Pull the latest changes:
git pull origin main - Resolve conflicts in your IDE
- Test the resolution in your scratch org
- Commit and push the resolution
- If unable to resolve, escalate to Technical Architect
Deployment Failures
When deployments fail:
- Check the pipeline logs in Bitbucket
- Review code quality reports in the artifacts
- Fix issues locally and re-commit
- Use validation deployments to test fixes
Org Sync Issues
If your org gets out of sync with the repository:
- Use
sf project retrieve startto get latest org state - Review differences with
git diff - Commit necessary changes or revert unwanted ones
- The pipeline includes sync checks to detect this automatically
Chapter 6 - Creating a New Project
Setting up the Project
SF Cli Project
- Open VSCode and navigate to the folder where you want to create the Project - presumably
somefolder/sfdx_projectsor equivalent - Use CTRL+SHIFT+P to open the VSCode Command Panel and type SFDX, then select
SFDX:Create Project
- Select
emptythen type the name of your project and type Enter. - This will create a new SF Project. VS Code will ask if you want to open the folder - say yes.
- You should now have the VScode Project open.
- Select the Source tracking tab of VS Code and click "Initialize Repository"

- Go to Bitbucket and create a repository.
 Make it "empty" and refuse to add a GitIgnore.
 - Copy the URL given by Bitbucket in the format
https://MYNAME@bitbucket.org/MYWORSPACE/MYREPO.gitwhich should be displayed in the screen. - Select the three dots at the top right of the leftmost panel, then click "Add Remote"

- Paste the URL, select "Add Remote from URL". When asked for the remote name, type
originthen press enter. - At the bottom right, click yes on "Run Fetch periodically".

- run
git push --set-upstream origin mainin the VSCode Terminal to sync your local and remote branches.
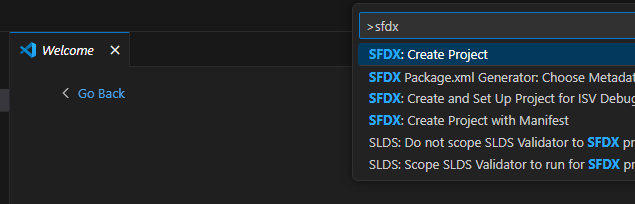
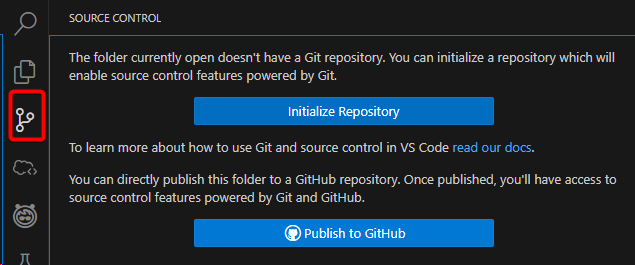
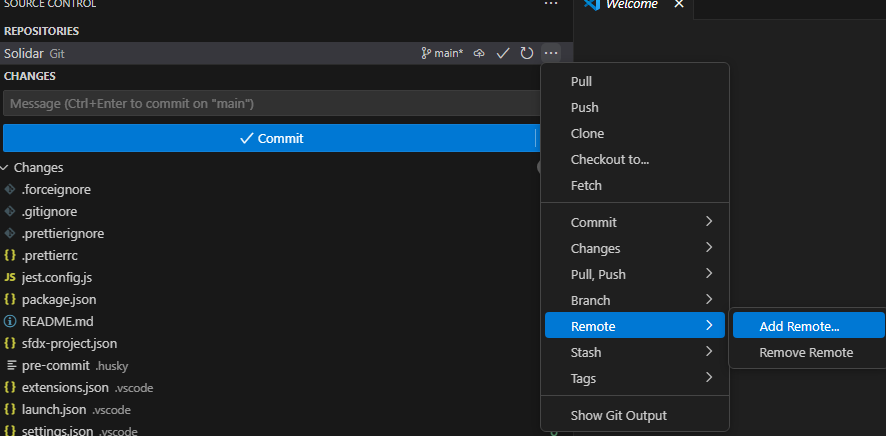

Fetch your Salesforce Metadata
- Login to your Salesforce org. This can be done using CTRL+SHIFT+P
Authorize an Org, or runningsf org login web --alias MyOrgin the terminal where MyOrg is the name you want to give to the org. - Run
sf project retrieve start --target-org MyOrg --ignore-conflicts --wait 20 - Commit the state of the project and push
Continue working
Useful Command reference
Base
sf org login web --alias MyOrg
Login
git add . && git commit -m "My Commit Message" && git push
quick and dirty commit everything from local
git remote update origin --prune
get all Branches from remote and remove the deleted ones from your local
Deployments
sf project retrieve start --target-org MyOrg --ignore-conflicts --wait 20
Retrieve changes from Org. Assumes Source Tracking is on.
sf project retrieve start --target-org MyOrg --ignore-conflicts --wait 20 -x manifest/package.xml
Get the metadata listed in the package from the Org
sf project retrieve start --target-org MyOrg --ignore-conflicts --wait 20 -m InstalledPackage:FSL
Retrieve specific metadata from the org. Based on the Metadata Types from SF https://developer.salesforce.com/docs/atlas.en-us.api_meta.meta/api_meta/meta_types_list.htm
sf project deploy start --target-org MyOrg --ignore-conflicts --wait 20
Deploy the source. Does destructive changes and assumes source tracking
sf project deploy start --target-org MyOrg --source-dir force-app --ignore-conflicts --wait 20
Deploy the metadata contained in the force-app folder. Does not do destructive changes.
sf project deploy start --target-org MyOrg --manifest package/package.xml --pre-destructive-changes destructiveChanges/destructiveChanges.xml --ignore-conflicts --ignore-warnings --wait 20 --dry-run
Same as previous but validates only
Using SGD
sf sgd:source:delta --to HEAD --from HEAD~1 --output-dir . -i .sgdignore
sgd - do delta from last commit to current commit, generate the package.xml and destructivechanges in the current directory, and ignore directories listed in .sgdignore
sf project deploy start --target-org MyOrg --manifest package/package.xml --pre-destructive-changes destructiveChanges/destructiveChanges.xml --ignore-conflicts --ignore-warnings --wait 20 --dry-run
sgd - do a Salesforce Project deploy based on the generated manifest from SGD, and do destructive changes before running anything else based on the destructivechanges.xml
Usual Command Flows - Daily
This flow represents a typical consultant's daily routine for working with Salesforce scratch orgs and version control.
1. Start of Day - Setup
# Open your terminal/CLI
# Navigate to your project folder
cd path/to/your/salesforce-project

# Get latest changes from repository
git pull origin main
Check for conflicts: If conflicts occur, resolve them before proceeding or escalate to Technical Architect.
2. Salesforce CLI Authentication
# Login to your scratch org
sf org login web --alias my-scratch-org

# Or use existing auth
sf org open --alias my-scratch-org
3. Deploy Latest Team Changes
# Deploy teammates' latest changes to your scratch org
sf project deploy start --target-org my-scratch-org
Review deployed metadata output
Check for any overlaps with your planned work
4. Handle Potential Overlaps
If deployed metadata overlaps with your work:
# Check what changed in git
git log --oneline -n 10
git diff HEAD~1 path/to/file

# If needed, revert specific files to previous version
git checkout HEAD~1 path/to/file
6. Daily Development Work
Ideally retrieve once per ticket change (see below)
7. End of Day - Retrieve Changes
# Retrieve metadata changes from your scratch org
sf project retrieve start --target-org my-scratch-org

# Alternative: Retrieve specific metadata types
sf project retrieve start --metadata ApexClass,CustomObject --target-org my-scratch-org
8. Verify and Commit Changes
# Check retrieved changes
git status
git diff

# Stage specific files (selective commit)
git add force-app/main/default/classes/MyClass.cls
git add force-app/main/default/objects/MyObject__c/

# Commit with ticket number
git commit -m "TICKET-123: Add new validation rule to Account object"

# Push to remote repository
git push origin feature/my-ticket-branch
9. Handle Merge Conflicts
If merge conflicts occur:
# Attempt to resolve locally
git pull origin main
# Resolve conflicts in your IDE
git add .
git commit -m "TICKET-123: Resolve merge conflicts"
git push
If unable to resolve: Escalate to Technical Architect or CoE Hub.
Usual Command Flows - Scratch Org Creation
Scratch orgs typically last 7-30 days. Here's the flow for creating and managing scratch orgs.
1. Create New Scratch Org
# Navigate to project directory
cd path/to/your/salesforce-project

# Create scratch org using project config
sf org create scratch --definition-file config/project-scratch-def.json --alias my-scratch-org --duration-days 30 --set-default
2. Initial Org Setup
# Open the scratch org
sf org open --target-org my-scratch-org

# Deploy base metadata from main branch
git checkout main
git pull origin main
sf project deploy start --target-org my-scratch-org --wait 20
3. Configure Org Settings
# Assign permission sets if needed
sf org assign permset --name MyPermissionSet --target-org my-scratch-org

# Run post-setup scripts if configured
sf apex run --file scripts/setup.apex --target-org my-scratch-org
4. Create Feature Branch
# Create new branch for your work
git checkout -b feature/my-ticket-branch

# Push branch to remote
git push -u origin feature/my-ticket-branch
5. Daily Work Routine
Follow the "Daily Normal Command Flow" above for regular development work.
6. Scratch Org Renewal (Before Expiration)
# Check org expiration date
sf org display --target-org my-scratch-org

# If org is expiring, retrieve all changes first
sf project retrieve start --target-org my-scratch-org
git add .
git commit -m "TICKET-123: Final changes before org renewal"
git push

# Delete old scratch org
sf org delete scratch --target-org my-scratch-org --no-prompt

# Create new scratch org and redeploy
sf org create scratch --definition-file config/project-scratch-def.json --alias my-scratch-org-v2 --duration-days 30
sf project deploy start --target-org my-scratch-org
Usual Command Flows - Sprint Release and Change Flow
This flow describes the process when code is promoted through environments during sprint releases.
1. Pre-Release - Complete Feature Work
# Ensure all changes are committed
git status
sf project retrieve start --target-org my-scratch-org
git add .
git commit -m "TICKET-123: Final implementation"
git push origin feature/my-ticket-branch
2. Create Pull Request
Via BitBucket UI:
3. Pipeline Validation (Automated)
BitBucket automatically triggers:
# This happens automatically in the pipeline
# Code Analyzer steps
pmd-analyzer: Check Apex code quality
eslint: Check JavaScript/LWC quality
sf scanner run: Security and quality scans

# Validation deployment
sf project deploy validate --target-org target-sandbox --test-level RunLocalTests
If validation fails: Technical Architect reviews and adds fixes to PR branch.
4. Pull Request Merge
Once validation passes and PR is approved:Bash
# Via BitBucket UI - Click "Merge" button5. Post-Merge Deployment (Automated)
Option A: Simple Deployment (No Destructive Changes)
# Automated pipeline command
sf project deploy start --target-org target-sandbox --test-level RunLocalTests --wait 30
Option B: SGD - Salesforce Git Delta Deploy (With Destructive Changes)
# Automated pipeline using SGD tool
# Generates delta packages between commits

# Install SGD (if not already in pipeline)
sf plugins install sfdx-git-delta

# Generate delta package
sf sgd source delta --to "HEAD" --from "HEAD~1" --output-dir "sgd"

# Deploy with destructive changes
sf project deploy start -x sdg/package/package.xml --post-destructive-changes sdg/destructiveChanges/destructiveChanges.xml
9. Rollback (If Needed)
# Quick rollback using git
git revert <commit-hash>
git push origin main

# Or restore from previous deployment
sf project deploy start --manifest path/to/previous-package.xml --target-org target-sandbox