How to check off records on a list view and pass them all to a Flow (button)
Flow Actions are really useful! However, they aren't available everywhere. This article will tell you how to place a flow button on a list view or related list, and pass into the flow the ids of the selected records so you can use and act on them.
How to set it up:
The first step is to build your flow. Within the flow, create a variable called "ids" without the quotes (warning: it's case sensitive). This variable should be a Text variable which allows multiple values, and should have Available for Input selected. If you do this, the variable will be populated with the list of ids of the records that you selected on your list view.
Now you will probably want to act on those records, which means you'll need a Record Collection variable. Until recently, you'd need to use invokable apex to fetch a Record Collection without querying inside a loop. But now we have a new IN operator which you can use inside a Get Records, like this:
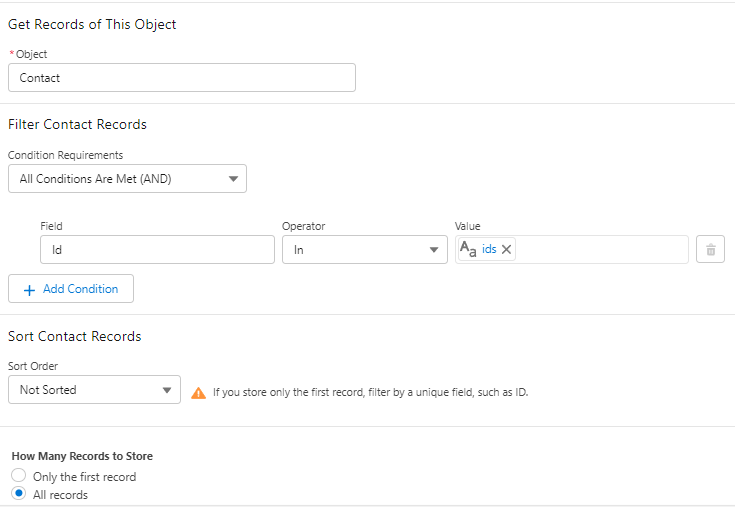
Make sure to store ALL the matching records.
Building the Flow:
Here is an example flow I set up with this method. The flow updates the Owner of the selected Contacts.
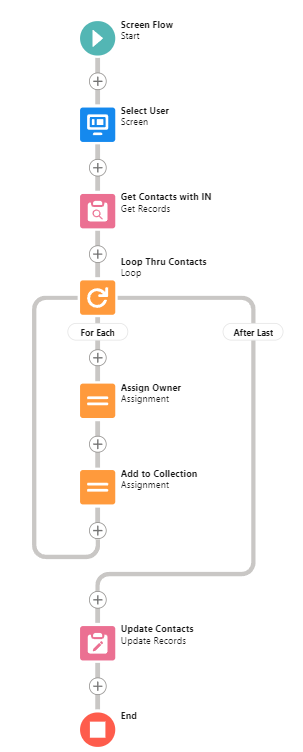
First I show a list of Users to choose from.
Then we use a Get Records (screenshot above) to fetch all the contacts which were selected in the list view - their ids are automatically stored in the ids variable.
After that, we loop through the contacts, update each contact's owner to the one selected in the first step, add the contact to a new collection variable, and when the loop is done, Update Records with that new collection variable to send our changes to the database.
(Note: if you'd like, you can replace the entire loop with a Map Collection action from unofficiasf.com)
Setting up your button:
To set up this button, visit Object Manager and find the object you're using (in the above example, Contacts).
Enter this URL for the Content Source:
/flow/Contacts_List_Mass_Change_Owner?retURL=003/o
(Change it to match the url of your flow, which you can get from the View Details and Versions page). You can leave out the ?retURL=003/o part, I'll explain it later.
Or, you can add it to Related List view by editing the page layout of the parent object (for example: Accounts). You'll need to click the wrench icon to edit the related list, and the button should be available to be added there.
Configuring the flow finish behavior:
One caveat with launching a flow from a url button (as opposed to a Flow Action) is that the flow does not launch in a modal, instead, it replaces the page you are looking at. This means that you will need to manually set your flow's finish location or it will loop back to the beginning of the flow when it's done (which might cause an error and will definitely cause confusion).
You can set the flow return url via retURL in your custom button (to hardcode a specific URL). Usually you'd use that to redirect to an object's home page, or to a specific record (ie: if the button was placed on a record page). The code posted above (?retURL=003/o) would take you to the Contacts home page when the flow finished. However, if your button is on a list view, those options are less useful.
I was therefore seeking a way to direct the user back to the list view they were looking at. For a while it seemed impossible, but eventually (after a lot of googling) I found a way to write a Visualforce page which, upon load, simply redirects to the list view you were looking at most recently for that object. (This should most often be the list view you clicked the button from, but your results may vary if you've been multitasking in different tabs.)
You will need to create a Visualforce page for each object you want to use this for, but you can reuse the pages between multiple buttons. Here's the page I created for Contacts:
<apex:page standardController="Contact" recordSetVar="contacts" action="{!list}">

</apex:page>
Overwhelming, right? Well, all you need to do is copy/paste that code into a new Visualforce page in Dev Console, and if you're not doing this for Contacts, change the two references to the object name. I called my page ContactLastListView.
Now we'll go back to our button and set its retURL (or place to go when finished) to that page. Like this:
/flow/Contacts_List_Mass_Change_Owner?retURL=apex/ContactLastListView
Alternatively, if you are putting this button on a related list, you'll probably want to navigate back to the record you were looking at. You can do this by setting the retURL of your button to the id of the parent record, like this:
/flow/Contacts_List_Mass_Change_Owner?retURL=/{!Account.Id}
Now don't forget to test your flow button and make sure it works as intended!
No comments to display
No comments to display